Resource List: Difference between revisions
From MoodleDocs
(Little reformat and edit of introduction.) |
Carson Tam (talk | contribs) |
||
| (One intermediate revision by one other user not shown) | |||
| Line 1: | Line 1: | ||
'''Resource List''' is a contributed code module for Moodle. The Resource List provides a way for instructors to create a resource heading then place course resources under this heading. A Javascript allows the students to expand and collapse the resources listed under each heading. This feature can visually condenses a course. | '''Resource List''' is a contributed code module for Moodle. The Resource List provides a way for instructors to create a resource heading then place course resources under this heading. A Javascript allows the students to expand and collapse the resources listed under each heading. This feature can visually condenses a course. | ||
The Resource List uses the standard Moodle "Link to files or websites" type of interface. | |||
== Using the resource list feature == | |||
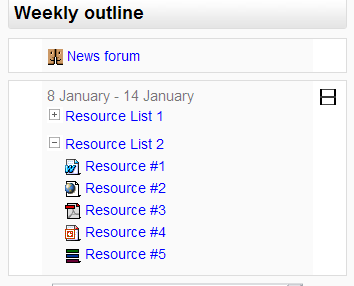
[[Image:resourcelist_in_course_section.png|frame|center|Examples of Resource Lists in a 1.9 course]] | |||
=== Adding a Resource List === | === Adding a Resource List === | ||
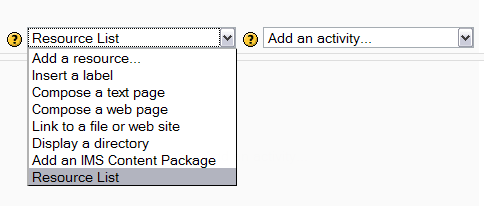
The '''Resource List''' is added via the "Add a resource..." drop-down menu in a course section | The '''Resource List''' is added via the "Add a resource..." drop-down menu in a course section. | ||
[[Image:add_a_resource_list.png]] | [[Image:add_a_resource_list.png|frame|center|"Add a resource" drop down menu showing Resource List]] | ||
=== Adding Resources to Resource List === | === Adding Resources to Resource List === | ||
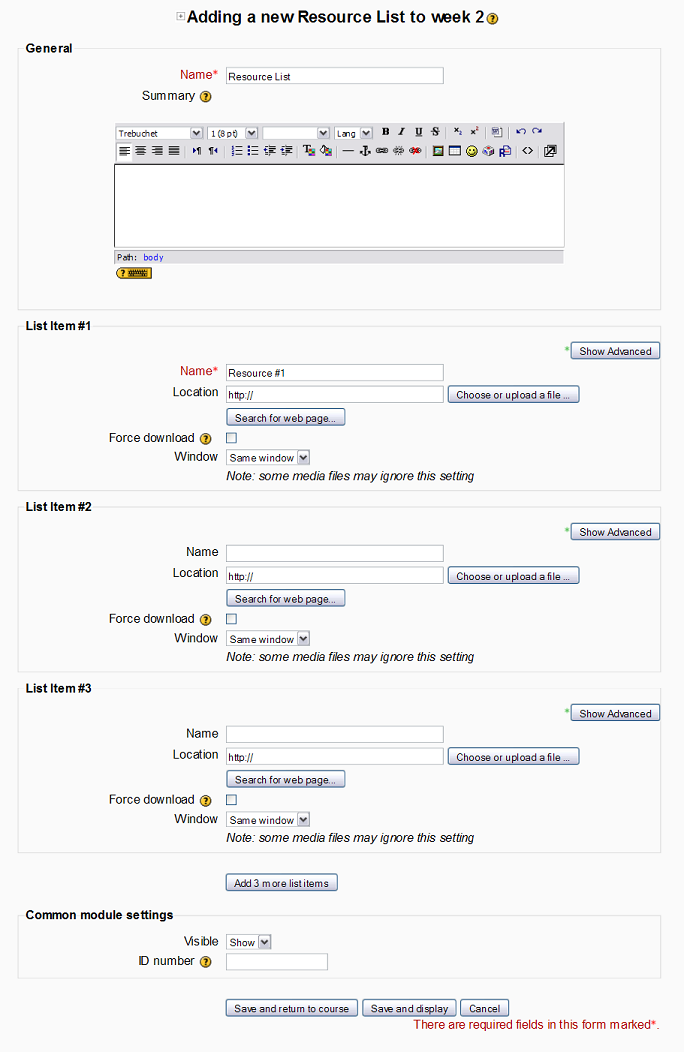
[[Image:resourcelist_input_screen.png]] | Adding or editing a resource list is fairly straight forward. | ||
[[Image:resourcelist_input_screen.png|frame|center|The settings screen for a Resource List]] | |||
== Installation == | == Installation == | ||
| Line 22: | Line 21: | ||
== See also == | == See also == | ||
*[http://moodle.org/mod/data/view.php?d=13&rid=4433 Resource List module] is in Modules and Plugins database page for downloads and more information. | *[http://moodle.org/mod/data/view.php?d=13&rid=4433 Resource List module] is in Modules and Plugins database page for downloads and more information. | ||
*You can also download the latest code from [http://tracker.moodle.org/browse/CONTRIB-2385 Moodle's contributed module] on the tracker. | |||
*Discussions: please create or find a discussion topic in the [[Resource List module forum]] | *Discussions: please create or find a discussion topic in the [[Resource List module forum]] | ||
Latest revision as of 18:28, 21 December 2010
Resource List is a contributed code module for Moodle. The Resource List provides a way for instructors to create a resource heading then place course resources under this heading. A Javascript allows the students to expand and collapse the resources listed under each heading. This feature can visually condenses a course.
The Resource List uses the standard Moodle "Link to files or websites" type of interface.
Using the resource list feature
Adding a Resource List
The Resource List is added via the "Add a resource..." drop-down menu in a course section.
Adding Resources to Resource List
Adding or editing a resource list is fairly straight forward.
Installation
- Load the
resourcelistmodule directory into"[moodle root]/mod"directory. - Go to the
"[moodle root]/mod/resourcelist"directory and run the following command:$ patch -b -p0 -i moodle19.patch
- If your theme uses customized pix, copy these files, "icon.gif", "switch_plus.gif", and "switch_minus.gif" to the
"[moodle root]/theme/[your theme]/pix/mod/resourcelist/"directory.$ cp *.gif ../../theme/[your theme]/pix/mod/resourcelist/
- Visit your admin page to create all the necessary data tables.
See also
- Resource List module is in Modules and Plugins database page for downloads and more information.
- You can also download the latest code from Moodle's contributed module on the tracker.
- Discussions: please create or find a discussion topic in the Resource List module forum


