ELIS Users
ELIS Users
The user management screen in ELIS is similar to Moodle's user management screens, but adds more information to the user profile, such as group/user set, program, active/inactive, etc. Also, the users a person views in the ELIS Manage User's screen is determined by their role in ELIS - users with the right roles in ELIS can see only 'their' users in Manage Users - e.g. an administrator of a user set can see only the users of her user set in the Manage Users screen.
Note: all users in Moodle that have an id number are automatically created in ELIS. ELIS will also automatically add an id number to Moodle users who lack one if this is set in the admin configuration screen.
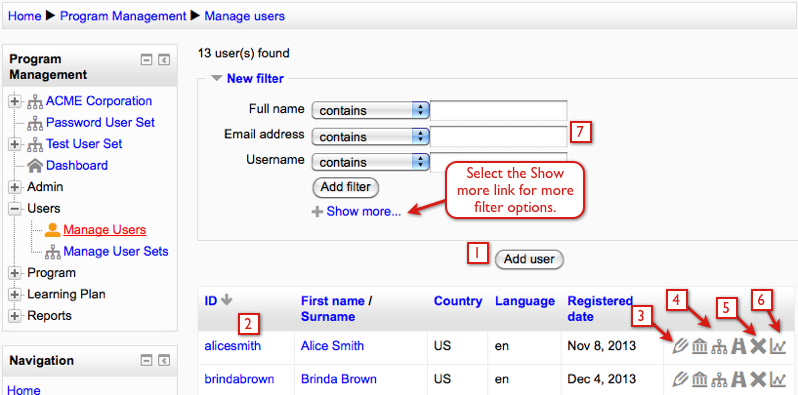
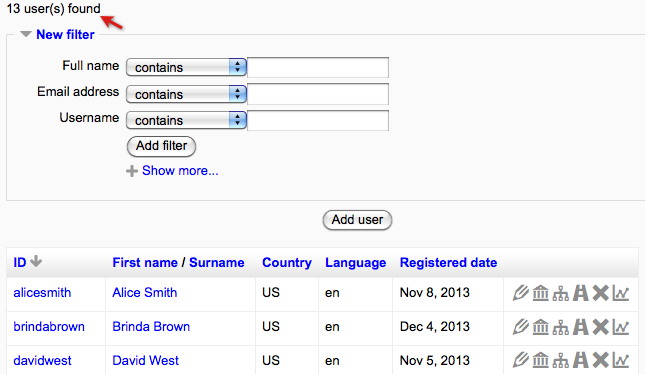
Manage Users screen:
From the Manage Users screen you can:
- add new users
- link to the user's ELIS profile screen
- edit users
- link to the user's Programs, User Sets, and Tracks tabs - where programs, user sets, and tracks the user is assigned to are listed and where new items can be assigned to the user
- delete users
- link to a user's individual user report
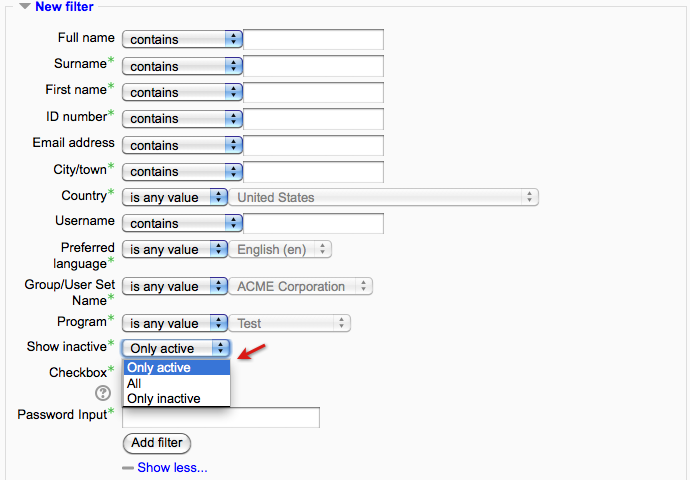
- search for ELIS users with the filter. To perform a more advanced search, select the Show Advanced button in the filter section. From the advanced filter you can filter users by group/user set name, program, active/inactive, and by ELIS custom profile fields.
Advanced filter options:
By default the manage users screen only shows active users. Use the "Show Inactive" filter, shown in the image above, to find inactive users.
When searching for users of a group, user set, or program with the select filter - the filter has the following options in the drop down menu:
- is any value - this option disables the filter (i.e. all information is accepted by this filter)
- is equal to - this option allows only information that is equal to the value selected from the list
- is not equal to - this option allows only information that is different from the value selected from the list
Below the user search filter is the user list for ELIS. If the filter is used, only the users included in the search will be listed here.
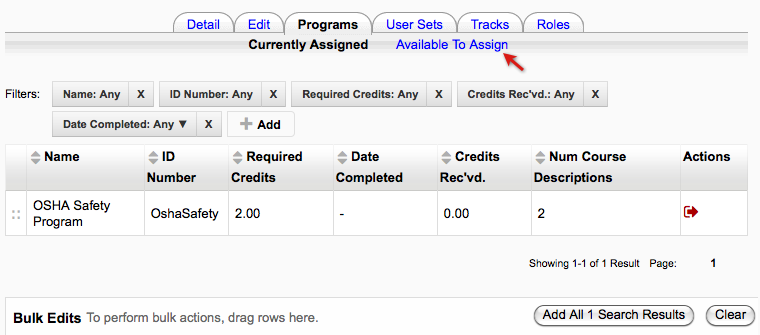
Clicking the icons next to each user will enable various actions related to the user. For example, selecting the Programs icon will display a list of programs the user is assigned to as well as provide a screen where you can assign new programs to the user.
The Programs tab opens on the Currently Assigned screen. In the example below the user is assigned to one program currently. If there were multiple programs the filters above the list can be used. Select the Available to Assign link to assign new programs to the user.
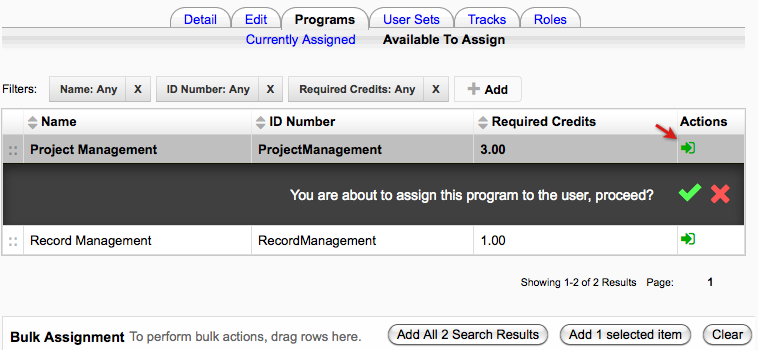
Select the green assign icon next to a program to open the confirmation window for assigning the user to the program.
Selecting the User Sets tab or Tracks tab will open a similar screen where user sets and tracks can be assigned to the user.
ELIS User ID Numbers
ELIS uses an ID number to keep track of users - this means that the user's data is always attached to the same person, regardless if their name, email, or other information changes. This also means that in order for users loaded from Moodle to import correctly into ELIS, they must have an ID number set in their user profile.
The ID Number must not change, as ELIS uses this as the unique identifier for that user in the system - names and other user information can change, but not the ID number. This is like a US Social Security number in that way (but don't use SSNs for the ID number:-)).
If you already have a unique identifier for your users that does not change, then you can use it for the ID number in ELIS. If you don't you'll need to create one or let ELIS generate ones for you.
The key to this master data management methodology is simple: ID numbers don't change.
When a user is added to ELIS from Moodle then deleted from ELIS, it will delete the Moodle user as well. Deleting a Moodle user does not remove the record from the database, so creating a new ELIS user with the same ID number as the deleted user will cause it to associate with the deleted Moodle user. Re-using ID numbers or changing ID numbers in Moodle may cause data integrity issues in ELIS. Ensure that ID numbers are unique and not re-used.
Auto-Assign ID Numbers
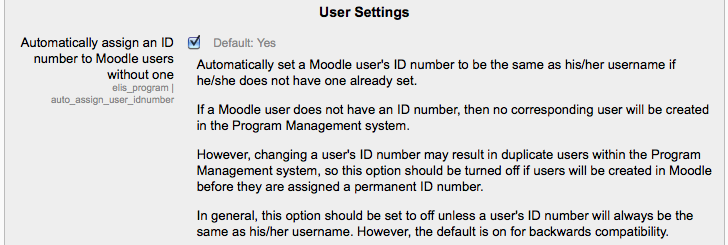
There is a check box in the ELIS Configuration screen that will automatically set a Moodle user's ID number to be the same as their username, if they don't have one already set. If the site admin needs to have users in Moodle who are never brought into ELIS - they can turn off automatic ID number assignment in the ELIS Configuration settings for their site. In this case, admins will have to generate ID numbers for the users they do want in ELIS or provide ID numbers as part of the user loading process.
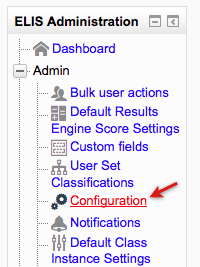
To adjust this setting go to the Program Management block > Admin > Configuration.
Then scroll to the User Settings at the bottom of the page.
This should be turned on if you want all Moodle users to get created in ELIS using their username as the ELIS id number. In some cases users do not want this turned on (when they want to create users in Moodle who do not get added to ELIS).
Manage User List and ELIS Roles
ELIS roles can be setup to determine which users are visible to another user in the Manage Users screen. For instance, if a user has been given an Administrative Role in a User Set, they can see only the users in their own User Set in the ELIS Manage Users screen. When a Site Administrator views Manage Users they see all ELIS Users on the site:
When ELIS roles are used, this list can be limited to the users that are in a user set, program, track, or ELIS class.
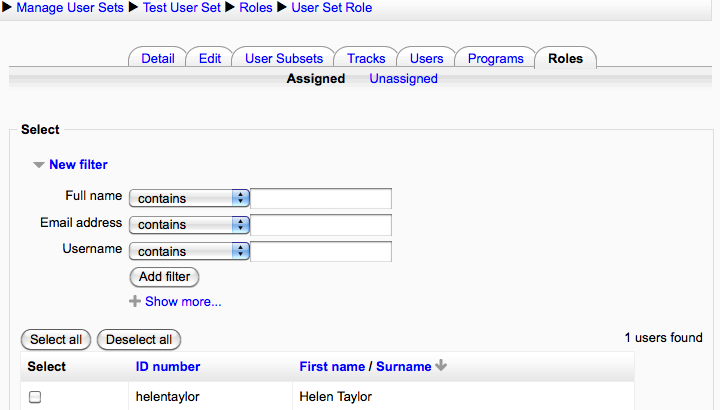
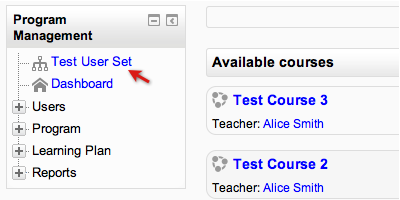
For example, the user below has a user set role in the Test User Set:
When she logs in, she sees only the Test User Set and user sub-sets if there are any:
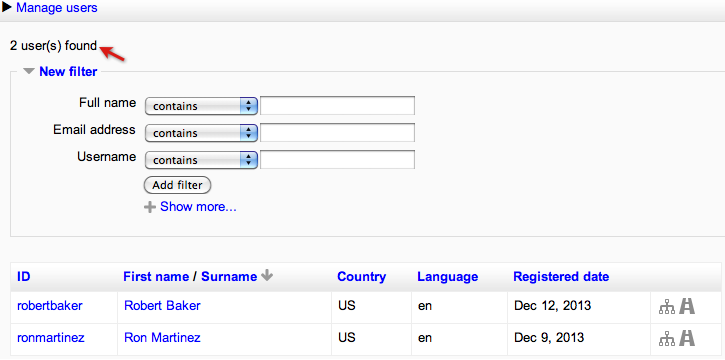
When this user visits the Manage Users screen, instead of seeing all the users on the site, she sees only the users in the ACME Software user set:
This user can search for users in her User Set, etc. but can only see the users that are in the User Set(s) she is assigned an administrator role in.
By using ELIS roles, you can now setup user roles with limited administrative functions, limited to users in their the user set, program, etc. where they have been given administrative authority via ELIS role assignments.
ELIS and Moodle Profile Fields
A powerful feature of ELIS is the ability to auto-assign users to user sets by looking at data in the user's custom profile fields. The user set can then be associated to tracks and its users can be auto-enrolled in classes of the track. Once ELIS setup is complete users can be assigned to different user sets, programs, tracks, and classes by their custom profile field settings.
Users can be assigned to user sets via either dropdown menu custom profile fields, text input profile fields, or checkbox profile fields. Dropdown menu profile fields give users a drop down list of choices to choose from by which they can be added to a user set. Text input profile fields enable users to enter text (or numbers or symbols) and be added to user sets associated with that alphanumeric string.
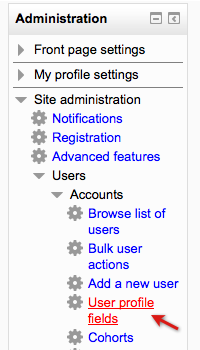
To create Moodle custom profile fields go to the Administration block > Users > Accounts > User profile fields.
Creating a Profile Field Category
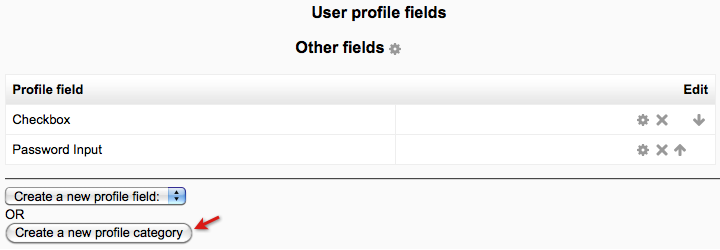
From the user profile fields screen, new profile field categories can be created. Select the "Create a new profile category" button to add a profile category. Once categories are created use the icons to the right of the category to edit, delete, or move the category.
We'll create a new category then create a profile field and add it to the category. To start we'll select the "Create a new profile category" button.
User profile fields:
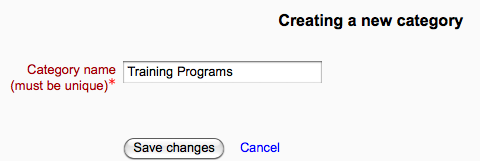
Next we give the category a name and save changes.
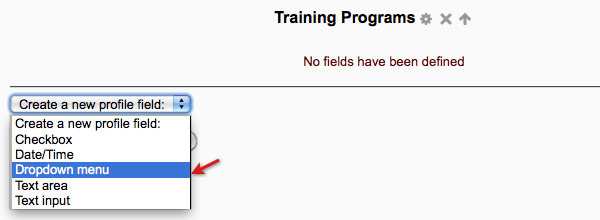
The new category we created, Training Programs, has been added to the user profile field screen as shown in the next image.
Creating a Dropdown Menu Profile Field
Now we are going to add a profile field to the new category. Scroll down to the bottom of the page to the "Create a new profile field" drop down menu. For this example we'll create a dropdown menu profile field.
User profile fields:
Start by giving the profile field a short name and name. Adding a description is optional.
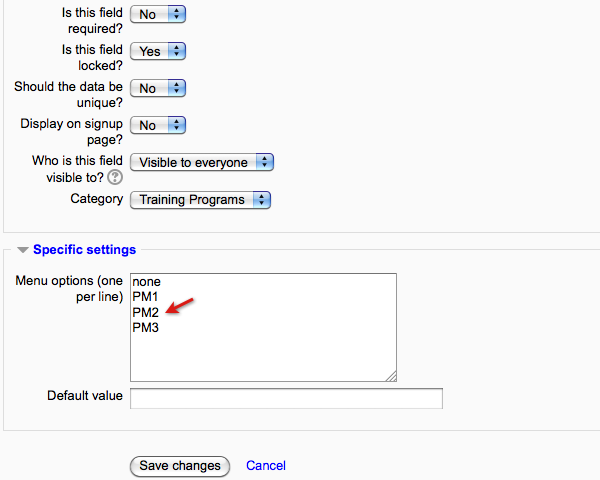
Scroll down the page to the next group of settings that control the profile field. The next image is showing these settings. The settings are:
- Is this field required? - If a field is required the user will have to make a selection for the field when editing their profile. There are some exceptions, if the field is also locked the user will not be able to edit the field. Fields set to required will automatically start with Choose... as the default value.
- Is this field locked? - If the field is locked, the user can not change the field when editing their profile. Only users with admin access can edit fields that are locked.
- Should the data be unique? - The default value for this is no.
- Display on the signup page? - Turn this setting on to display the profile field in the user profile screen. If turned off, the profile field will only be visible when editing the user profile.
- Who is this field visible to? - The default setting for this is visible to everyone.
- Category - Select a category to add this profile field to.
- Menu options - The specific settings menu options are the options that will be associated to clusters. Each option can be linked to a different outcome.
- Default value - The default value is the value users will start with for the profile field when entered into the system. If a default value is added, it has to be one of the menu options for the profile field.
For this example the field will be locked so users can not change their Project Management Level setting. I've entered the menu options none, PM1, PM2, PM3. The options all map to different levels of Project Management in the program. Later, in the User Set section of this book, we will associate menu options to user sets.
To have all users in the system have their Project Management Level profile field automatically start at "PM1", we would enter "PM1" in the default value to the example above. If all users in the system will not be assigned a value for this profile field, having "none" as the default value would be a better setup.
Editing Profile Fields
The next image of the user profile field screen shows the new profile field we created above. To edit the profile field select the edit icon shown in the image.
Text input profile fields are covered later in the "Auto-Assigning Users via a Passcode" page of this book.
CSV Upload Users
CSV upload can be used to create/update users and edit user profile field values. The profile field values can be used to assign users to user sets. First, the profile field has to be created in Moodle.
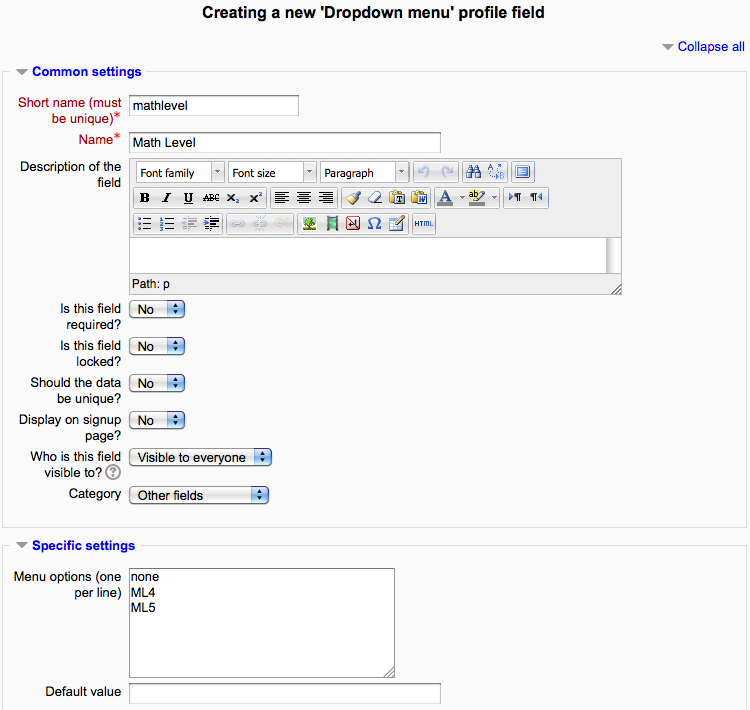
To create a Moodle profile field go to Administration block > Site Administration > Users > Accounts > User Profile Fields. For this example we will use a dropdown menu profile field, Math Level. The short name for this field is "mathlevel". For this profile field the menu options (values) being set with the file are "ML4" and "ML5".
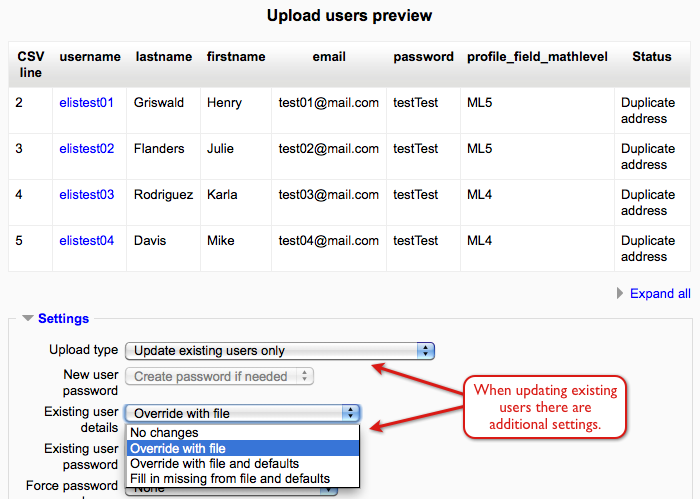
In the CSV file "profile_field_" is entered in the header before the shortname of the profile field. The last column of the next image demonstrates this. The entry in the column header is "profile_field_mathlevel". The value assigned to the users is one of the menu options for the Math Level profile field.
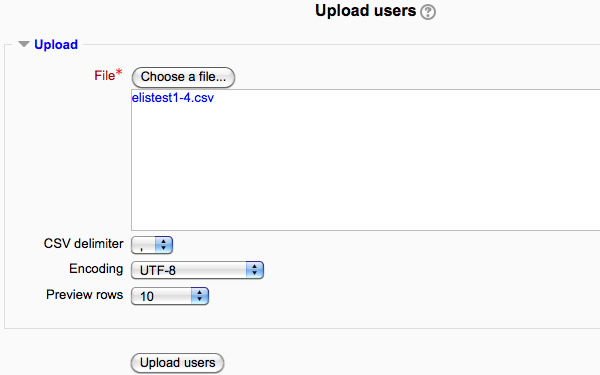
To upload the CSV file go to the Administration block > Site Administration > Users > Accounts > Upload users. Select the Choose a file button or drag and drop a file into the space provided.Then select the Upload users button.
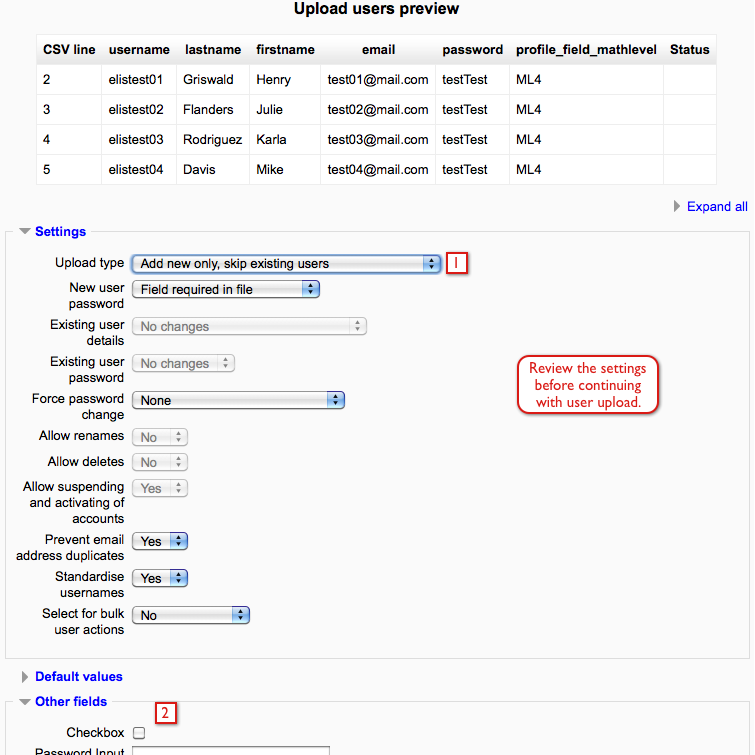
Once the file is uploaded, a list of the uploaded users is shown along with a list of additional settings that can be applied to the users. Review the list of settings before finishing the upload. The following image shows an example of the settings on the preview screen.
- Upload type: Enter the type of upload. For this example "Add new only, skip existing users" is selected.
- Other fields: This is a list of the custom profile fields not being set by the file, these are considered defaults on this screen.
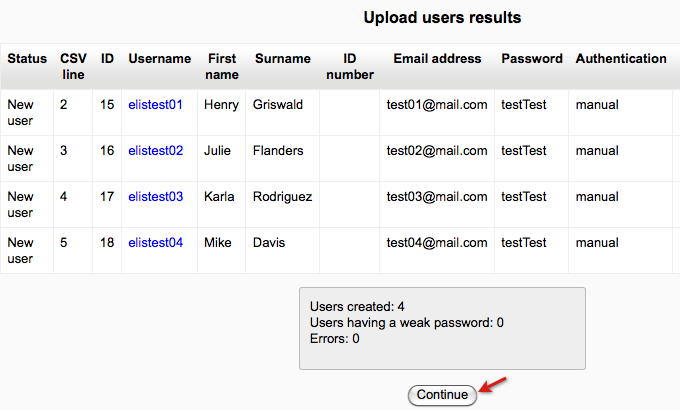
Once the additional settings have been reviewed and adjusted, complete the user upload by selecting the Continue button at the bottom of the page. For this example the new users will be created in Moodle and then id numbers will be manually added to add the users to ELIS as well. Users are only created in ELIS if they have id numbers, users can have id numbers automatically created from their username if set in the Program Management block > Admin > Configuration > User Settings. All information from CSV upload is applied to the users as soon as the upload is complete.
User Set Assignment with Profile Fields
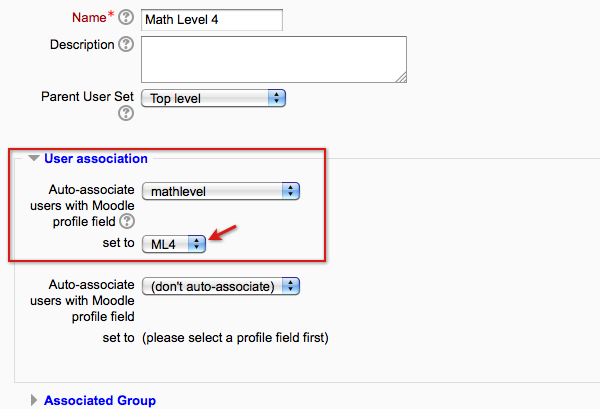
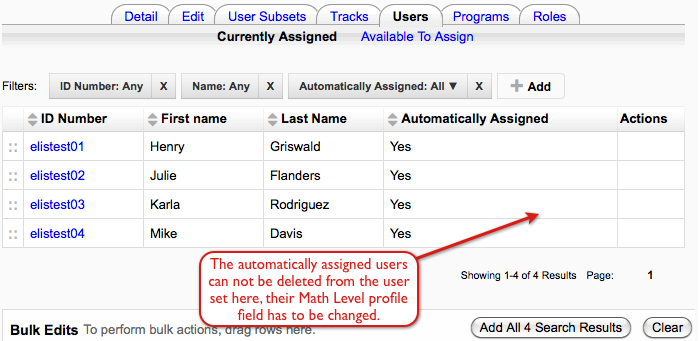
Users can be automatically assigned to user sets by custom Moodle profile fields. In the example above we created a profile field, Math Level, and assigned the 4 users the value ML4 for that profile field. Next we will create a user set and automatically associate all users with their Math Level profile field set to ML4.
Once the user set is created, all users that have their Math Level profile field set "ML4" are automatically assigned to the Math Level 4 user set.
If we want to move the users to another user set we can do that by updating user data via CSV upload. For example, change the custom profile field Math Level to ML5 for a couple users in the file, have that value auto-associate to another user set.
When updating existing users there are additional settings, for example the "Existing user details" field. For this example "Override with file" is selected. Some settings refer to defaults. Defaults are referring to the profile field values that are listed in the "Other fields" section. Any of the profile field values not set in the file can be set on the preview screen as "Default values". All the users in the file will be assigned the default values from the preview screen when existing user details is set to "Override with file and defaults".
Profile Update Survey
Administrators can setup a survey that asks users to fill in/update some or all fields in their user profile, including custom profile fields.
- Administrators can send this survey to all users when they login to the site or make it available to users to fill in at their leisure
- More than one survey can be used, for instance different surveys can be placed in different courses or on different pages.
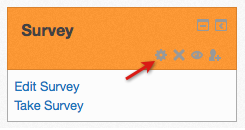
To create a new survey, first add the Survey block to your site:
You can use the default name of the survey or change it via the Configuration icon:
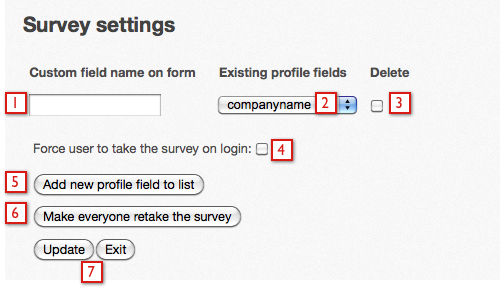
When you select the "Edit Survey" link you can see the survey editing form.
- Give a custom name for the profile field - this is the name the user sees on the form so it might be something like "Update your city", etc. If this is left blank, then the user taking the survey won't know what they are making an entry for. Steps 1, 2, and 3 will not be available until the "Add new profile field to list" button is selected, shown by 5 in the image.
- Using the drop down menu, you can select from any of the existing standard or custom profile fields on the site to have the user update* - including normally hidden and/or locked fields. Remember, if you add an locked field to the survey, the user will be able to change it's value in the survey only.
- If you want to delete a field from the survey select the Delete checkbox, then select the Update button at the bottom of the page.
- If you check this box, users will be forced to take the survey when they go to a page where the survey has been placed. Once the user has taken the survey, they aren't made to take it again (although they can unless you hide it).
- Select this button to add another choice to the form.
- Select this button to force all users who have already taken the survey to take it again.
- Select "Update" to save your changes, and "Exit" to leave the form.
