ELIS Learners perspective: Difference between revisions
No edit summary |
No edit summary |
||
| (3 intermediate revisions by the same user not shown) | |||
| Line 1: | Line 1: | ||
<h2>Learners Perspective</h2>Student/Learner level users in ELIS have a much simpler view of the system than the information and controls available to administrators.<br /><br /> | <h2>Learners Perspective</h2>Student/Learner level users in ELIS have a much simpler view of the system than the information and controls available to administrators.<br /><br /> | ||
<h2>Programs Widget/Block</h2> | |||
This example will demonstrate how a learner uses the new Programs Widget. <br /><br />First the Programs Widget or block is added. In this example learners will access the Programs block on their My Home page. The block has been added to the middle column. Administrators can adjust settings for the block by going to the ELIS Administration block> Admin > Widget Settings > Programs Widget.<br /><br />The two main use cases for user enrollment in ELIS are auto-enroll and self-enroll. This example is covering self-enroll. For self-enroll we want to: | |||
<ol> | |||
<li>Create Moodle courses, optional</li> | |||
<li>Create matching ELIS course descriptions that are linked to the Moodle courses</li> | |||
<li>Create ELIS class instances that in this example will be linked to the same Moodle course</li> | |||
<li>Create a program(s) and optionally a course set(s), then assign the ELIS course descriptions to the program. For this example all the courses are required in the program and course set.</li> | |||
<li>Enroll the user in the program. This will allow the user to choose from all available class instances of course descriptions in the program.</li> | |||
</ol><br /> Now login as the user assigned to the program. The learner navigates to the My Home page or is directed there. The programs widget/block is displayed in the middle column. The program Progress Bar is located to the right of the program. Selecting the arrow next to the program opens additional information. Users can also search programs in the programs widget now.<br />[[Image:elis2.7_learnerprogramwidget.png|frame|center|]]Once the program information is opened we see all the course sets and courses assigned to the program. <br /> | |||
<ol> | |||
<li>To view the courses assigned to the course set select the arrow next to the name of the course set.</li> | |||
<li>The Planning a Project course has already been completed by the user.</li> | |||
<li>Select the arrow next to a course to view more information about the course, including a list of available classes.</li> | |||
<li>Use the Enroll link next to class instances to enroll in the class</li> | |||
<li>Multiple classes can be listed.</li> | |||
</ol> | |||
[[Image:elis2.7_learnerprogramswidget2.png|frame|center|]]If the max number of users are already assigned to the class, the learner is automatically assigned to the class waitlist. Select the Leave link to unenroll from the waitlist.<br />[[Image:elis2.7_programswidget_waitlist.png|frame|center|]]If the learner tries to enroll in a course description with a prerequisite course that has not been completed by the user, there will be a message stating 'Prerequisites not complete' below the course description.<br />[[Image:elis2.7_programswidget_prerequisite.png|frame|center|]]For sites with many classes to choose from, the new search/filter capabilities for courses, classes, and course sets will be helpful. It may also be beneficial in other instances, e.g. if there are only a couple classes to search but each one has a detailed description that takes up space in the block. Search allows the learners to easily find the class they want without scrolling.<br /><br />To edit the settings for the filters, admin users can go to the ELIS Administration block > Admin > Widget Settings > Programs Widget. Any ELIS custom fields for courses, classes, or course sets can be added here in addition to some standard ELIS fields.<br /><br />Learners select the (1) search icon next to a course, class, or course set in the Programs widget to customize the filter and add fields for filtering. In the example below a (2) custom class field is being added to the filter.<br />[[Image:elis2.7_programswidget_classfilter.png|frame|center|]]The custom class field has now been added to the filter.<br />[[Image:elis2.7_programswidget_classfilter2.png|frame|center|]]This is a text entry field, when I select the custom field a text box opens for filtering the Groups And Teamwork classes. As soon as text is entered the filter starts working in real-time. <br />[[Image:elis2.7_programswidget_classfilter3.png|frame|center|]]The learner can add all the filters allowed in the settings. Fields can be removed from the filter list by selecting the X to the right of the field box.<br /> | |||
<h3>ELIS 2.7.3 Improvements</h3> | |||
Once a learner has enrolled in a class the programs widget updates the class details to show the student as enrolled. If the class is linked to a Moodle course, then a 'Moodle course' link will be listed with the class as shown in the next image.<br />[[Image:elis2.7_programswidget_courselink.png|frame|center|]] | |||
When the learner completes a class, the programs widget updates the class details with the user's status, grade, and completion date for that class. | |||
<br />[[Image:elis2.7_programswidget_class_morelink.png|frame|center|]] | |||
Select the More link to view all the class information.<br />[[Image:elis2.7_programswidget_classinfo.png|frame|center|]] | |||
Note: ELIS 2.7.5.0 and 2.8.3.0 fix an issue introduced in ELIS 2.7. If a learner is assigned to a track of classes they should only see classes that are assigned to the track in the Programs Widget. | |||
<h2>Individual User Reports</h2> | |||
All the users in ELIS can generate an Individual Course Progress Report or an Individual User Report. When users select the Individual Course Progress Report link an Individual Course Progress Report filter will appear with the user's name pre-selected. Select the checkbox next to any additional columns you want to add to the report.<br />[[Image:elis2.7_indcourseprogress_filter.png|frame|center|]]Selecting the Show Report button will generate the report, an example report is shown below.<br /><br /> | |||
Individual Course Progress Report:[[Image:elis2.7_indcourseprogressreport.png|frame|center|]]An Individual User Report can also be generated by selecting that link, an example of that report is below. Courses sets assigned to programs and the courses assigned to the course sets are listed first, then the courses assigned to a program but not a course set are listed. Courses not assigned to a program or course set are listed last.<br /><br />Individual User Report:[[Image:elis2.7_induserreport1.png|frame|center|]]Scroll to the bottom of this program's section of the report and there is a summary of the program completion at this point. Course set information is included in the summary if one is assigned to the program. The summary line is always highlighted.[[Image:elis2.7_induserreport2.png|frame|center|]] | |||
To change report options, click on the "Configure Parameters" icon located in the upper left corner of the report.<br /><br />The report can be exported in PDF or CSV format. To export the report, select either the "Download PDF" or "Download CSV" icons located in the upper left corner of the report. The report will download locally to your computer.<br /><br />Report data can be updated automatically without needed to go back to the report parameters by clicking the "Refresh" button located at the bottom center of the report page.<br /> | |||
<h2> | <h2>Certificates</h2> | ||
<h2>Auto-enrolled vs. self-enrolled courses</h2> | <h2>Auto-enrolled vs. self-enrolled courses</h2> | ||
In ELIS, the program administrator can set up courses so that they are auto-enrolled or let the students choose their own classes from a list in their learning plan. <br /><br />Tracks are used to auto-enroll users in classes. If a required course is set to be auto-enrolled in a track by the program administrator, then students who are in the track will be automatically added to the first available class(es) of that track which they meet all the prerequisite and/or co-requisite requirements for. <br /><br />If the available classes are full, learners then will be placed on the waitlist until a seat becomes available for them.<br /><br />Programs are used to enable users to self-enroll in classes. For this to work the course the class is an instance of must be assigned to a program and the user must be assigned to the program. Learners can then choose a class or from a list of classes from the courses of the program they are assigned to. If a course has prerequisites, then they will not be able to choose a class of that course until they have met the prerequisite requirements | In ELIS, the program administrator can set up courses so that they are auto-enrolled or let the students choose their own classes from a list in their learning plan. <br /><br />Tracks are used to auto-enroll users in classes. If a required course is set to be auto-enrolled in a track by the program administrator, then students who are in the track will be automatically added to the first available class(es) of that track which they meet all the prerequisite and/or co-requisite requirements for. <br /><br />If the available classes are full, learners then will be placed on the waitlist until a seat becomes available for them.<br /><br />Programs are used to enable users to self-enroll in classes. For this to work the course the class is an instance of must be assigned to a program and the user must be assigned to the program. Learners can then choose a class or from a list of classes from the courses of the program they are assigned to. If a course has prerequisites, then they will not be able to choose a class of that course until they have met the prerequisite requirements.<br /> | ||
[[Category: ELIS]] [[Category: ELIS Users]] | [[Category: ELIS]] [[Category: ELIS Users]] | ||
Latest revision as of 17:16, 28 May 2015
Learners Perspective
Student/Learner level users in ELIS have a much simpler view of the system than the information and controls available to administrators.
Programs Widget/Block
This example will demonstrate how a learner uses the new Programs Widget.
First the Programs Widget or block is added. In this example learners will access the Programs block on their My Home page. The block has been added to the middle column. Administrators can adjust settings for the block by going to the ELIS Administration block> Admin > Widget Settings > Programs Widget.
The two main use cases for user enrollment in ELIS are auto-enroll and self-enroll. This example is covering self-enroll. For self-enroll we want to:
- Create Moodle courses, optional
- Create matching ELIS course descriptions that are linked to the Moodle courses
- Create ELIS class instances that in this example will be linked to the same Moodle course
- Create a program(s) and optionally a course set(s), then assign the ELIS course descriptions to the program. For this example all the courses are required in the program and course set.
- Enroll the user in the program. This will allow the user to choose from all available class instances of course descriptions in the program.
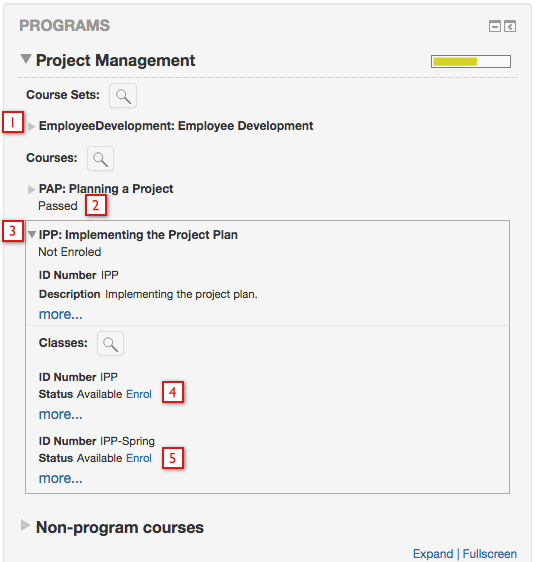
Now login as the user assigned to the program. The learner navigates to the My Home page or is directed there. The programs widget/block is displayed in the middle column. The program Progress Bar is located to the right of the program. Selecting the arrow next to the program opens additional information. Users can also search programs in the programs widget now.
Once the program information is opened we see all the course sets and courses assigned to the program.
- To view the courses assigned to the course set select the arrow next to the name of the course set.
- The Planning a Project course has already been completed by the user.
- Select the arrow next to a course to view more information about the course, including a list of available classes.
- Use the Enroll link next to class instances to enroll in the class
- Multiple classes can be listed.
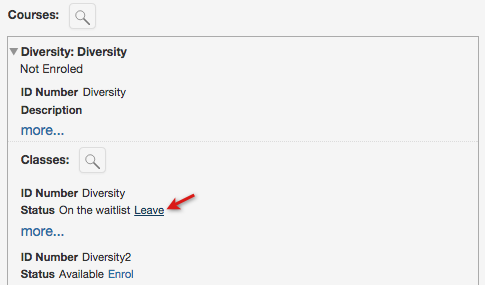
If the max number of users are already assigned to the class, the learner is automatically assigned to the class waitlist. Select the Leave link to unenroll from the waitlist.
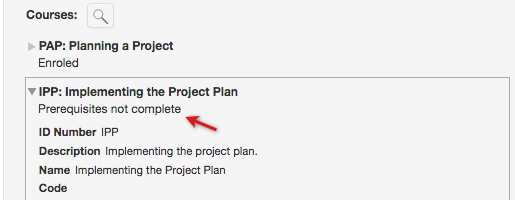
If the learner tries to enroll in a course description with a prerequisite course that has not been completed by the user, there will be a message stating 'Prerequisites not complete' below the course description.
For sites with many classes to choose from, the new search/filter capabilities for courses, classes, and course sets will be helpful. It may also be beneficial in other instances, e.g. if there are only a couple classes to search but each one has a detailed description that takes up space in the block. Search allows the learners to easily find the class they want without scrolling.
To edit the settings for the filters, admin users can go to the ELIS Administration block > Admin > Widget Settings > Programs Widget. Any ELIS custom fields for courses, classes, or course sets can be added here in addition to some standard ELIS fields.
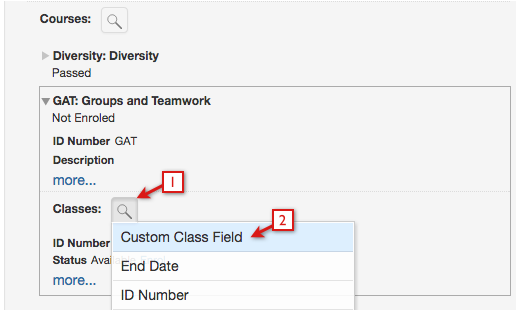
Learners select the (1) search icon next to a course, class, or course set in the Programs widget to customize the filter and add fields for filtering. In the example below a (2) custom class field is being added to the filter.
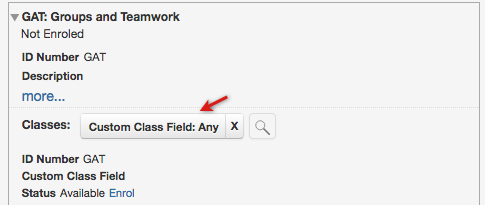
The custom class field has now been added to the filter.
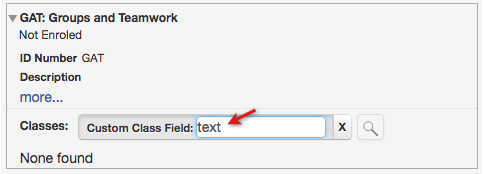
This is a text entry field, when I select the custom field a text box opens for filtering the Groups And Teamwork classes. As soon as text is entered the filter starts working in real-time.
The learner can add all the filters allowed in the settings. Fields can be removed from the filter list by selecting the X to the right of the field box.
ELIS 2.7.3 Improvements
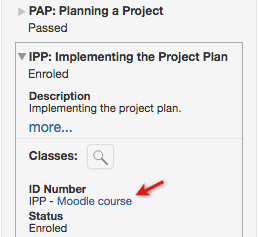
Once a learner has enrolled in a class the programs widget updates the class details to show the student as enrolled. If the class is linked to a Moodle course, then a 'Moodle course' link will be listed with the class as shown in the next image.
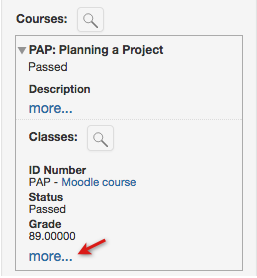
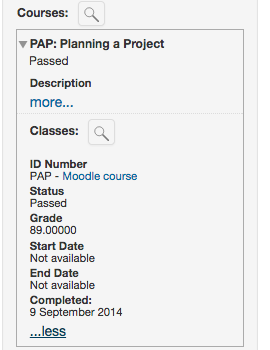
When the learner completes a class, the programs widget updates the class details with the user's status, grade, and completion date for that class.
Select the More link to view all the class information.
Note: ELIS 2.7.5.0 and 2.8.3.0 fix an issue introduced in ELIS 2.7. If a learner is assigned to a track of classes they should only see classes that are assigned to the track in the Programs Widget.
Individual User Reports
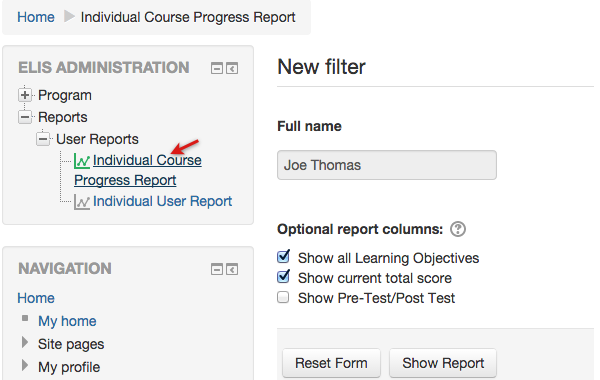
All the users in ELIS can generate an Individual Course Progress Report or an Individual User Report. When users select the Individual Course Progress Report link an Individual Course Progress Report filter will appear with the user's name pre-selected. Select the checkbox next to any additional columns you want to add to the report.
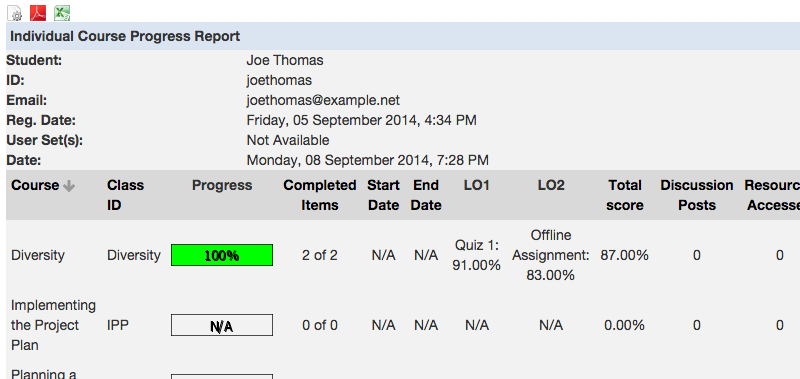
Selecting the Show Report button will generate the report, an example report is shown below.
Individual Course Progress Report:
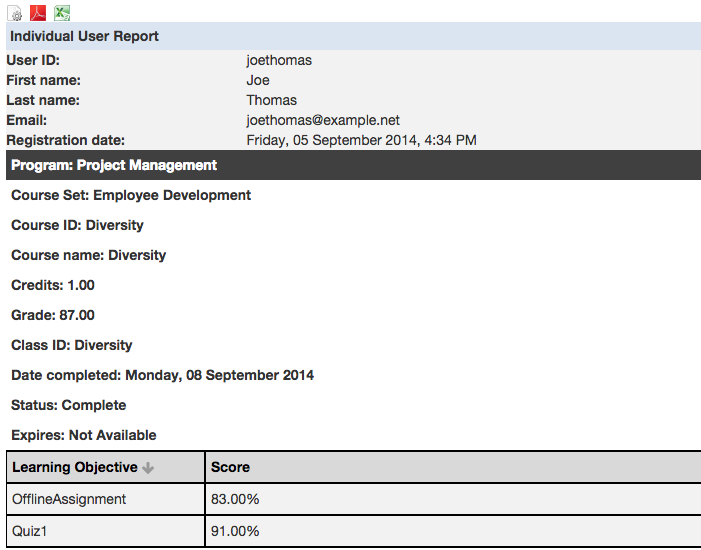
An Individual User Report can also be generated by selecting that link, an example of that report is below. Courses sets assigned to programs and the courses assigned to the course sets are listed first, then the courses assigned to a program but not a course set are listed. Courses not assigned to a program or course set are listed last.
Individual User Report:
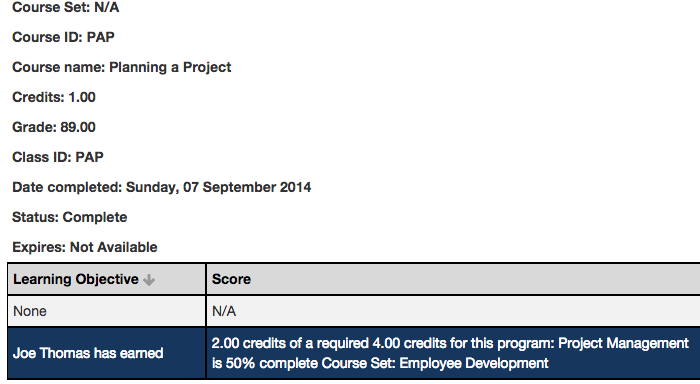
Scroll to the bottom of this program's section of the report and there is a summary of the program completion at this point. Course set information is included in the summary if one is assigned to the program. The summary line is always highlighted.
To change report options, click on the "Configure Parameters" icon located in the upper left corner of the report.
The report can be exported in PDF or CSV format. To export the report, select either the "Download PDF" or "Download CSV" icons located in the upper left corner of the report. The report will download locally to your computer.
Report data can be updated automatically without needed to go back to the report parameters by clicking the "Refresh" button located at the bottom center of the report page.
Certificates
Auto-enrolled vs. self-enrolled courses
In ELIS, the program administrator can set up courses so that they are auto-enrolled or let the students choose their own classes from a list in their learning plan.
Tracks are used to auto-enroll users in classes. If a required course is set to be auto-enrolled in a track by the program administrator, then students who are in the track will be automatically added to the first available class(es) of that track which they meet all the prerequisite and/or co-requisite requirements for.
If the available classes are full, learners then will be placed on the waitlist until a seat becomes available for them.
Programs are used to enable users to self-enroll in classes. For this to work the course the class is an instance of must be assigned to a program and the user must be assigned to the program. Learners can then choose a class or from a list of classes from the courses of the program they are assigned to. If a course has prerequisites, then they will not be able to choose a class of that course until they have met the prerequisite requirements.

