ELIS Course descriptions
Course Descriptions
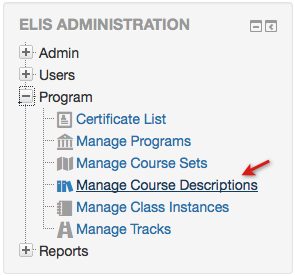
Once you have planned and started the setup of your program, the next step is to add some Course Descriptions which you will add to the new program. To do this, select the Manage Course Descriptions link in the Program Management block.
This will open up the Course Descriptions screen.
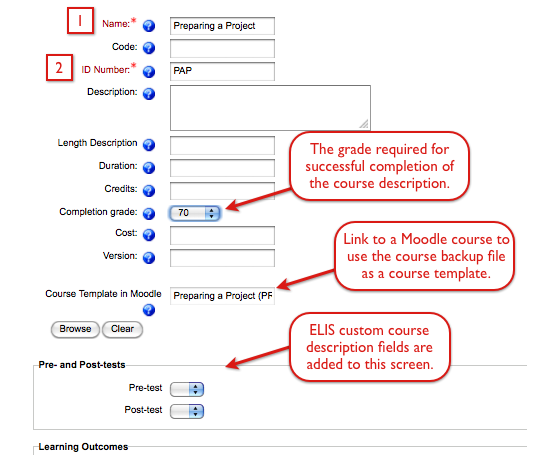
Select the "Add Course Description" button to add a new Course Description. The form will ask you to enter some information about your Course Description. There are two required fields:
- Name of Course Description: A Course Description may have many “classes” (or sometimes called sections). This is the name of the parent Course Description. For example a Course Description might be called Moodle 101 - Introduction to Moodle
- Course Description ID: This number can contain numbers, letters, spaces and special characters and will show up on reports. Often people will just use the name of the Course Description here - however if a Course Description has a long name it may cause some issues with the formatting of reports, in which case one might use an abbreviation. Some SIS/MIS/ERP systems can only use numeric tags or have other naming limitations, so the Course Description ID can provide a method to work with these systems if required.
There are other fields on the Course Description form, check the blue 'Help' icons next to the field names for definitions of these fields.
Other optional fields of particular interest are the Completion Grade, the Cost, the Version, and the Course Template in Moodle.
The Course Template in Moodle is a zip file of a complete Moodle Course - when classes are created from the Course Description, they will be created by automatically restoring this zip file. This is useful for batch class creation, when a master Course Description is being used. For example, University A creates 4 tracks of it's Online Teaching Certificate Program, and this action automatically creates all 12 Moodle Courses, with all their associated content, from the Templates set in the Program.
If you enter the Name and Course Description ID, you can always come back to the Course Description editing form and add the other information.
Default Course Description settings
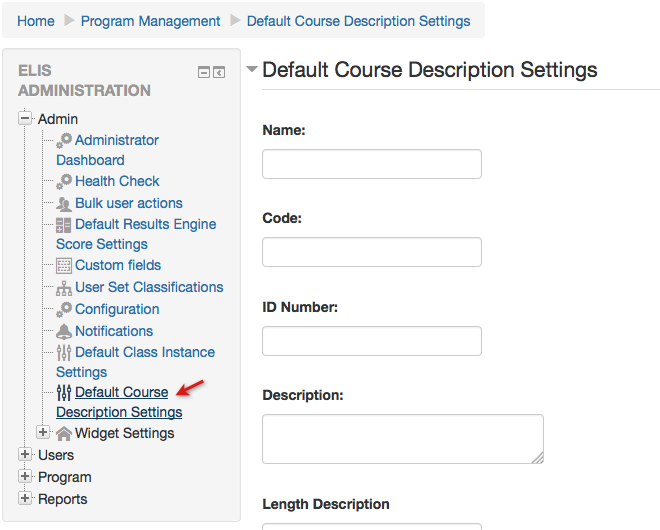
Default Course Description settings can also be set for Course Descriptions as shown in the following image. When adding new Course Descriptions the default settings will be set according to this screen. All of these settings can also be adjusted while adding/editing Course Descriptions. Go to the Program Management block > Admin > Default Course Description Settings.
Default Course Description settings:
Learning Objectives
The old ELIS concept of Completion Elements has been renamed to Learning Objectives to make the purpose of these more clear.
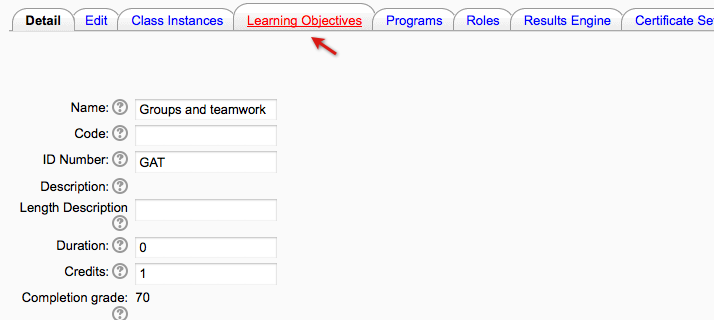
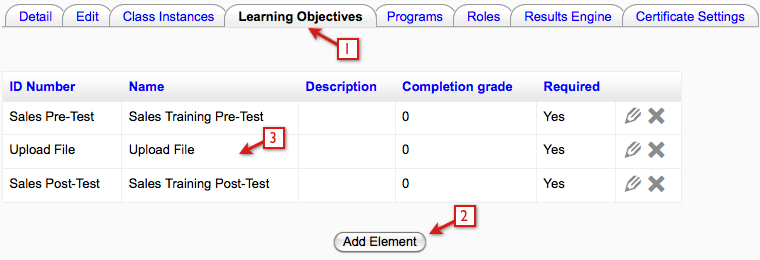
Once the Course Description has been set up, click on the Learning Objectives tab.
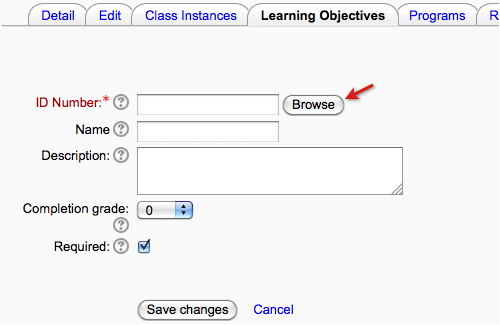
- This is the ID Number for the LO in Moodle when it was assigned - this number must be an exact match, including case, with the ID in Moodle.
- Click the Add Element button to add a new Learning Objective to the ELIS Course Description.
TIP: To make it easier for users to read reports that display Learning Objectives, you can use the name of the Learning Objective for the ID Number in Moodle. The only limitation is that Learning Objectives must be unique in a course - you can't have two IDs that both say Assignment 1.
To set the Learning Objective that is linked to a user's grade in a Moodle activity, you can enter the ID number from the Moodle class by going to the Moodle class and locate the Moodle activity you wish to use as a Learning Objective. Or you can use the new Browse functionality to browse the graded activities in the Moodle course, and add them to ELIS.
To use the LO Browse functionality, click the Browse button.
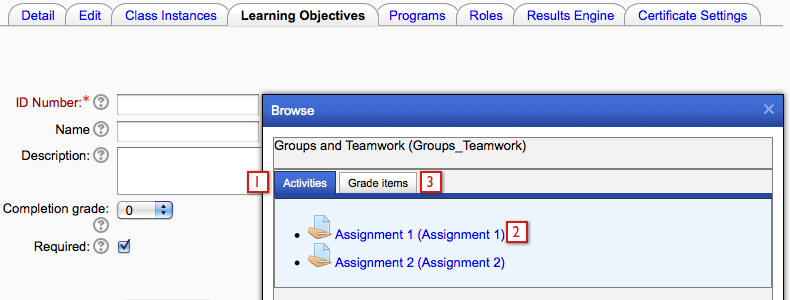
The Browse button shows you all the activities in the Moodle template class.
- The Activities tab, this will list all graded activities in the Moodle template class.
- If the activity has an ID Number, it will be shown in parantheses. Activities still must have ID Numbers in Moodle to be used in ELIS. Click on the Activity to add it to ELIS.
- Gradebook grade items and grade categories will show in this tab, these can also be used as Learning Objectives.
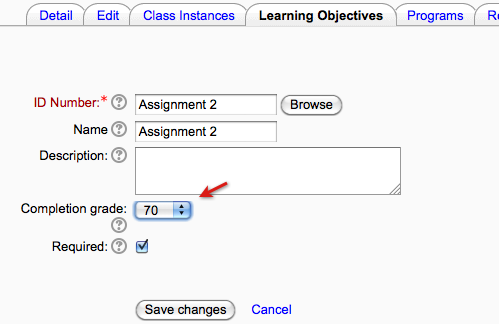
Select the activity then close the browse window. Add the optional Name and Description, and set the grade for which students will be marked complete in the activity. Select Save changes to setup your completion element.
Moodle Gradebook grade items and Moodle Gradebook Categories as ELIS Learning Objectives
Moodle Gradebook grade items and Moodle Gradebook grade categories can be used as Learning Objectives. Gradebook grade items are often used to manage external grades, for example attendance at offline classes, certification tests taken outside Moodle, etc. The are also used to hold scores derived via Moodle's grade calculations.
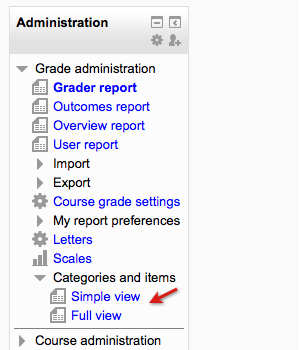
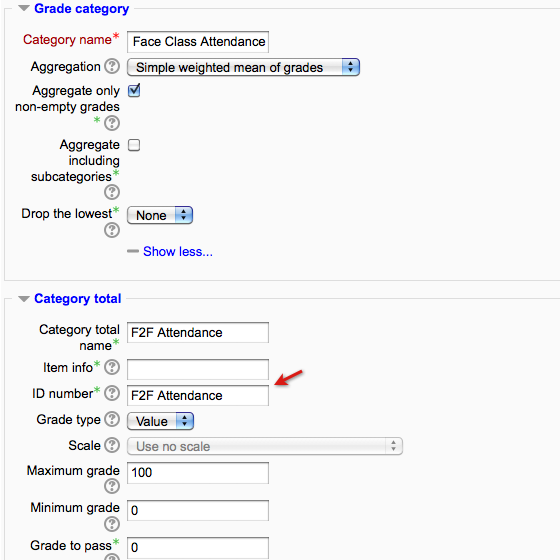
Grade categories are created in Moodle by pressing the Add category button on either the Simple view or the Full view of the Mooodle gradebook Categories and items section.
When creating a Gradebook grade category to use as an ELIS Learning Objective, enter an ID Number for the Category.
When the Category has been setup in Moodle's Gradebook, you can now locate it back in the ELIS Course Description:
Click the "Grade items" tab to see Gradebook items and Categories. These will work the same way in ELIS as Moodle activities - set a completion grade and when a learner has achieved that score, they will be marked as complete for that LO.
When you create or edit a Gradebook grade item or Gradebook category, you can now use it as a Learning Objective in ELIS.
This function lets you aggregate grades from graded items in Moodle to use them as Learning Objectives.
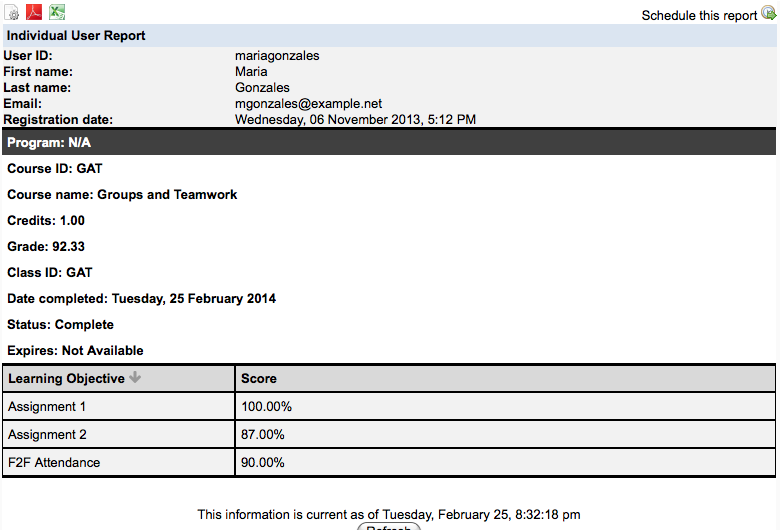
These will then automatically manage user completion for a Course Description, and can also be viewed on the user report:
* Note that if you want to use Learning Objectives that are not graded in Moodle, only in ELIS, it is important to use an ID number for the Learning Objective that is not matched by any activity ID numbers.
Pre-Test and Post-Test Learning Objectives
In ELIS courses, you can assign Pre-assessment and Post-assessments items for classes, and then measure the difference between the Pre-assessment and Post-assessments*. This can help you assess if courses are effectively improving targeted knowledge in your program. If you have multiple trainers/teachers teaching the same class you can see the more effective ones over time - their learners show more improvement between the Pre-assessment and Post assessments over time. Also if you make adjustments to content or programs aimed at improving effectiveness, ELIS can help you determine the scope of the improvement. We also have functionality to show how much time learners are spending in the courses- so you can decide whether %5 improvement is worth the time it takes - if it takes extra time - for example.
Pre-Test and Post-Test learning objectives should be added to the course as ordinary learning objectives. Pre-test and post-test learning objectives will be counted with other learning objectives in reports, the benefit is that some reports have a separate column for these learning objectives.
To add pre-test and post-test learning objectives:
- Go to the Learning Objectives tab of a course description
- Select the Add Element button and add learning objectives
- Add the pre-test and post-test learning objectives.
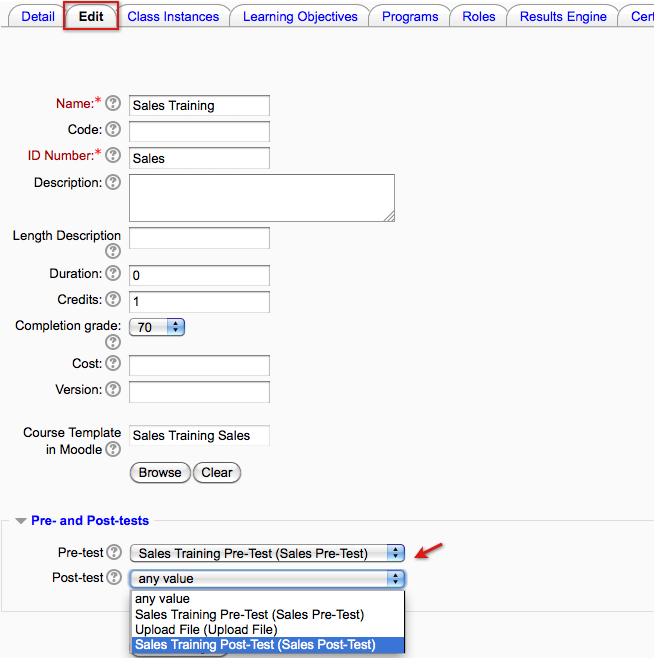
Once learning objectives have been added to the course they can be selected from the drop down menu for the pre-test or post-test fields. To edit these fields select the Edit tab for the course.
Only one learning objective can be selected for each field, and once a learning objective is selected for one field it can't be selected for the other field.
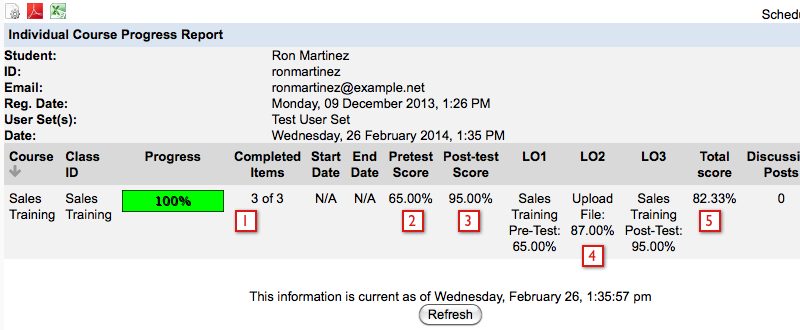
The following images have sample reports that have pre-test and post-test data. The first report is the Individual Course Progress Report. The following list briefly explains some areas of the report. It is optional to include pre-test, post-test, and learning objectives in the course, the settings for this are on the report filter page.
- Completed Items: This column shows data for learning objectives in the course. The pre-test and post-test data are included in this column because they are learning objectives. The progress bar to the left of this item shows the percentage of learning objectives completed.
- Pre-test: This column shows the score the user received on the pre-test if there is one for the course.
- Post-test: This column shows the score the user received on the post-test if they received one.
- Learning objectives: The learning objectives for the course are displayed here.
- This course has been completed by the user and they have a grade in ELIS.
The Site Usage Summary Report has pre-test and post-test averages for all the courses on the site.
*By default these are termed "Pre-test" and "Post-test", however it is easy to change these terms (without affecting the functionality:-)) in the Moodle language editor.
Course Certificates
Course Certificates need to be enabled at the site and course level for them to be available to your users. To enable the site setting go to the Program Management block > Admin > Configuration > Certificates. To enable course certificates make sure the checkbox is unchecked. Just the first setting is for course description certificates here, the other certificate settings are for program certificates.
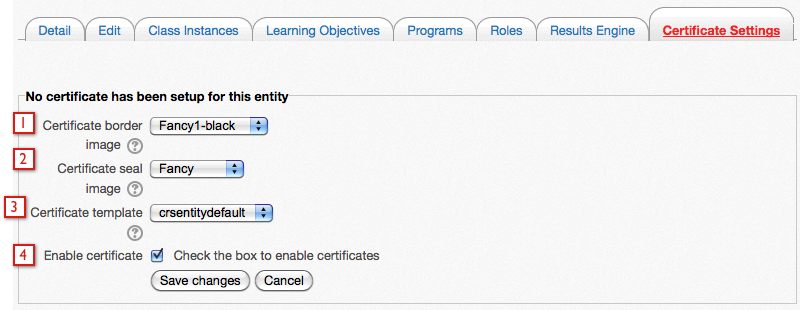
To edit the certificate settings for the course description go the Program Management block > Program > Manage Course Descriptions. Select the Certificate Settings icon next to the course description (shown in the following image) or select the course description name and go to the Certificate Settings tab.
The settings for course certificates are:
- Certificate border image
- Certificate seal image
- Certificate template
- Enable certificate
Select the enable certificate checkbox and then use the other settings to customize the certificate.
Now when a user completes a class instance of this course, they will be able to view and print a certificate. Users can access their certificates by going to the Program Management block > Program > Certificate List. Any certificates earned by the user will be listed, select the certificate name to view it.
Adaptive Learning Results Engine
The Results Engine brings advanced adaptive learning functionality to Moodle via ELIS. Moodle 2 enables adaptivity within a course, for example activities can be shown based on the results of a previous activity. The ELIS Results Engine enables the results of an activity or set of activities in a course to enroll a learner in a new class, a set of classes, and/or update their profile information. For example, the Results Engine could be used to act on the poor score a learner earns in a course, and based on that score enroll them in a remedial program. Conversely, it can be used to enroll a learner in advanced courses if they do well in a course. When used for competency management, http://en.wikipedia.org/wiki/Competency_management_system, the Results Engine can update user profiles with new skills and/or competencies based on assessment and/or courses taken. Progress against an organization's competency architecture, a href="http://en.wikipedia.org/wiki/Competency_architecture, can then be tracked via the User Class Completion Report.
Example of the Results Engine in Use:
There are several ways to use the Results Engine, below is one example from an Adaptive Learning program. In this example, learners take an initial assessment, then the results engine assigns them instructional material designed to fill gaps revealed by the initial assessment. This process is repeated as the learners move through the program.
Results Engine Profile Field Update:
The Results Engine can also update a learner's profile field, based on their score on an assessment, a set of assessments, or a their score in a course. For example, a learner could be given an assessment that measures their success at achieving state standards for their grade level. Based on the results of this assessment they could be enrolled in classes with content designed for their current achievement level. This enables credit to be granted based on competency. The results engine can also be used to help boost graduation rates by assigning learners alternative course material when they do poorly on an assignment, set of assignments, or a course.
In a corporate setting, the Results Engine can be used to perform gap analysis on a skill or set of skills, and employees automatically assigned coursework designed to cover their gaps. A single Moodle course could have multiple assessments that then acted on by the results engine. So this single course could have a set of different assessments to evaluate their competency in different important skills, and automatically assign them course work designed to address gaps. This leads to more efficient and effective training, as learners are not spending time on content they have already mastered, and can focus the time they can spend on training on content that they have not mastered.
For example, an institution offers internal Project Management training, and institutes a staff profile field that records four project management levels: None, Basic, Advanced, Master. Coursework and and assessments enable staff to have their Project Management expertise assessed. The Results Engine is used to update learners profile based on the results of their coursework and/or assessments. When a major project is proposed, the User Class Completion Report can then be used by a manager to search all staff who have a Master level of Project Management expertise to assess internal resource competency for managing the project.
A manager/administrator can setup the UCC Report to search for and display users with selected custom Profile field settings:
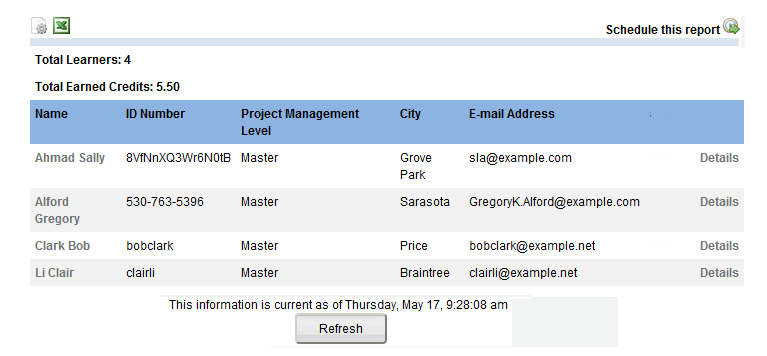
The report then displays all users with those values in their Profile. The report can be exported as CSV to facilitate contacting the users if required. In the example report below, the report is configured to show Project Management level, along with the city and email address of the staff with the Master level. Of course the report could also show other custom fields, for example Department, Manager, Manager contact information, etc.
As both the Results Engine and the UCC Report utilize ELIS Custom Fields that can be created and modified in the Custom Field screens, the system is highly customizable to match different competency/skill/learning level requirements.
Using the Adaptive Results Engine:
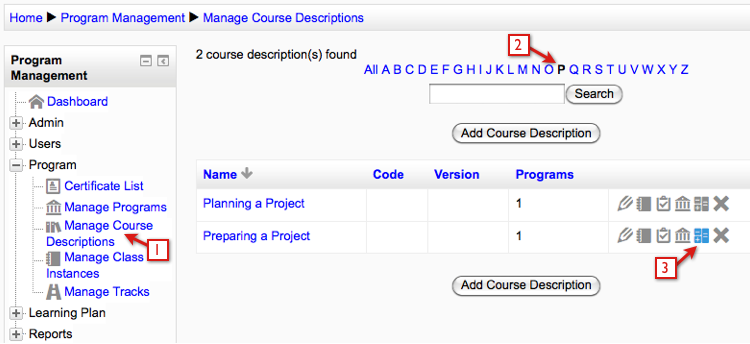
The ELIS Results Engine operates at the Program-Course Description level. To activate the results engine for a course description go to the Program Management block > Admin > Course Descriptions.
- Select the Course Description link in the Program Management block.
- If there are many courses on your site, you may want to use the Search function above the course list. In the example I have selected the letter P from the list of letters, which searched for and displayed course descriptions starting with the letter P.
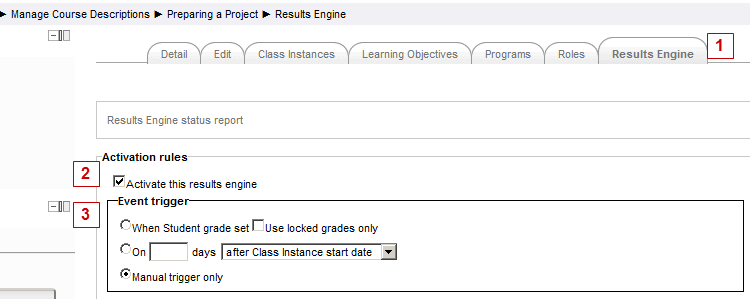
- Select the Results Engine icon for a course description to link to the Results Engine tab of the course.
- The tab in a course description's page for accessing/editing the Results Engine.
- Check this to activate the Results Engine for this ELIS CD.
- This determines when the Results Engine will update a learner's record.
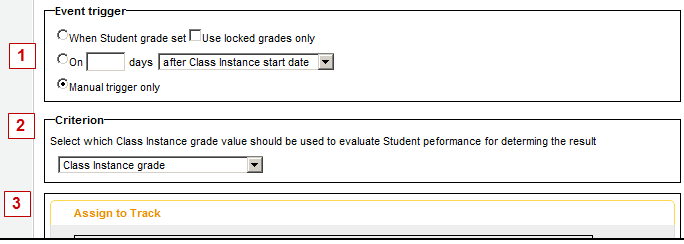
Setting up a Results Engine instance consists of setting up three main actions:
- When the Results Engine is run is set by the Event trigger
- What criteria the Results Engine acts on is set by the Criterion setting
- What happens - currently there are three kinds of actions the Results Engine can take:
- The learner may be assigned to an ELIS track of classes - this is often used to move the learner up a level in their coursework
- The learner may be assigned to a single class - this is often used to assign remedial course work
- Update a learner's Profile Field - this is often used in Competency/Skills training - the learner's profile can be updated to show their competency level in a skill based on the results of the course, assessment, etc.
Currently, each Course Description in a given ELIS Program can have one results engine assigned to it.
Setting up the the Event Trigger
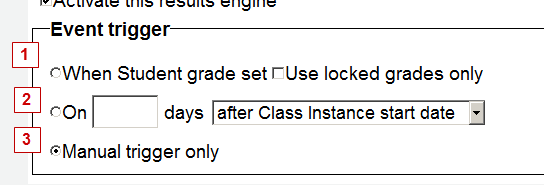
The event trigger determines when the results engine is run.
- If this is is then the learner grade reaches a certain level. This can be the learner's course grade, or the grade on an ELIS Learning Objectives. ELIS Learning Objectives can be individual Moodle activities, or collections of activities in a Moodle gradebook category. For example, the results engine could be triggered simply by a learner's grade on a particular assessment, such as a competency exam or pre-test. Or the trigger could be the learner's grade on an assessment, a presentation, and attendance, if all of those grades are collected into a Moodle gradebook category. Or the trigger could be the learner's overall course grade.
- This will run the Results Engine on a set number of days after the ELIS Class Instance start date. For example if the class is set to start on May 5, then the Results engine can be set to run X days after the start date.
- If this is set, then the Results Engine will only run after an administrator activates it manually.
Setting up the Action:
This is where you determine what action happens when the Results Engine runs. There are three possible Actions:
- Assign the learner to a track
- Assign the leaner to a class
- Update a profile field in the learner's profile.
Assigning a learner to a track as the result of a Class Instance/Learning Objective Score:
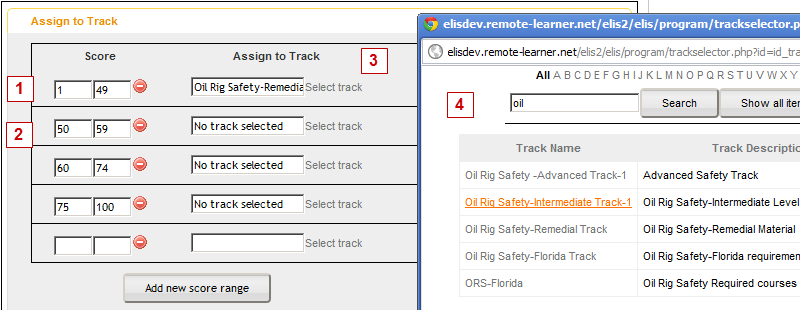
- The Results Engine can be used to automatically assign a learner to a track of classes. For example, if a learner gets below 50% grade on a course or assessment, they can be assigned to a track of remedial classes.
- You can edit the score ranges, and each score range can have a different result.
- Click the Select track link to open up the track selection window.
- You can search for a track and the click it to assign to a score range.
More blank score ranges can be be added by clicking the Add new score range button. If you just want to assign a track based on one or two score ranges, then remove the unused score ranges.
Assigning a learner to a new Class Instance as the result of a Class Instance/Learning Objective Score:
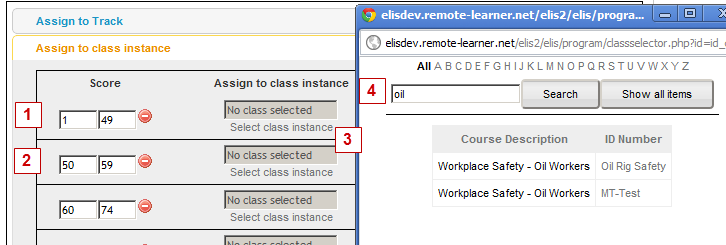
- The Results Engine can be used to automatically assign a learner to a class instance. For example, if a learner gets below 50% grade on a course or assessment, they can be assigned to a remedial class.
- You can edit the score ranges, and each score range can have a different result.
- Click the Select class instance link to open up the track selection window.
- You can search for a track and the click it to assign to a score range.
User Profile Field update.
This function will update the ELIS User Profile field with the settings specified the results. For example, a user who passes a Project Management course might have their User Profile updated with information indicating they have passed the course. Similarly, if a user who has passed coursework signifying that they are ready for promotion in a company, that information can be entered into their profile. In a K-20 setting, this function can be used to indicate learners who are at risk or who have earned certain skills.
The User Class Completion Report can be used to generate reports on these custom profile fields, for example to show all users who have achieved a certain skill level (Project Manager Level 1, for example), all users who are ready for Management, all users who are at risk, etc.
These fields can also be used for automatic Userset assignment if the ELIS fields are set to synchronize values back to Moodle.
Example of using the Results Engine to automatically update a learner's profile field:
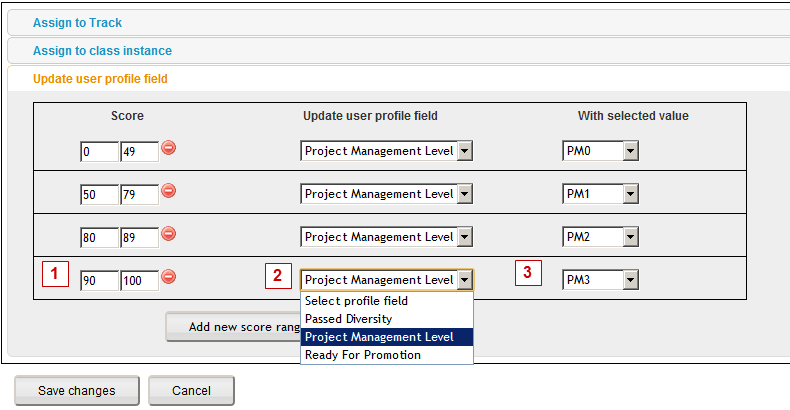
For example, if a learner gets below 50% grade on a course or assessment - in this example an assessment of their Project Management skill level, a custom profile field for Project Management Level is updated to PM0, in this case a value denoting a low level of Project Management competency.
- Set the assessment score range for the profile field update action
- Choose from any custom ELIS profile field to update. In this example we are updating the values of the Project Management Level profile field with all score ranges, however you can have different score ranges update different profile fields, if that fit your requirements.
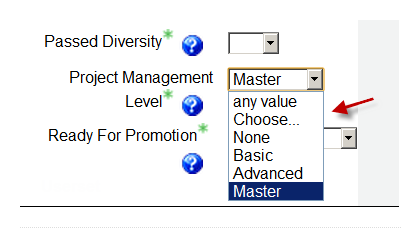
- Choose from the available values. If the Profile field is of the Menu of Choices type, with a set range of values, you will see those values in the selection drop down.
Profile field type Menu of Choices:
When the type of Profile field being updated is a "Menu of Choices" type, a drop down menu showing the available choices is displayed.
Setting the value of an Open Text Profile field:
When the type of Profile field being updated is a text field, then you can enter any value you like into the field. In this example, the Ready for Promotion custom field is a text field.
