Supervised block
The main idea of the supervised block is to have an add additional control over your students, so they will be able to do something only under teacher supervision. Installed with supervisedcheck (quiz access rules plugin, included out of box) allows you to add restrictions to your quizzes.
How it works together? The course's teacher creates the session specifying the academic group, lesson type (e.g. laboratory work, exam, etc.), classroom and duration. After that students will be able to start quizzes from this course according next conditions:
- the session is active;
- student is in an academic group for which the session was created;
- student is in session's classroom (you can specify the ip subnet for each classroom, see below);
- the session was created for the lesson type which is specified for current quiz (see editing quiz settings section).
Of course you can specify only some important quizzes to be under teacher's control and not all in the course.
Structure and installation
Out of the box you have 2 Moodle plugins:
- supervised is a block for managing sessions, classrooms and lesson types. For installing, put the supervised folder into your-moodle-path/blocks/ directory.
- supervisedcheck is a quiz access rules plugin for setting up your quizzes to work with supervised block. For installing, put the supervisedcheck folder into your-moodle-path/mod/quiz/accessrule/ directory. This plugin can not be used separately and must be installed only together or after supervised block.
Go to http://your-moodle-website/admin/ to finish the installation process.
Teacher-side
First of all, go to your course, turn editing on and add the supervised block to be able work with it. Now before creating your first session, you should create lesson types and classrooms (and may be add some groups to your course?).
Creating lesson types
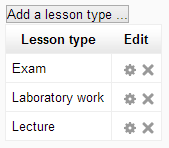
In the supervised block's body click the "lesson types" link. Here you can add some:
Lesson type describes just by it's name and nothing else. Consider that lesson types creates for current course, so you must create new ones for each other course. If you won't create lesson types you will be able to start session with "Not specified" lesson type.
Creating classrooms
Each classroom describes by name and IP subnet. Additionally you can "hide" the classroom, so it will remain in system but you won't be able to create a session in this classroom. You can specify an IP subnet in standard Moodle format. So they divided by comma and each address can be described in one on those ways:
- xxx.xxx.xxx.xxx (full IP address)
- xxx.xxx.xxx.xxx/nn (number of bits in net mask)
- xxx.xxx.xxx.xxx-yyy (a range of IP addresses in the last group)
- xxx.xxx or xxx.xxx. (incomplete address)
Example: 235.144.18, 235.144.19.2-34, 235.144.19.38, 235.144.19.40-44
As opposed to lesson types, you can use the same classrooms in all courses. For start session you must provide at least one classroom. Consider, if you create classroom with an incorrect IP subnet, students won't be able to start the quiz.
Editing quiz settings
For link some quizzes from course with supervised sessions, go to their settings, extra restrictions on attempts section. Here you will find three options for setting your quiz:
- Don't use supervised control for this quiz (by default).
- Use supervised control for all lesson types.
- Use supervised control for custom lesson types (even if you start a session for unchecked lesson type, student won't be able to start this quiz).
Sessions starting or planning
The teacher can start a new session just from supervised block's body choosing classroom, lesson type (or just choosing "Not specified"), academic group and session duration:
Teacher can also choose "All groups". In this case all students from this course will be able to start the quiz.
During the session teacher can change the classroom, academic group, duration, view session logs (see below) or finish session:
The second option is to plan the session. In this case the manager plans the schedule for teachers and add sessions for them. The teacher can also plans sessions for himself (see also capabilities section).
If the option "Send e-mail" is checked, the teacher will be notified about session creation and any changes.
What happens if the teacher has a planned session near current time? The supervised block shows the notification about it and propose to start it. The teacher is able to change something before starting (classroom, group, lesson type or duration).
The teacher is able to view session logs and filter them by users took part in session.
Student-side
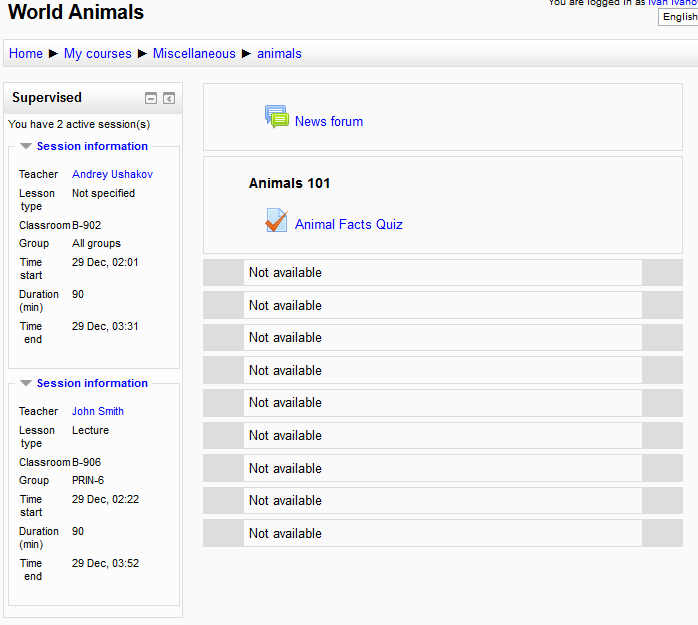
When student is in course he can see in a supervised block if there is an active session(s):
So, he can try to start the quiz.
Capabilities
| Capability name | Archetypes | Description |
| block/supervised: besupervised | student | |
| block/supervised: supervise | editingteacher, teacher | |
| block/supervised: editclassrooms | editingteacher, manager | |
| block/supervised: editlessontypes | editingteacher, manager | |
| block/supervised: viewownsessions | editingteacher, teacher | |
| block/supervised: viewallsessions | manager, editingteacher | |
| block/supervised: manageownsessions | editingteacher, teacher | |
| block/supervised: manageallsessions | manager, coursecreator | |
| block/supervised: managefinishedsessions | manager, coursecreator |


