Cloze editor module: Difference between revisions
| Cloze editor module | |
|---|---|
| Type | Other, Activity module, Cloze editor |
| Set | N/A |
| Downloads | https://moodle.org/plugins/view.php?plugin=tinymce_clozeeditor |
| Issues | https://moodle.org/plugins/view.php?plugin=tinymce_clozeeditor |
| Discussion | https://moodle.org/mod/forum/discuss.php?d=221420 |
| Maintainer(s) | Andreas Glombitza |
m (tidy up) |
(updated Moodle branches compatability) |
||
| (26 intermediate revisions by 2 users not shown) | |||
| Line 1: | Line 1: | ||
{{Infobox plugin | {{Infobox plugin | ||
|type = Other, Activity module, Cloze editor | |type = Other, Activity module, Cloze editor | ||
|entry = | |entry = https://moodle.org/plugins/view.php?plugin=tinymce_clozeeditor | ||
|tracker = https://moodle.org/plugins/view.php?plugin= | |tracker = https://moodle.org/plugins/view.php?plugin=tinymce_clozeeditor | ||
|discussion = https://moodle.org/mod/forum/discuss.php?d= | |discussion = https://moodle.org/mod/forum/discuss.php?d=221420 | ||
|maintainer = [[User:Andreas Glombitza|Andreas Glombitza]] | |maintainer = [[User:Andreas Glombitza|Andreas Glombitza]] | ||
|float = right | |float = right | ||
| Line 10: | Line 10: | ||
==Download== | ==Download== | ||
You can download specific versions for Moodle 1.9, 2.0, 2.1 and | * You can download specific versions for Moodle 1.9, 2.0, 2.1, 2.2, 2.3, and 2.4 up to 2.9 from [https://moodle.org/plugins/view.php?plugin=tinymce_clozeeditor]. | ||
* This plugin also works in Moodle 2.7 and higher versions as long as the user chooses the [[TinyMCE]] (not the [[Atto editor]]) as [[Update_profile| his/her personal editor in his/her profile]], or as the site default [[Text editor]]. | |||
==Overview== | ==Overview== | ||
The integration (PHP/ | The integration (PHP/javascript) is essentially a new button in the HTML editor which brings up an interface that helps create CLOZE questions in the correct syntax. It will also read and edit existing CLOZE items (which you have selected with your cursor). | ||
Here's a demonstrator (which can also be used to create your own CLOZE quizzes): | |||
http://goo.gl/zxRQmN | |||
==Installation instructions== | |||
http:// | |||
===Installation for Moodle 1.9 version=== | ===Installation for Moodle 1.9 version=== | ||
# Unzip | # Unzip | ||
# copy to your moodleroot directory, keeping the directory structure | # copy to your '''moodleroot''' directory, keeping the directory structure | ||
The following files in your installation will be overwritten with mod'd files | The following files in your original Moodle installation will be overwritten with mod'd files (so make sure to BACK THEM UP before): | ||
lib/weblib.php * | lib/weblib.php * | ||
| Line 38: | Line 33: | ||
lib/editor/htmlarea/dialog.js | lib/editor/htmlarea/dialog.js | ||
* Overwriting weblib.php is OPTIONAL: | * Overwriting the '''weblib.php''' file is OPTIONAL: | ||
* If you choose to include this modified weblib.php, the CLOZE-editor button will only show for teachers, and only in question-interfaces. In any other editor instances, and for students, it will be hidden. | * If you choose to include this modified '''weblib.php''' file, the CLOZE-editor button will only show for teachers, and only in question-interfaces. In any other editor instances, and for students, it will be hidden. This is very convenient :) | ||
* If you refrain from overwriting weblib.php, | * If you refrain from overwriting the '''weblib.php''' file, the cloze editor plugin will still work, but the editor button will be visible in EVERY editor instance for teachers, but not for students. This might be disconcertirg for some teachers :( | ||
===Installation for Moodle 2.0, 2.1, 2.2 and 2.3=== | |||
===Installation for Moodle 2.0 and 2. | |||
# Unzip. | # Unzip. | ||
# | # Copy the CONTENTS (excluding version.php!) of the directory '''clozeeditor''' to the directory '''lib/editor/tinymce''' on your Moodle installation, keeping the directory structure. | ||
'''ATTENTION''': DO '''NOT''' OVERWRITE '''lib/editor/tinymce/version.php''' as this would break TinyMCE; the version.php in the download package can be ignored/deleted. | |||
The following | The following file in your installation will be OVERWRITTEN with a mod'd file (so make sure to BACK IT UP): | ||
lib/editor/tinymce/lib.php | lib/editor/tinymce/lib.php | ||
===Installation for Moodle 2.4 and higher versions=== | ===Installation for Moodle 2.4 and higher versions=== | ||
# Unzip | # Unzip | ||
# | # Copy the contents of the directory to the directory '''lib/editor/tinymce/plugins''' on your Moodle installation, keeping the directory structure. | ||
# Visit ' Administration > Site Administration > Notifications ' and | # Visit ' Administration > Site Administration > Notifications ' | ||
# Finish the installation process by clicking on the 'Upgrade Moodle database now' button. | |||
===Installation for Moodle 2.5 and higher versions=== | |||
* As of Moodle version 2.5, the plugin can be deployed from within Moodle, by uploading the cloze editor ZIP file (see https://docs.moodle.org/25/en/Installing_add-ons#Installing_via_uploaded_ZIP_file). | |||
# Download the cloze editor ZIP-package from [https://moodle.org/plugins/view.php?plugin=tinymce_clozeeditor the Moodle plugins database] | |||
# In your Moodle "Site Administration" menu, go to "Plugins/Install add-ons" | |||
# Look for the "Install add-on from ZIP file" section | |||
# Select "TinyMCE HTML editor / tinymce (tinymce)" as "Plugin type" | |||
# Drag and drop (or choose location and upload to server) the "clozeeditor.zip" file inside the ZIP package area | |||
[[File:254 install from ZIP file.png|300px]] | |||
# Tick the acknowledgement statement check box | |||
# At the add-on package validation, if everything is OK, click on the "Install add-on!" button | |||
# If the screen goes blank and the installation pauses, hit the "Update screen" key (F5) as many times (about 5) as needed | |||
# At the Plugins check window, click on the "Upgrade Moodle database now" button | |||
# At the Final window showing Success, click on the "Continue" button | |||
===Installation for Moodle 2.7 and higher versions=== | |||
* As of april 2014, Moodle 2.7 now includes two HTML [[Text_editor|text editors]]: the old [[TinyMCE]] and the [[Atto editor]]. | |||
* As long as [https://moodle.org/mod/forum/discuss.php?d=253748 the old TinyMCE editor is still included], you can still install the CLOZE editor add-on as described for Moodle 2.5 above | |||
* After successfully installing the add-on, you must go to ' Administration > Site administration > Plugins > Text editors > Manage editors ' | |||
* You will see Moodle's available text editors: | |||
[[File:27available_editors_default_config.png|600px]] | |||
*The [[Atto editor]] is now the default text editor for Moodle 2.7+. It is small, but has no CLOZE support: | |||
[[File:27Atto_editor.png|600px]] | |||
* You must move up the TinyMCE editor: | |||
[[File:27available_editors_default_config_click_here.png|600px]] | |||
* You will now use TinyMCE as your default [[Text editor]]: | |||
[[File:27available_editors_Moving Atto down makes TinyMCE top.png|600px]] | |||
* And the CLOZE editor works beautifully in Moodle 2.7+, 2.8+ and 2.9+: | |||
[[File:27TinyMCE editor with CLOZE plugin working OK.png|600px]] | |||
==Using the cloze editor== | ==Using the cloze editor== | ||
| Line 67: | Line 100: | ||
[[File:Cloze editor symbol.png]] | [[File:Cloze editor symbol.png]] | ||
* Write a small text (e.g, the poem) in the HTML editor | * Write a small text (e.g, the poem) in the HTML editor | ||
[[File:to make a prairie_1.png]] | [[File:to make a prairie_1.png|400px]] | ||
* Select a word to be replaced by a CLOZE (in this case, '''bee''') | * Select a word to be replaced by a CLOZE (in this case, '''bee''') | ||
[[File:to make a prairie_2.png]] | [[File:to make a prairie_2.png|400px]] | ||
* Click on the small yellow question mark [[File:Cloze editor symbol small.png]] | * Click on the small yellow question mark [[File:Cloze editor symbol small.png]] | ||
* Choose the type of CLOZE sub-question format that you want (in this case, a drop-down menu in-line in the text) | * Choose the type of CLOZE sub-question format that you want (in this case, a drop-down menu in-line in the text) | ||
[[File:to make a prairie_3.png]] | [[File:to make a prairie_3.png|400px]] | ||
* The correct answer has been placed automatically. | * The correct answer has been placed automatically. | ||
* Check it and write some feedback if you want | * Check it and write some feedback if you want | ||
[[File:to make a prairie_3.png]] | [[File:to make a prairie_3.png|400px]] | ||
* Fill in the wrong answers (if any) | * Fill in the wrong answers (if any) | ||
[[File:to make a prairie_4.png]] | [[File:to make a prairie_4.png|400px]] | ||
* Click on the 'Insert' button to process | * Click on the 'Insert' button to process | ||
[[File:to make a prairie_5.png]] | [[File:to make a prairie_5.png|400px]] | ||
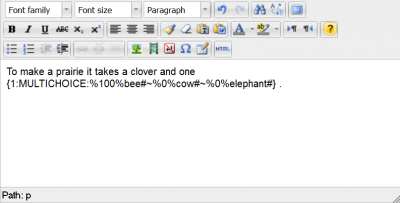
* The correct CLOZE syntax will be shown within the editor window | * The correct CLOZE syntax will be shown within the editor window | ||
[[File:to make a prairie_6.png]] | [[File:to make a prairie_6.png|400px]] | ||
* Save the question | * Save the question | ||
* Check that the question works as intended | * Check that the question works as intended | ||
[[File:to make a prairie_7.png]] | [[File:to make a prairie_7.png|400px]] | ||
===Editing existing CLOZE items=== | |||
* Select an existing CLOZE item with your cursor (including the curly outer brackets). Then click on the small yellow question mark. The editor will come up, with the fields correctly populated for this item. | |||
==The cloze editor button and Moodle roles== | ==The cloze editor button and Moodle roles== | ||
* The CLOZE-editor button will | * The CLOZE-editor button in Moodle 2.x will show for teachers and students alike, every time they use the HTML editor, even when they are writing something else not related to a cloze question (e.g: a forum post). | ||
==Other languages== | ==Other languages== | ||
* All the English language strings of the cloze editor are available for translation at [http://lang.moodle.org/ AMOS] | |||
* If you make a [[Language customization]], you can have the cloze editor in your preferred language. | * If your Language pack does not have the English language strings translated, you can make a [[Language customization]], so that you you can have the cloze editor in your preferred language. | ||
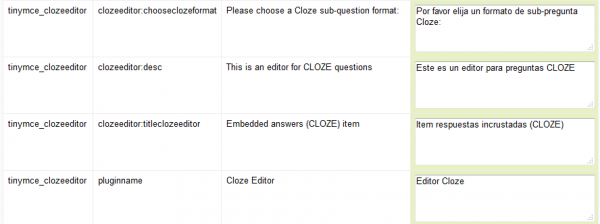
* The following image shows a mexican spanish translation of the English language strings of this add-on. | * The following image shows a mexican spanish translation of the English language strings of this add-on. | ||
[[File:cloze editor language customization.png]] | [[File:cloze editor language customization.png|600px]] | ||
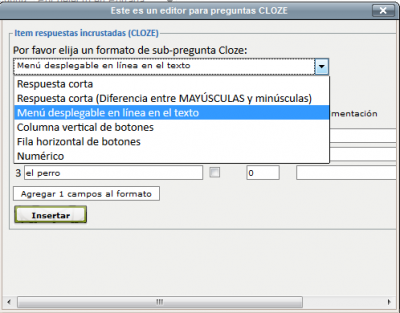
* And here are the translated strings being used inside the plugin: | * And here are the translated strings being used inside the plugin: | ||
[[File:Cloze editor in spanish.png]] | [[File:Cloze editor in spanish.png|400px]] | ||
==See also== | ==See also== | ||
* [[Embedded Answers (Cloze) question type]] | * [[Embedded Answers (Cloze) question type]] | ||
* [https://moodle.org/plugins/view.php?plugin=other_cloze Cloze editor add-on] in the Moodle plugin database | * [https://moodle.org/plugins/view.php?plugin=other_cloze Cloze editor add-on] in the Moodle plugin database | ||
* [http://projects.ael.uni-tuebingen.de/quiz/htmlarea/index.php http://projects.ael.uni-tuebingen.de/quiz/htmlarea/index.php] on-line CLOZE editor | |||
[[Category:Questions]] | [[Category:Questions]] | ||
Latest revision as of 14:59, 9 October 2015
An interface that integrates with Moodle's existing HTML editor (HTMLArea in 1.9 and TinyMCE in 2.x) to support teachers in creating Cloze (Embedded answers) questions in the GIFT syntax.
Download
- You can download specific versions for Moodle 1.9, 2.0, 2.1, 2.2, 2.3, and 2.4 up to 2.9 from [1].
- This plugin also works in Moodle 2.7 and higher versions as long as the user chooses the TinyMCE (not the Atto editor) as his/her personal editor in his/her profile, or as the site default Text editor.
Overview
The integration (PHP/javascript) is essentially a new button in the HTML editor which brings up an interface that helps create CLOZE questions in the correct syntax. It will also read and edit existing CLOZE items (which you have selected with your cursor).
Here's a demonstrator (which can also be used to create your own CLOZE quizzes):
Installation instructions
Installation for Moodle 1.9 version
- Unzip
- copy to your moodleroot directory, keeping the directory structure
The following files in your original Moodle installation will be overwritten with mod'd files (so make sure to BACK THEM UP before):
lib/weblib.php *
lib/editor/htmlarea/htmlarea.php
lib/editor/htmlarea/dialog.js
* Overwriting the weblib.php file is OPTIONAL:
- If you choose to include this modified weblib.php file, the CLOZE-editor button will only show for teachers, and only in question-interfaces. In any other editor instances, and for students, it will be hidden. This is very convenient :)
- If you refrain from overwriting the weblib.php file, the cloze editor plugin will still work, but the editor button will be visible in EVERY editor instance for teachers, but not for students. This might be disconcertirg for some teachers :(
Installation for Moodle 2.0, 2.1, 2.2 and 2.3
- Unzip.
- Copy the CONTENTS (excluding version.php!) of the directory clozeeditor to the directory lib/editor/tinymce on your Moodle installation, keeping the directory structure.
ATTENTION: DO NOT OVERWRITE lib/editor/tinymce/version.php as this would break TinyMCE; the version.php in the download package can be ignored/deleted.
The following file in your installation will be OVERWRITTEN with a mod'd file (so make sure to BACK IT UP):
lib/editor/tinymce/lib.php
Installation for Moodle 2.4 and higher versions
- Unzip
- Copy the contents of the directory to the directory lib/editor/tinymce/plugins on your Moodle installation, keeping the directory structure.
- Visit ' Administration > Site Administration > Notifications '
- Finish the installation process by clicking on the 'Upgrade Moodle database now' button.
Installation for Moodle 2.5 and higher versions
- As of Moodle version 2.5, the plugin can be deployed from within Moodle, by uploading the cloze editor ZIP file (see https://docs.moodle.org/25/en/Installing_add-ons#Installing_via_uploaded_ZIP_file).
- Download the cloze editor ZIP-package from the Moodle plugins database
- In your Moodle "Site Administration" menu, go to "Plugins/Install add-ons"
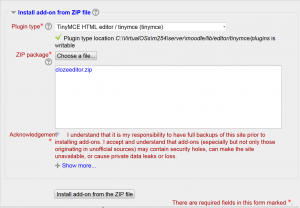
- Look for the "Install add-on from ZIP file" section
- Select "TinyMCE HTML editor / tinymce (tinymce)" as "Plugin type"
- Drag and drop (or choose location and upload to server) the "clozeeditor.zip" file inside the ZIP package area
- Tick the acknowledgement statement check box
- At the add-on package validation, if everything is OK, click on the "Install add-on!" button
- If the screen goes blank and the installation pauses, hit the "Update screen" key (F5) as many times (about 5) as needed
- At the Plugins check window, click on the "Upgrade Moodle database now" button
- At the Final window showing Success, click on the "Continue" button
Installation for Moodle 2.7 and higher versions
- As of april 2014, Moodle 2.7 now includes two HTML text editors: the old TinyMCE and the Atto editor.
- As long as the old TinyMCE editor is still included, you can still install the CLOZE editor add-on as described for Moodle 2.5 above
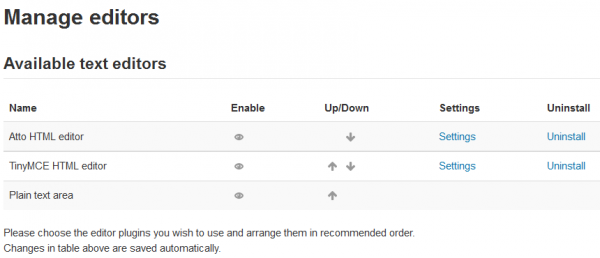
- After successfully installing the add-on, you must go to ' Administration > Site administration > Plugins > Text editors > Manage editors '
- You will see Moodle's available text editors:
- The Atto editor is now the default text editor for Moodle 2.7+. It is small, but has no CLOZE support:
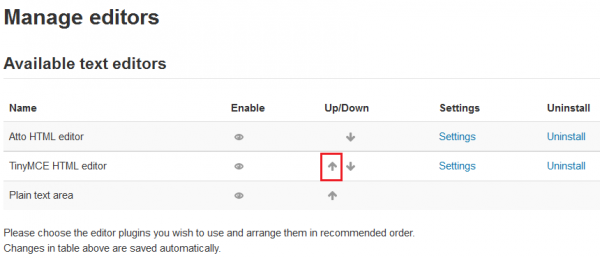
- You must move up the TinyMCE editor:
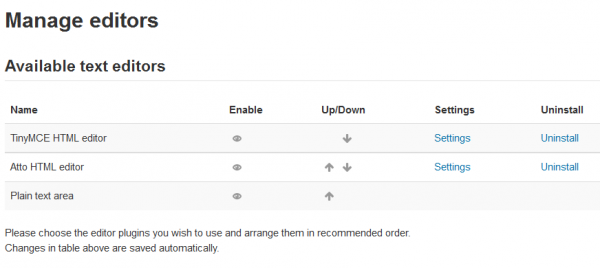
- You will now use TinyMCE as your default Text editor:
- And the CLOZE editor works beautifully in Moodle 2.7+, 2.8+ and 2.9+:
Using the cloze editor
- We will be asking the students to choose the correct word used in a poem by Emily Dickinson:
- The cloze editor button is a small yellow question mark in the HTML editor.
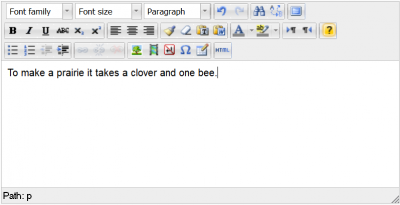
- Write a small text (e.g, the poem) in the HTML editor
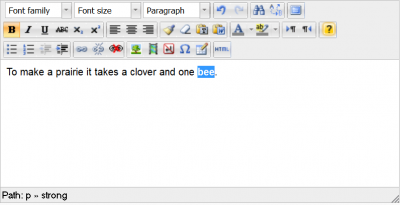
- Select a word to be replaced by a CLOZE (in this case, bee)
- Click on the small yellow question mark

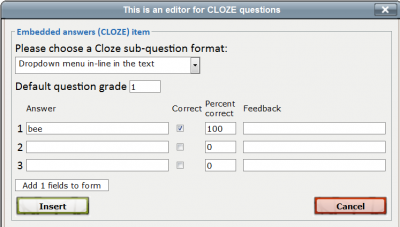
- Choose the type of CLOZE sub-question format that you want (in this case, a drop-down menu in-line in the text)
- The correct answer has been placed automatically.
- Check it and write some feedback if you want
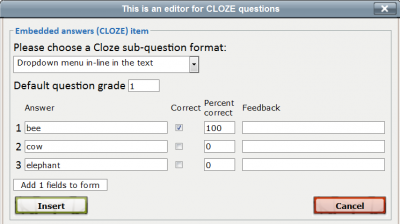
- Fill in the wrong answers (if any)
- Click on the 'Insert' button to process
- The correct CLOZE syntax will be shown within the editor window
- Save the question
- Check that the question works as intended
Editing existing CLOZE items
- Select an existing CLOZE item with your cursor (including the curly outer brackets). Then click on the small yellow question mark. The editor will come up, with the fields correctly populated for this item.
The cloze editor button and Moodle roles
- The CLOZE-editor button in Moodle 2.x will show for teachers and students alike, every time they use the HTML editor, even when they are writing something else not related to a cloze question (e.g: a forum post).
Other languages
- All the English language strings of the cloze editor are available for translation at AMOS
- If your Language pack does not have the English language strings translated, you can make a Language customization, so that you you can have the cloze editor in your preferred language.
- The following image shows a mexican spanish translation of the English language strings of this add-on.
- And here are the translated strings being used inside the plugin:
See also
- Embedded Answers (Cloze) question type
- Cloze editor add-on in the Moodle plugin database
- http://projects.ael.uni-tuebingen.de/quiz/htmlarea/index.php on-line CLOZE editor
