Office365: Difference between revisions
Don Glover (talk | contribs) No edit summary |
|||
| Line 41: | Line 41: | ||
<p>https://login.windows.net/common/oauth2/token</p></li> | <p>https://login.windows.net/common/oauth2/token</p></li> | ||
<li><p>Note the Redirect URI. This should be the URI of the Moodle instance followed by /auth/oidc.</p> | <li><p>Note the Redirect URI. This should be the URI of the Moodle instance followed by /auth/oidc.</p> | ||
<p>For example, https:// www.bellowscollege.com/auth/oidc/</p></li></ol> | <p>For example, https:// www.bellowscollege.com/auth/oidc/</p><p>'''Note''': The Microsoft application redirect URL can only be the fully qualified domain name pointing to your Moodle instance. The default Moodle installation is configured with the IP address pointing to your instance. For your integration to function properly, you must ensure that the $CFG->wwwroot in your config.php file is set to the domain name and not the IP address pointing to your instance and that the redirect URL is set using that domain name.</p></li></ol> | ||
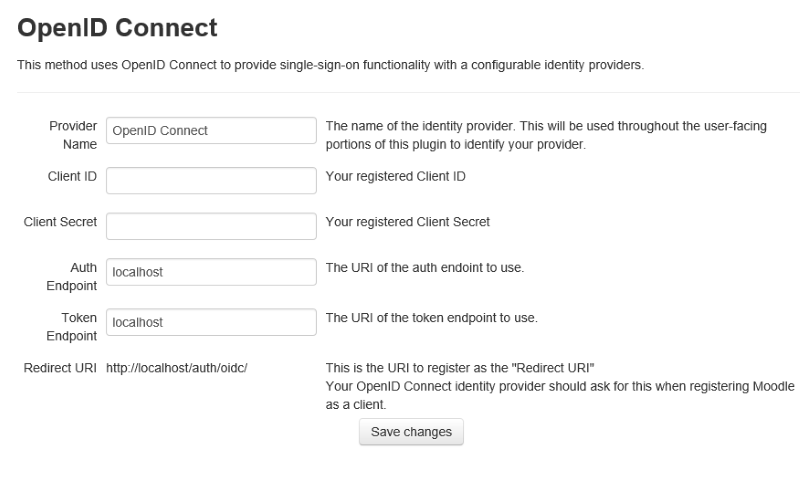
[[image:SettingOpenIDConnect.png||OpenID Connect Settings]] | [[image:SettingOpenIDConnect.png||OpenID Connect Settings]] | ||
Revision as of 16:23, 23 January 2015
Introduction
Office 365 services complement the Moodle learning platform to provide a more productive experience for teachers and students.
The Office 365 plugin set provides Moodle integration with Word Online, One Drive for Business, and the Outlook calendar. The plugin uses Azure Active Directory to provide a Single Sign On experience with Office 365.
Getting Started
Requirements
You must have the following:
- Office 365 subscription
- Microsoft Azure subscription
- Moodle version 2.7 or above
Install the plugins
The packages are available from:
When you log back in to your Moodle instance, you are presented with the all the plugin configuration options. Since you are installing the plugins as a package there are dependencies that have not yet been enabled. Save the settings without configuring them. You will come back to them later.
For information on installing plugins in Moodle see Installing Plugins
Configure the plugins
Enable the OpenID Connect authentication plugin:
Navigate to Site Administration>Plugins>Authentication.
Click Manage authentication.
Locate the OpenID Connect authentication plugin and click the eye icon to enable
Click the Settings link for the plugin.
In the Provider Name field type an end user-facing label that will inform a user of the type credentials her or she must use to login.
In the Auth Endpoint field enter:
In the Token Endpoint field, enter:
Note the Redirect URI. This should be the URI of the Moodle instance followed by /auth/oidc.
For example, https:// www.bellowscollege.com/auth/oidc/
Note: The Microsoft application redirect URL can only be the fully qualified domain name pointing to your Moodle instance. The default Moodle installation is configured with the IP address pointing to your instance. For your integration to function properly, you must ensure that the $CFG->wwwroot in your config.php file is set to the domain name and not the IP address pointing to your instance and that the redirect URL is set using that domain name.
Configuring Single Sign-on with Office 365
Preparing your Office 365 account for single sign-on with your Moodle installation
You will need an Azure subscription. If you do not have one, you can create one by visiting [Microsoft Azure Sign Up]
To use Moodle with Office 365 for SSO, you must configure Microsoft Azure to manage your Office 365 Microsoft Azure Active Directory:
- Create a new Active Directory.
- Select Use existing directory.
- Select I am ready to be signed out now and click the check mark.
- Sign in with your Office 365 subscription credentials.
- Click Continue.
- Log out and sign back in to your Azure account.
Note: During the setup, you are required to enter a credit card and phone number. If you do not setup virtual machines or use paid services on the subscription, and only use it to access the Azure Active Directory, you will not be charged for the subscription.
To register an application in the Azure Management Portal
- Sign in to the Microsoft Azure Management Portal.
- Click on the Active Directory icon on the left menu, and then click on the desired Office 365 connected Azure AD.
- On the top menu, click Applications. If no apps have been added to your directory, this page will only show the Add an App link. Click on the link, or alternatively you can click on the Add button on the command bar.
- On the What do you want to do page, click on the link to Add an application my organization is developing.
- On the Tell us about your application page, you must specify a name for your application and indicate the type of application you are registering with Azure AD. Click web application and/or web API (default) and then click the arrow icon on the bottom-right corner of the page.
- On the App properties page, provide the Sign-on URL and App ID URI for your Moodle instance. The Sign-on URI is the Redirect URI you from the OpenID Connect authentication plugin configuration. The APP ID URI is the main URI of the Moodle instance.
- Click the checkbox in the bottom-right hand corner of the page and then click Ok to add your app to Azure Active Directory.
- There are a couple more values and changes you need to make and write down some values which you will need in the next section.
To configure your app to provide identity for your Moodle instance
- Click on the Active Directory icon on the left menu, and then click on the desired Azure AD.
- Click the Applications tab at the top of the screen.
- Select your app.
- Click Configure at the top of the screen.
- Locate the Client ID and copy it to the Client ID field in your OpenID connect configuration screen.
- To create a Client Secret, locate the keys section and select a duration for the validity of the key. Save the new key and copy it to the Client Secret field in your OpenID connect configuration screen.
- Locate the Permissions to other applications section.
- Click Add application click the plus sign to the right of Office 365 Exchange Online and Office 365 SharePoint Online. Note, the plus will appear when you hover over each of the items.
- Click the check mark at the bottom right of the dialog.
- In the Delegated Permissions dropdown for Office 365 Exchange Online select the following permissions:
- Read users’ calendars
- Have full access to users’ calendars
- In the Delegated Permissions dropdown for Office 365 SharePoint Online select the following permissions:
- Read items in all site collections
- Edit or delete items in all site collections
- Create or delete items and lists in all site collections
- Have full control of all site collections
- Read users' files
- Edit or delete users' files
- In the Application Permissions dropdown for Windows Azure Active Directory select the following permissions:
- Read directory data
- In the Delegated Permissions dropdown for Windows Azure Active Directory select the following permissions:
- Read directory data
- Enable sign-on and read users' profiles
- Click save at the bottom of the screen.
Add a user to the app
- Click on the Active Directory icon on the left menu, and then click on the desired Azure AD.
- Click the Applications tab at the top of the screen.
- Select your app.
- Click the Users tab at the top of the screen.
- Select an Office 365 User to assign to assign to the App.
- Click Assign at the bottom of the screen.
- When prompted whether you are sure you want to enable access, click Yes.
Microsoft Office 365 Integration
To configure the O365 plugin
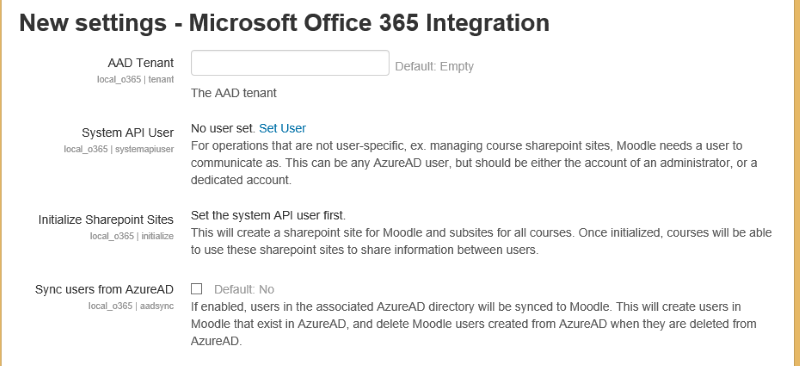
- Navigate to Site Administration>Plugins>Local plugins.
- Click Microsoft Office 365 Integration.
- In the AAD Tenant field type the subdomain of your Office 365 subscription. For example, if your subscription URL is contoso.onmicrosoft.com type contoso.
- Click the System API User link and an Azure AD user to use to perform operations that are not user-specific. We recommend that you select either the account of an administrator or create a dedicated account to use.
- In the Course SharePoint sites parent site URI field type the subdomain of the SharePoint site in which you want to create courses. For example, if your SharePoint site URL is contoso.sharepoint.com, type contoso.
- If you want to sync users from Azure AD to your Moodle instance, click the Select Sync users from Azure AD checkbox.

