Text editor: Difference between revisions
Mary Cooch (talk | contribs) m (→List of groups) |
No edit summary |
||
| (45 intermediate revisions by 8 users not shown) | |||
| Line 1: | Line 1: | ||
{{Editing text}} | {{Editing text}} | ||
The text editor (sometimes referred to as the 'HTML editor' or even 'TinyMCE') has many icons to assist the user in entering content. Many of these icons and functions should be familiar to anyone who uses a word processor. Some examples of where you will see the text editor include: Editing Section headings, description of an activity, writing an answer to a quiz question or editing the content of many blocks. | The text editor (sometimes referred to as the 'HTML editor' or even '[http://www.tinymce.com/ TinyMCE]') - has many icons to assist the user in entering content. Many of these icons and functions should be familiar to anyone who uses a word processor. Some examples of where you will see the text editor include: Editing Section headings, description of an activity, writing an answer to a quiz question or editing the content of many blocks. | ||
An individual user can select an editor in their profile from ''Administration > My Profile settings > Edit profile.'' | |||
== | ==Collapsing and expanding the editor== | ||
{{New features}} | |||
The TinyMCE editor first appears with just one row of buttons. Clicking the icon top left will expand it to three rows. | |||
{| | {| | ||
|[[File: | |[[File:26tinymce1.png|250px|thumb|Collapsed view]] | ||
|[[File: | |[[File:26tinymce2.png|250px|thumb|Expanded view]] | ||
|} | |} | ||
== | ==Toolbar buttons== | ||
For those who are not familiar with the tool bar, here are the buttons as grouped in their rows. Remember that the site administrator can edit or provide additional buttons. | |||
Row 1 | |||
{| | {| | ||
|[[ | |[[File:26tinymcerow1.png|400px|thumb]] | ||
|} | |} | ||
= | {| class="nicetable" | ||
|- | |||
|- | |||
| 1:Expand | |||
| 2.Formatting | |||
| 3.Bold | |||
| 4.Italic | |||
|- | |||
| 5.Bulleted list | |||
| 6.Numbered list | |||
| 7.Add link | |||
| 8.Unlink | |||
|- | |||
| 9.Stop auto linking | |||
| 10.Add image | |||
| 11.Add emoticon | |||
| 12.Add media | |||
|- | |||
| 13.Manage embedded files | |||
| | |||
| | |||
| | |||
|} | |||
Row 2 | |||
{| | |||
|[[File:26tinymcerow2.png|400px|thumb]] | |||
|} | |||
{| class="nicetable" | |||
|- | |||
|- | |||
| 1:Undo | |||
| 2.Redo | |||
| 3.Underline | |||
| 4.Strikethrough | |||
|- | |||
| 5.Subscript | |||
| 6.Superscript | |||
| 7.Align left | |||
| 8.Align centre | |||
|- | |||
| 9.Align right | |||
| 10.Decrease indent | |||
| 11.Increase indent | |||
| 12.Text colour | |||
|- | |||
| 13.Background colour | |||
| 14.Left to Right | |||
| 15.Right to Left | |||
| | |||
|- | |||
|} | |||
Row 3 | Row 3 | ||
{| | |||
|[[File:26tinymcerow3.png|400px|thumb]] | |||
|} | |||
=== | {| class="nicetable" | ||
*[[Image: | |- | ||
There are four levels of selecting a font or background | |- | ||
*A quick pick 5x8 matrix of | | 1:Font family | ||
*"More | | 2.Font size | ||
| 3.Edit HTML | |||
| 4.Find | |||
|- | |||
| 5.Find/replace | |||
| 6.Insert non-breaking space | |||
| 7.Insert special character | |||
| 8.Insert table | |||
|- | |||
| 9.Clean up messy code | |||
| 10.Remove formatting | |||
| 11.Paste as plain text | |||
| 12.Paste from MS Word | |||
|- | |||
| 13.Toggle full screen | |||
|- | |||
|} | |||
===Colour pickers=== | |||
*[[Image:26colourpickers.png]] | |||
There are four levels of selecting a font or background colour, | |||
*A quick pick 5x8 matrix of colours | |||
*"More colours" that links to Picker, Pallet and Named tabs | |||
<gallery> | <gallery> | ||
Image:HTML_editor_color_selector_basic_1.png|A quick pick 5x8 matrix of colors | Image:HTML_editor_color_selector_basic_1.png|A quick pick 5x8 matrix of colors | ||
| Line 50: | Line 116: | ||
Image:HTML_editor_color_selector_more_pallet_1.png|A Pallet tab with a 18x12 matrix of colors | Image:HTML_editor_color_selector_more_pallet_1.png|A Pallet tab with a 18x12 matrix of colors | ||
Image:HTML_editor_color_selector_more_named_1.png|A Named tab with custom pallets | Image:HTML_editor_color_selector_more_named_1.png|A Named tab with custom pallets | ||
</gallery> | </gallery> | ||
| Line 99: | Line 148: | ||
*Additionally the equation, emoticon and spell check buttons have links to their Settings screens. | *Additionally the equation, emoticon and spell check buttons have links to their Settings screens. | ||
[[File: | [[File:26tinymceplugins.png |thumb|none|upright=2.0|alt="The TinyMCE editor plugins screen" | The TinyMCE editor plugins screen]] | ||
=====Manage embedded files===== | |||
{{New features}} | |||
This plugin allows users to add, delete or override files embedded in the current text area, for example in a label or topic summary. (It complements the [[Embedded files repository]]) | |||
{| | |||
|[[File:26embeddedfiles1.png|thumb|The Manage files button]] | |||
| | |||
|[[File:26embeddefiles2.png|thumb|Managing embedded files from within TinyMCE]] | |||
|} | |||
=====Insert equation===== | =====Insert equation===== | ||
| Line 115: | Line 174: | ||
|[[File:Browserspellcheck.png|thumb|Right-click+CTRL for browser spellcheck]] | |[[File:Browserspellcheck.png|thumb|Right-click+CTRL for browser spellcheck]] | ||
|} | |} | ||
'''NOTE:''' | |||
While the default spell engine is Google spell which can be changed in ''Administration>Site administration>Plugins>Text editors>TinyMCE HTML editor'', this is no longer supported by Google and will not work. (Note that it is only visible in IE9 and lower) It is due to be removed. See MDL-38867. In browser spell check is recommended. | |||
If PSpell is selected then aspell 0.50 or later must be installed on your server and the path to aspell set in Administration > Site administration > Server > System Paths. | |||
| Line 123: | Line 187: | ||
|[[File:Spellengine.png|thumb|Choosing a different spell engine]] | |[[File:Spellengine.png|thumb|Choosing a different spell engine]] | ||
|} | |} | ||
According to: http://php.net/manual/en/book.pspell.php | |||
"As of php 5.3. Pspell is no longer supported/bundled. Instead you can use the enchant which is bundled by default in 5.3." | |||
If | If PSpell is selected then aspell 0.50 or later must be installed on your server and the path to aspell set in Administration > Site administration > Server > System Paths. | ||
===Customising the editor toolbar=== | ===Customising the editor toolbar=== | ||
| Line 133: | Line 199: | ||
{| | {| | ||
| [[File:editortoolbar.png|thumb|The Editor toolbar box]] | | [[File:editortoolbar.png|thumb|The Editor toolbar box]] | ||
|[[File:horizontalrule.png|thumb|Example of | |[[File:horizontalrule.png|thumb|Example of toolbar with added horizontal rule button]] | ||
|} | |} | ||
====Available fonts list==== | ====Available fonts list==== | ||
| Line 158: | Line 221: | ||
|} | |} | ||
*Example | *Example: Moving the toolbar to the bottom: | ||
Add the following: | Add the following: | ||
{"theme_advanced_toolbar_location" : "bottom"} | {"theme_advanced_toolbar_location" : "bottom"} | ||
*Example | |||
*Example: Adding your own custom styles. | |||
(This might be useful for example if you want a "house style" for important notes, key points or similar) | (This might be useful for example if you want a "house style" for important notes, key points or similar) | ||
In the editor toolbar, enter "styleselect" and then in the custom box add the following code, changing it to suit your purposes: | In the editor toolbar, enter "styleselect" and then in the custom box add the following code, changing it to suit your purposes: | ||
| Line 168: | Line 232: | ||
{"title" : "Bold text", "inline" : "b"}, | {"title" : "Bold text", "inline" : "b"}, | ||
{"title" : "Red text", "inline" : "span", "styles" : {"color" : "#ff0000"}}, | {"title" : "Red text", "inline" : "span", "styles" : {"color" : "#ff0000"}}, | ||
{"title" : "Red header", "block" : "h1", "styles" : {"color" : "#ff0000"}} | {"title" : "Red header", "block" : "h1", "styles" : {"color" : "#ff0000"}} ]} | ||
The following will let you use bootstrap CSS classes if you use a bootstrap based theme: | |||
{"style_formats" : [ | |||
{"title" : "Well", "block" : "div", "classes" : "well"}, | |||
{"title" : "Label", "inline" : "span", "classes" : "label"}, | |||
{"title" : "Label - success", "inline" : "span", "classes" : "label label-success"}, | |||
{"title" : "Label - warning", "inline" : "span", "classes" : "label label-warning"}, | |||
{"title" : "Label - important", "inline" : "span", "classes" : "label label-important"}, | |||
{"title" : "Label - info", "inline" : "span", "classes" : "label label-info"}, | |||
{"title" : "Label - inverse", "inline" : "span", "classes" : "label label-inverse"}, | |||
{"title" : "Button", "inline" : "a", "classes" : "btn btn"}, | |||
{"title" : "Button - primary", "inline" : "a", "classes" : "btn btn-primary"}, | |||
{"title" : "Button - info", "inline" : "a", "classes" : "btn btn-info"}, | |||
{"title" : "Button - success", "inline" : "a", "classes" : "btn btn-success"}, | |||
{"title" : "Button - warning", "inline" : "a", "classes" : "btn btn-warning"}, | |||
{"title" : "Button - danger", "inline" : "a", "classes" : "btn btn-danger"}, | |||
{"title" : "Button - inverse", "inline" : "a", "classes" : "btn btn-inverse"} | |||
]} | |||
*Example: Enabling copy of rich content with styles from MS Word (tm) and paste into TineMCE without removing important styles: | |||
{"paste_retain_style_properties" : "margin, padding, width, height, font-size, | |||
font-weight, font-family, color, text-align, ul, ol, li, | |||
text-decoration, border, background, float, display"} | |||
==TinyMCE additional plugins== | |||
In Moodle 2.4 and later, the TinyMCE editor can be extended and replaced by new plugins available in the [https://moodle.org/plugins/browse.php?list=category&id=45 Moodle plugins database]. Some of these plugins are: | |||
* [[Cloze editor module]] for easily adding [[Embedded Answers (Cloze) question type]]. | |||
* [https://moodle.org/plugins/view.php?plugin=tinymce_wordcount Word count] prints a word count in the bottom right-hand corner of your TinyMCE editor which updates as you type. | |||
* [[TinyMCE Mathslate]] is a [[Mathematics]] editor that does not depend on Java. | |||
* [https://moodle.org/plugins/view.php?plugin=tinymce_youtube YouTube Anywhere] enables direct recording and uploading into YouTube from the TinyMCE HTML editor. | |||
==See also== | ==See also== | ||
===Screencasts=== | |||
[http://www.youtube.com/watch?v=1m2xkm2EyXA&feature=share&list=SPxcO_MFWQBDe8RRnGjoUDqbcm9PSlIoWn&index=4 TinyMCE text editor improvements.] | |||
*[http://youtu.be/bBZQYGcDaMg Moodle 2.0 HTML Editor - Row 1] MoodleBites video on YouTube | |||
*[http://youtu.be/uS_M6-eHsxE Moodle 2.0 HTML Editor - Row 2] MoodleBites video on YouTube | |||
*[http://youtu.be/3rRztnWkhuY Moodle 2.0 HTML Editor - Row 3] MoodleBites video on YouTube | |||
==Dragging/dropping images into the text editor== | |||
* You can drag and drop images into the editor in some activities, lika [[Page]], [[Questions]] and [[Labels]]. | |||
* You can not drag and drop images into a [[Forum ]] post | |||
* As described by [https://moodle.org/mod/forum/discuss.php?d=270053 this] forum thread. | |||
* See MDL-43996 | |||
===Other=== | |||
* [[Text editor FAQ]] | * [[Text editor FAQ]] | ||
* [[Embedded files repository]] | |||
[[Category:Site administration]] | [[Category:Site administration]] | ||
[[de:Text-Editor]] | [[de:Text-Editor]] | ||
[[es:Editor de texto]] | |||
Revision as of 20:27, 22 April 2015
The text editor (sometimes referred to as the 'HTML editor' or even 'TinyMCE') - has many icons to assist the user in entering content. Many of these icons and functions should be familiar to anyone who uses a word processor. Some examples of where you will see the text editor include: Editing Section headings, description of an activity, writing an answer to a quiz question or editing the content of many blocks.
An individual user can select an editor in their profile from Administration > My Profile settings > Edit profile.
Collapsing and expanding the editor
New feature
in Moodle 2.6!
The TinyMCE editor first appears with just one row of buttons. Clicking the icon top left will expand it to three rows.


Toolbar buttons
For those who are not familiar with the tool bar, here are the buttons as grouped in their rows. Remember that the site administrator can edit or provide additional buttons.
Row 1

| 1:Expand | 2.Formatting | 3.Bold | 4.Italic |
| 5.Bulleted list | 6.Numbered list | 7.Add link | 8.Unlink |
| 9.Stop auto linking | 10.Add image | 11.Add emoticon | 12.Add media |
| 13.Manage embedded files |
Row 2

| 1:Undo | 2.Redo | 3.Underline | 4.Strikethrough |
| 5.Subscript | 6.Superscript | 7.Align left | 8.Align centre |
| 9.Align right | 10.Decrease indent | 11.Increase indent | 12.Text colour |
| 13.Background colour | 14.Left to Right | 15.Right to Left |
Row 3

| 1:Font family | 2.Font size | 3.Edit HTML | 4.Find |
| 5.Find/replace | 6.Insert non-breaking space | 7.Insert special character | 8.Insert table |
| 9.Clean up messy code | 10.Remove formatting | 11.Paste as plain text | 12.Paste from MS Word |
| 13.Toggle full screen |
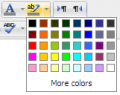
Colour pickers

There are four levels of selecting a font or background colour,
- A quick pick 5x8 matrix of colours
- "More colours" that links to Picker, Pallet and Named tabs
A quick pick 5x8 matrix of colors
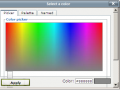
A rainbow color picker tab
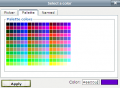
A Pallet tab with a 18x12 matrix of colors
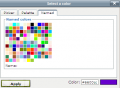
A Named tab with custom pallets


Insert table

General tab
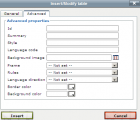
Advanced tab


To add borders to a table
Cell borders are crucial for helping readers to follow the rows across the screen. If they aren’t showing already you can add them as follows:
- In the Wiki page containing your table, click its Edit tab
- Carefully select all the cells of the table
- Then right click (Macs: Command+click or Ctrl+Click) over any part of your selection to get a context menu; from it select Cell > Table Cell Properties; the cell properties dialog box then loads.
- Click on its Advanced tab, set Border Color to black (for instance), then click Apply, and then click Update.
- Click Save; the Wiki page containing your table will then load displaying its borders.
Site administration settings
Manage editors
A site administrator can enable / disable text editors in Settings > Site administration > Plugins > Text editors > Manage editors. By default the TinyMCE HTML editor and plain text area are enabled.
TinyMCE editor settings
The TinyMCE HTML editor has its own settings page Administration>Site administration>Plugins>Text editors>TinyMCE HTML editor>General settings with the following options:
Plugins
- Buttons for equations, emoticons,images, media, automatic linking, and legacy spell-checking may be enabled, disabled or uninstall here by clicking on their eye.
- Additionally the equation, emoticon and spell check buttons have links to their Settings screens.

Manage embedded files
New feature
in Moodle 2.6!
This plugin allows users to add, delete or override files embedded in the current text area, for example in a label or topic summary. (It complements the Embedded files repository)


Insert equation
Accessed from Administration>Site administration>Plugins>Text editors>TinyMCE HTML editor>Edit equation, this allows you to enable or disable the TeX filter in the editor context and thereby display the Dragmath button. If you have a global custom TeX filter, then disable this setting.
Insert emoticon
Accessed from Administration>Site administration>Plugins>Text editors>TinyMCE HTML editor>Insert emoticon, this allows you to enable or disable the emoticon filter in the editor context and thereby display the emoticon button.
Legacy spell checker
The legacy spell checker is visible in IE9 and lower only, but not in other browsers. If you want to disable it and and rely on browser spell checker functionality instead, you can do this by disabling the legacy spellchecker plugin by clicking its eye in Administration > Site administration > Plugins > Text editors > TinyMCE HTML editor > General settings
To spell-check via your browser, type your word (which if incorrectly spelt will have red lines under it) and press right click + CTRL

NOTE: While the default spell engine is Google spell which can be changed in Administration>Site administration>Plugins>Text editors>TinyMCE HTML editor, this is no longer supported by Google and will not work. (Note that it is only visible in IE9 and lower) It is due to be removed. See MDL-38867. In browser spell check is recommended.
If PSpell is selected then aspell 0.50 or later must be installed on your server and the path to aspell set in Administration > Site administration > Server > System Paths.
You can select a different spell engine from Administration> Site administration > Plugins > Text editors > TinyMCE HTML editor>Check spelling

According to: http://php.net/manual/en/book.pspell.php
"As of php 5.3. Pspell is no longer supported/bundled. Instead you can use the enchant which is bundled by default in 5.3."
If PSpell is selected then aspell 0.50 or later must be installed on your server and the path to aspell set in Administration > Site administration > Server > System Paths.
Customising the editor toolbar
An administrator can remove or add buttons to the TinyMCE editor toolbar by altering the Editor toolbar box in Administration>Site administration>Plugins>Text editors>TinyMCE HTML editor>General settings as demonstrated in the screencast Customise the text editor in 2.4
|
|


Available fonts list
In addition to the default fonts, a site administrator can add extra fonts by typing their name and string in the box in Administration > Site administration > Plugins > Text editors > TinyMCE HTML editor>General settings as demonstrated in the screencast How to add extra fonts.

Custom configuration
A setting in Administration>Site administration>Plugins>Text editors>TinyMCE HTML editor>General settings provides a box in which an administrator can apply custom formats. See MDL-37186 for more details with examples, and see also the TinyMCE configuration page


- Example: Moving the toolbar to the bottom:
Add the following:
{"theme_advanced_toolbar_location" : "bottom"}
- Example: Adding your own custom styles.
(This might be useful for example if you want a "house style" for important notes, key points or similar) In the editor toolbar, enter "styleselect" and then in the custom box add the following code, changing it to suit your purposes:
{"style_formats" : [
 {"title" : "Bold text", "inline" : "b"},
 {"title" : "Red text", "inline" : "span", "styles" : {"color" : "#ff0000"}},
 {"title" : "Red header", "block" : "h1", "styles" : {"color" : "#ff0000"}} ]}
The following will let you use bootstrap CSS classes if you use a bootstrap based theme:
   {"style_formats" : [
       {"title" : "Well", "block" : "div", "classes" : "well"},
       {"title" : "Label", "inline" : "span", "classes" : "label"},
       {"title" : "Label - success", "inline" : "span", "classes" : "label label-success"},
       {"title" : "Label - warning", "inline" : "span", "classes" : "label label-warning"},
       {"title" : "Label - important", "inline" : "span", "classes" : "label label-important"},
       {"title" : "Label - info", "inline" : "span", "classes" : "label label-info"},
       {"title" : "Label - inverse", "inline" : "span", "classes" : "label label-inverse"},
       {"title" : "Button", "inline" : "a", "classes" : "btn btn"},
       {"title" : "Button - primary", "inline" : "a", "classes" : "btn btn-primary"},
       {"title" : "Button - info", "inline" : "a", "classes" : "btn btn-info"},
       {"title" : "Button - success", "inline" : "a", "classes" : "btn btn-success"},
       {"title" : "Button - warning", "inline" : "a", "classes" : "btn btn-warning"},
       {"title" : "Button - danger", "inline" : "a", "classes" : "btn btn-danger"},
       {"title" : "Button - inverse", "inline" : "a", "classes" : "btn btn-inverse"}
   ]}
- Example: Enabling copy of rich content with styles from MS Word (tm) and paste into TineMCE without removing important styles:
{"paste_retain_style_properties" : "margin, padding, width, height, font-size,
  font-weight, font-family, color, text-align, ul, ol, li,
  text-decoration, border, background, float, display"}
TinyMCE additional plugins
In Moodle 2.4 and later, the TinyMCE editor can be extended and replaced by new plugins available in the Moodle plugins database. Some of these plugins are:
- Cloze editor module for easily adding Embedded Answers (Cloze) question type.
- Word count prints a word count in the bottom right-hand corner of your TinyMCE editor which updates as you type.
- TinyMCE Mathslate is a Mathematics editor that does not depend on Java.
- YouTube Anywhere enables direct recording and uploading into YouTube from the TinyMCE HTML editor.
See also
Screencasts
TinyMCE text editor improvements.
- Moodle 2.0 HTML Editor - Row 1 MoodleBites video on YouTube
- Moodle 2.0 HTML Editor - Row 2 MoodleBites video on YouTube
- Moodle 2.0 HTML Editor - Row 3 MoodleBites video on YouTube
Dragging/dropping images into the text editor
- You can drag and drop images into the editor in some activities, lika Page, Questions and Labels.
- You can not drag and drop images into a Forum post
- As described by this forum thread.
- See MDL-43996