ELIS Files
ELIS Files-Alfresco Integration
By default, ELIS uses the Open Source Enterprise Content Management System (CMS) by Alfresco.
With our Moodle 2.3 Alfresco-ELIS Files integration, multiple files can be selected and uploaded at one time using the drag and drop feature. Uploads are fast as they utilize FTP (file transfer protocol), which is designed for fast file uploads.
The ELIS Alfresco integration provides for a folder for each user, where instructors, students, etc. can place files which they can access from anywhere on the site. The integration enables Moodle users to access their files via Moodle, using a desktop folder, a WebDAV client, or via an optional embedded java file manager, or by accessing Alfresco's online interface directly.
The repository can be set to enforce a maximum size on user's file directory, and administrators can set up content rules, workflows, metadata, etc. via Alfresco's online interface. Quotas and passwords are set in Moodle.
Why use the Alfresco ECM as the File System for Moodle?
Remote-Learner has vastly improved the ability of Clients to use Alfresco ECMS, a world class content management system, as the main file system for their Moodle sites.
So why would an institution want to use Alfresco as the file system for Moodle? There are number of great reasons; here are just a few.
- Our SSO (single sign-on) integration creates a folder for each user and each course in Alfresco, and your users can login to Alfresco directly using their Moodle password. This provides an enterprise content management system (ECMS) to our customers for a fraction of the usual cost of setup and configuration of an ECMS.
- Alfresco contains versioning capabilities. This means if a teacher or administrator accidentally or purposefully overwrites a file in Moodle (e.g. updates a homework assignment with new content), Alfresco retains both the original version of the file and the updated version in case the teacher or someone else would like to access the original file.
- Alfresco will not actually delete files even if the teacher accidentally deleted it from Moodle. Instead, Alfresco will retain a copy of the deleted file where the site administrator can retrieve it and undelete it in Moodle.
- Alfresco contains rich search capabilities. This enables users to search for file content across all of the various Moodle classes an institution has - they will see only the content they have permission to see. The Alfresco file permissions are automatically set by Moodle's roles system, although the site administrator can override or modify these. This means teachers working in Moodle have a straightforward and efficient way of finding and accessing content saved in Moodle by others via Alfresco. The Moodle file system does not include such file searching capabilities.
- When used with ELIS-2.1+ - our Alfresco implementation supports organizational and sub-organizational folders, where everyone in an organization has certain permissions to view and/or edit the files in the organizational folder.
All of this additional functionality is delivered without changing the teacher’s current user experience with Moodle*. They still navigate to the same place in Moodle that they usually do to both save and open files. They don’t need training or otherwise need to learn new software. Institutions and IT Pros can deliver the same Moodle experience their teachers are accustomed to.
*Teachers and students can also setup desktop folders, WebDAV clients, etc. to batch upload/download and manage files on Linux, Windows, MacOS, iPhoneOS, etc.
Administrator Access
Files in the Alfresco Repository can be managed in two ways, via the Moodle interface or Alfresco interface. A Moodle site administrator can access all the repository files through the Moodle interface and the Alfresco administrator can access all the repository files through the Alfresco interface.
Moodle administrators can access repository files from the site files, course files, or their My files tab on their profile page. Use the "Browse files from" drop down menu at the top of each page to navigate to different repository sections. If a Moodle administrator accesses Alfresco directly using the link in the Alfresco Repository block then they will only have access to their personal space unless the Alfresco administrator has granted them permissions in other spaces of the repository.
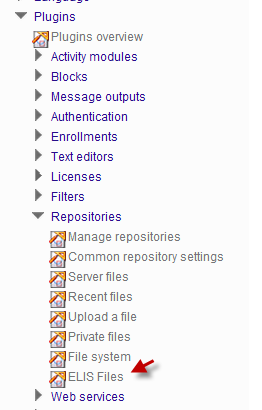
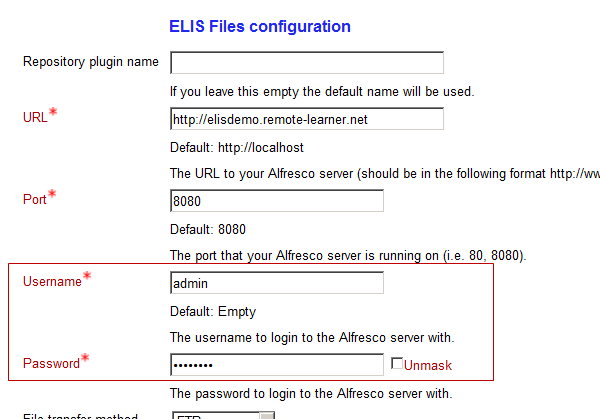
The Alfresco administrator uses a different username and password to access Alfresco. To locate the username and password go to the Administration block > Site Administration > Plugins > Repositories > ELIS files.
On the Settings screen, scroll to the username and password, use the "Unmask" checkbox to view the password.
Go to the Alfresco Repository block and select "this link" to login as the Alfresco administrator. This user has access to all the repository spaces using the Alfresco interface.
User Spaces
User spaces in the repository can be automatically created when a user logs on to the Moodle site for the first time. This feature will be enabled when Alfresco is installed.
To disable the setting go to the Administration block > Site Administration > Plugins > Authentication > Manage Authentication > ELIS Files SSO. Use the eye icon to disable the setting. If disabled, new users will not have Alfresco accounts created when they login to Moodle for the first time.
Users repository spaces will have the same name as their Moodle username. Users can login to the repository by selecting the repository link from the Alfresco Repository block, then enter their Moodle username and password on the Alfresco login screen.
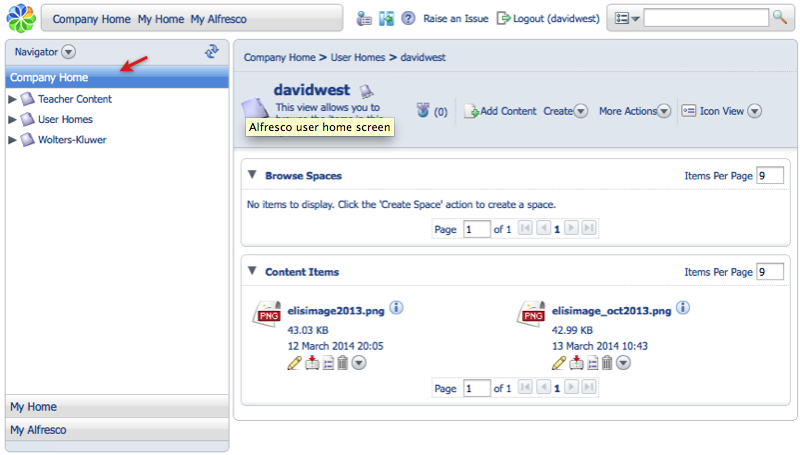
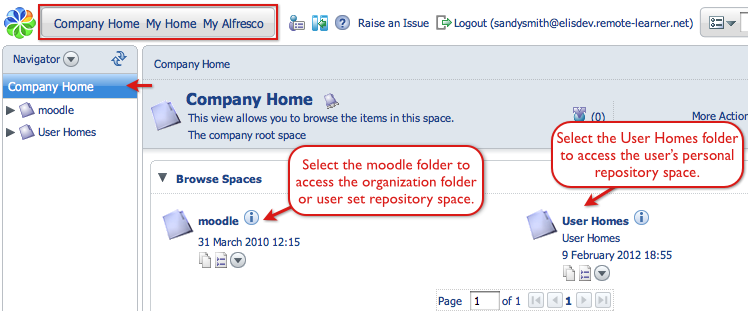
The user spaces are located on the Alfresco Company Home screen. Select the space name to see the contents of that space. A typical student user might only have the User Homes space available on the Company Home screen, and within the User Homes space, they might only have access to their user space. Users can upload files directly to their user space in Alfresco or via the Moodle Interface.
To see all the user spaces in Alfresco, you must be logged in as the Alfresco Administrative user as described previously.
User Profile and Settings
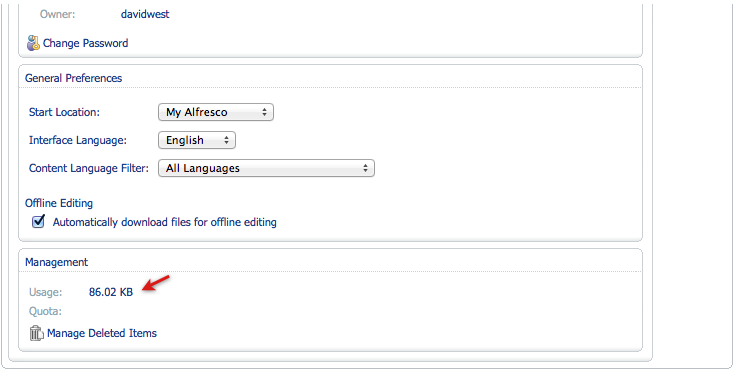
Each user has a user profile screen in the repository. The following image shows the link for that screen. Users can use the user profile screen to change their password, check repository usage, manage deleted items in their trash bin, etc.
Course Spaces
When a user accesses the repository course files for a Moodle course, a course space is automatically created in the Alfresco Repository for that course. The course space will be named the Moodle course short name.
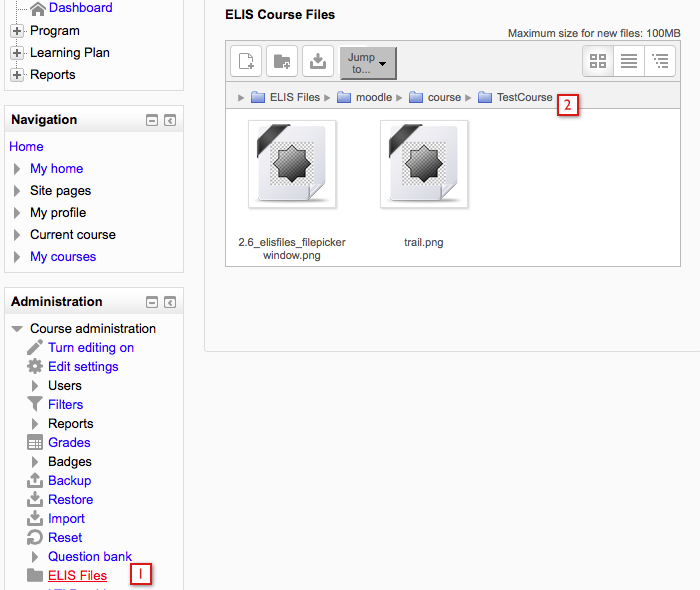
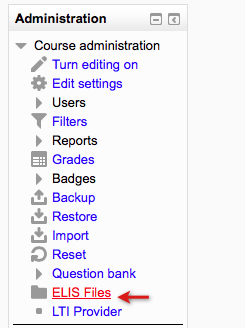
The course spaces can also be accessed via Moodle. Go to the Moodle course > Administration block > ELIS Files link. The link will open the repository course space.
- The ELIS Files link in the Course administration menu
- Selecting the ELIS files link in the Course Administration menu opens the course repository space. Note that the course shortname is displayed - this will also be the name of the course files space in Alfresco.
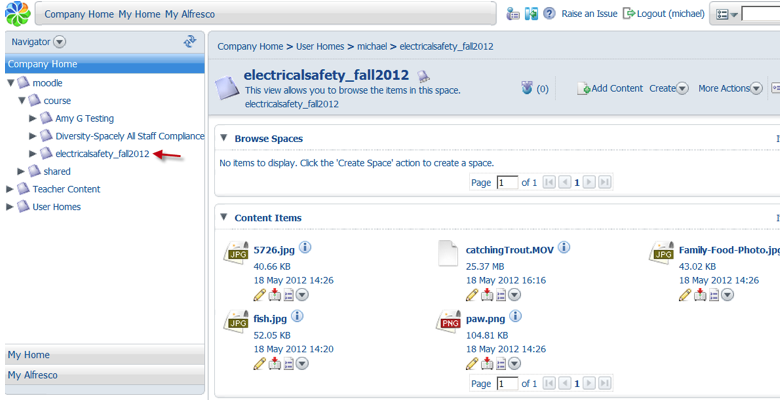
If you access Alfresco directly via the Alfresco Repository block link, the course spaces are located on the Company Home screen, shown in the image. Select the space name to see the contents of that space. The Course Files for the Electrical Safety course are identified by the unique Moodle shortname:
Uploading Files
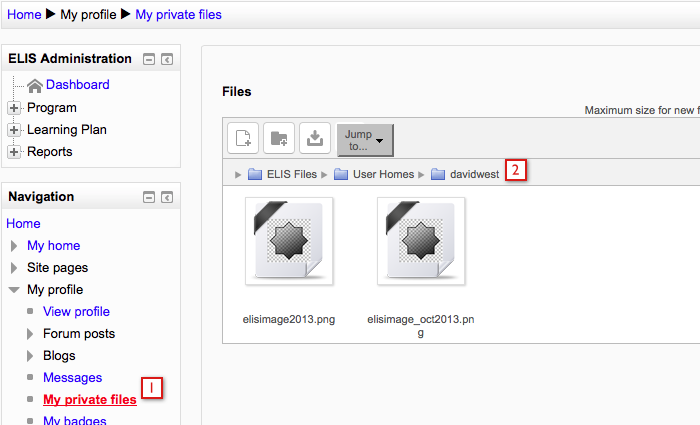
Files can be uploaded to the repository from either the My private files link or from the ELIS Files link in a course. To upload files using the My private files link go to the Navigation block > My profile > My private files.
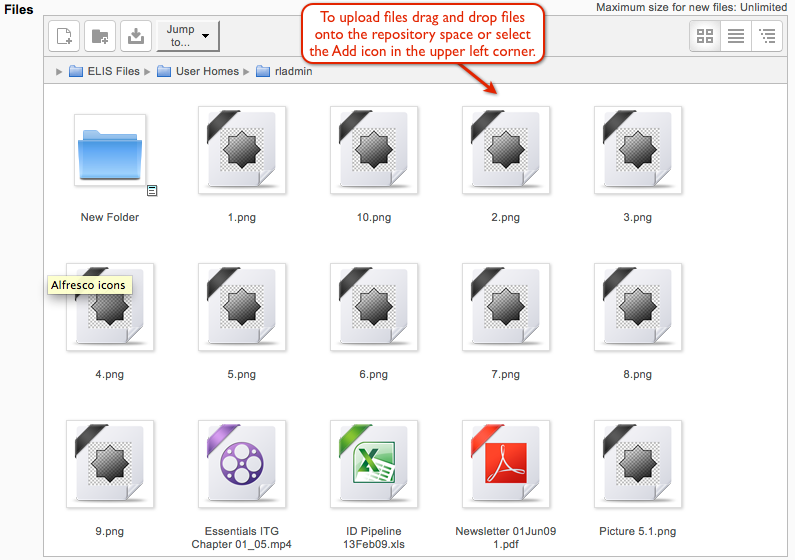
The "default file browsing location" setting determines where the file system opens. To edit the setting go to the Administration block > Site Administration > Plugins > Repositories > ELIS Files > Default file browsing location. In this example it is set to ELIS User Files so when a user opens the files interface they will see their personal repository space. To move to different repository spaces use the "Jump to..." menu.
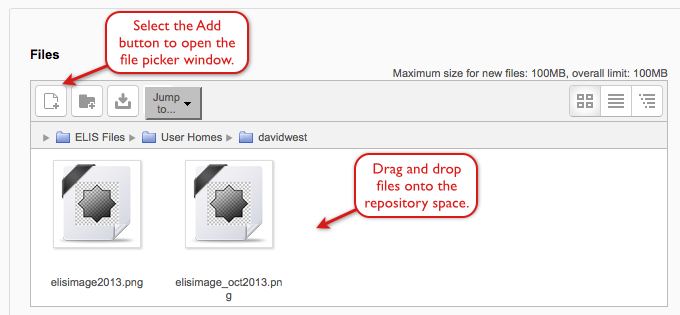
To upload files use the "Add" button to open the file picker window or drag and drop files from your desktop onto the repository space.
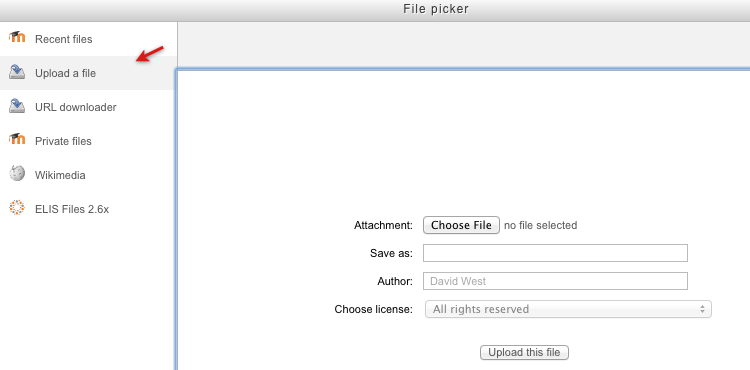
Using the "Add" button opens the file picker where you can upload a new file. Files can also be moved/copied from another repository space by going to the ELIS Files link in the file picker menu on the left hand side of the page.
Files can also be uploaded to the repository via the ELIS Files link in a course. Go to a course home page then go to the Administration block > Course Administration > ELIS Files.
The ELIS Files link in a course is only visible if the user has the View course level content permission allowed (repository/elis_files:viewcoursecontent). This permission is separate from the main group of ELIS permissions, it is in a section below the course permissions.
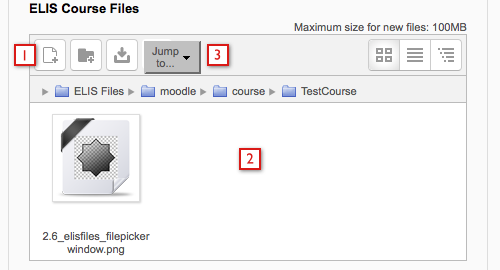
The ELIS Files link will open on the course repository space.
- Add - Select the Add button to open the file picker window. From the file picker window files can be uploaded to the space, or files can be moved/copied to the space from another repository space.
- Drag and drop - Drag and drop files from your desktop onto the repository space to upload the files.
- Jump to - Use the Jump to drop down menu to link to other repository spaces, and upload or move files to the selected space.
Auto-Creating User Set Spaces in the Repository
Some organizations want to have spaces where members of that organization can share and edit files. For example an Academic Department working on policy or program, a Corporate Division working on policy files, educational content for the division, etc. When Alfresco is coupled with Remote-Learner's ELIS Program Management system, spaces for organizations and sub-organizations can be created automatically as described below.
Organization spaces in the repository are automatically created when
- A user set is assigned a User Set Classification that has the "Automatically create an ELIS Files User Set shared folder" feature enabled and
- A user is assigned to the user set.
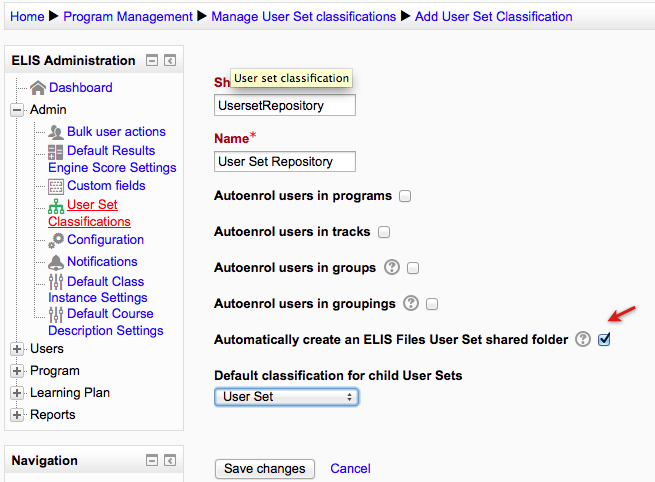
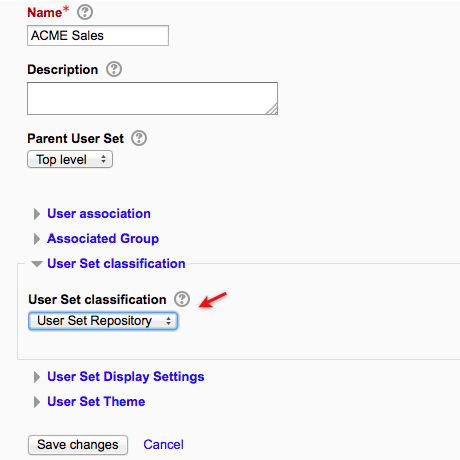
To setup a User Set classification go to the ELIS Administration block > Admin > User Set Classification. Create a new user set classification and enable the "Automatically create an ELIS Files User Set shared folder" setting.
Create a user set and assign the new User Set classification to it. Note - existing user sets that belong to a classification that you enable ELIS files shared folder creation for will also now have user set shared spaces created in Alfresco.
User sub-sets can also be setup with User Set Classifications that will create spaces in the repository. User sub-sets will create their own spaces that will be located in the same folder as the user set spaces in the repository, not as a sub-folder of the user set space.
Once the user set has been created and a user has been assigned to the user set, the shared ELIS Files user set space will be created in the repository. The space name will be the name of the user set.
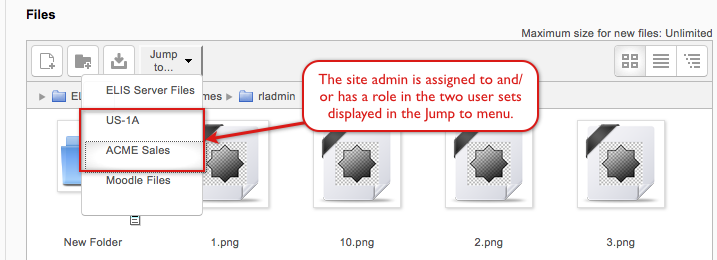
The site admin can view the user set repository spaces in the Jump to drop down menu if they are assigned to the user set or if they are assigned a role in the user set.
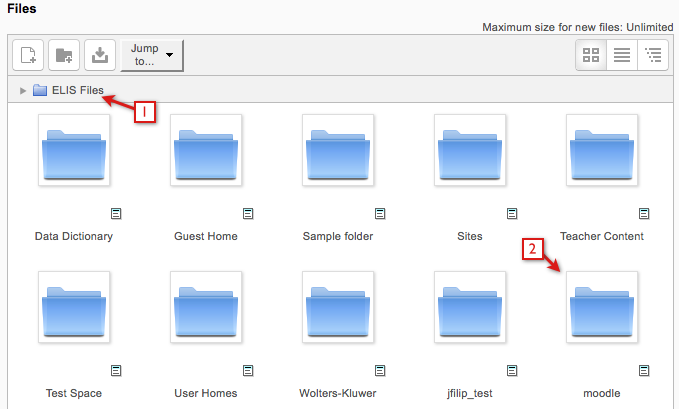
The site admin could access all user set repository spaces by using the ELIS Files breadcrumbs even if they have no assignment/roles in the user sets. Go to the Navigation block > My profile > My private files. Then in the breadcrumbs section select ELIS Files, select the moodle folder, and then select the userset folder.
Users other than site administrators will need to be assigned permissions via a role assignment to view the user set repository space. For example, edit the student or authenticated user role to allow the 'view shared user set content' capability. This would allow the student user access to shared user set content in user sets they are assigned to.
Accessing User Set Spaces
Users other than site administrators will need to be assigned a user set role with repository permissions in order to access the user set space. To demonstrate how this works we will:
- Create a role that allows ELIS Files permissions for a user set
- Assign a user the role in the test user set "Sales"
- Login as the user and access the ELIS Files space.
Creating a role with User Set files permissions:
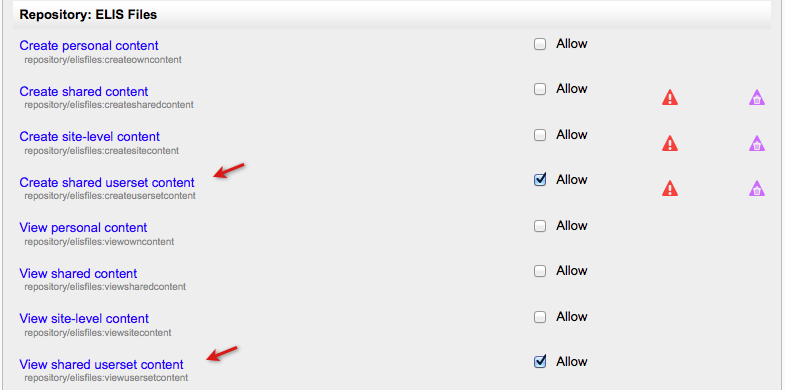
To create a new role go to the Administration block > Site Administration > Users > Permissions > Define roles and select the Add a new role button at the bottom of the page. Allow the following permissions in the ELIS Files Repository section:
- Create shared user set content - repository/elisfiles:createusersetcontent
- View shared user set content - repository/elisfiles:viewusersetcontent
These permissions could also be added to an existing role. For example, this test site gives ELIS Files permissions to the Authenticated user role. The "View shared user set content" permission could be assigned to the Authenticated user role, then any user set the user is assigned to will be visible in ELIS Files.
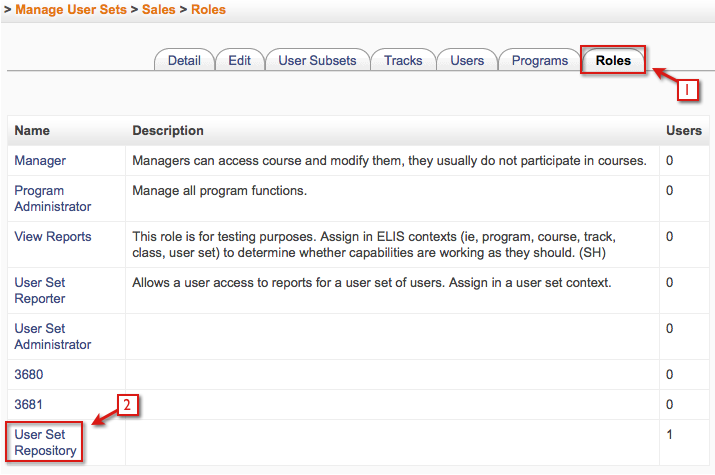
On the the Roles tab of the user set with repository space assign a new user to the new role.
In the above example we added the Repository permissions to the role "User Set Repository". On the roles table of a user set (in this example Sales) click the name of the role and assign a user to it. Login as the user. Access the repository using any of the ways described above.
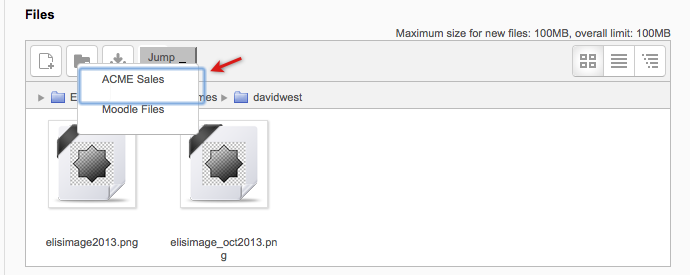
Shown in the next image is a user's ELIS Files space. The Jump to menu has links to the ACME Sales user set repository space or to the user's Moodle Files space.
Now in My private files the user can navigate to the shared user set space and view and access files.
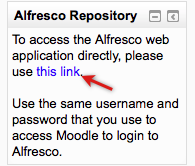
This user could also navigate to these spaces in Alfresco directly. To do so the user goes to the Alfresco Repository block and selects "this link".
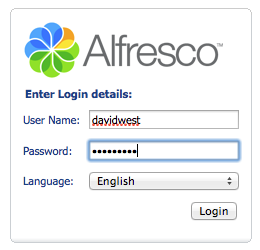
Enter the Moodle username and password to login to Alfresco.
In Alfresco you can navigate to the shared organization/user set space by selecting the Company Home link > moodle folder > organization folder and then the user set folder. The user's space/folder can be accessed from the My Home link or Company Home > User Homes folder.
Storage Quota
ELIS Files enables administrators to set a file size quota in the Repository administration interface. To access this from the site home page go to the Administration block > Site Administration > Plugins > Repositories > ELIS Files. Select the Save Changes button at the bottom of the screen to save any changes made.
If a user fills up their storage space to the limit of their quota, ELIS provides them with an error message when they try to upload files.
Users can check their repository usage as follows:
Login to Alfresco with Moodle username and password. Use the link in the Alfresco Repository block to login to Alfresco.
Select the User Profile icon.
User Profile and Settings:
At the bottom of the image in the Management section, the usage and quota information is given.
If a user file is deleted from the repository by a user other than the owner of the file, the user's repository space usage will not be updated to reflect that file being deleted. The file space will still be counted as being used, and the user will not see the file or have access to it. To prevent this only the owner of the space should delete files from a space.
Adding Repository Spaces
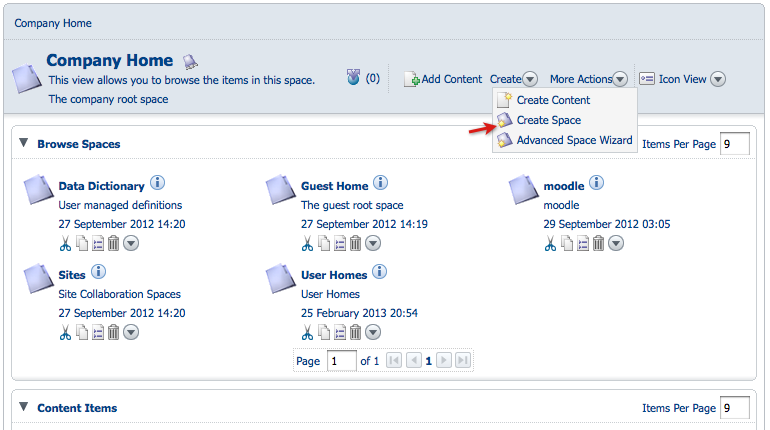
This page demonstrates how users can create spaces in Alfresco, users must login to Alfresco directly to create additional spaces. Use the Alfresco Repository block and your Moodle username and password to access Alfresco. For full access to the Alfresco repository login with the Alfresco username and password at Administration block > Site Administration > Repositories > ELIS Files > username and password section. Admin users can create spaces on the Company Home page, student users can create spaces within their space only. The following examples will be showing the company home page viewed by an admin user.
Creating Spaces
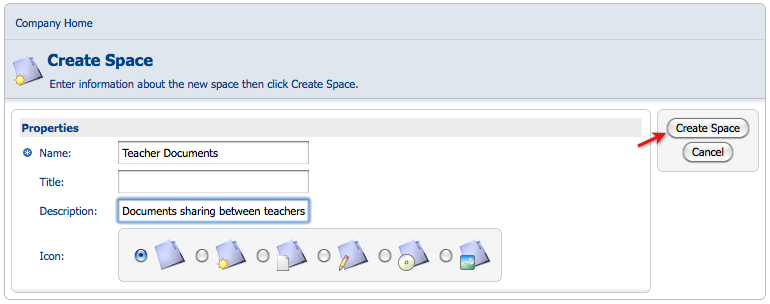
This space will be created so teachers can share documents with other teachers. The teachers must be added to the space so they have access to the documents within it.
The Create drop down menu, shown in the first image, has the link to create spaces. Enter a name for the space, the title and description are optional entries.
Once the space is created, files can be uploaded to the space or files can be moved to it from another space.
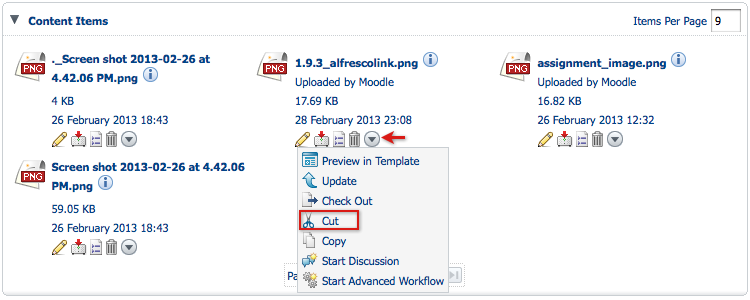
Moving Content to SpacesThere are two ways to move content, cut or copy. Cut will remove the item from one space and then it can be added to the another space. I want to remove this item from the content section so I'm selecting cut.
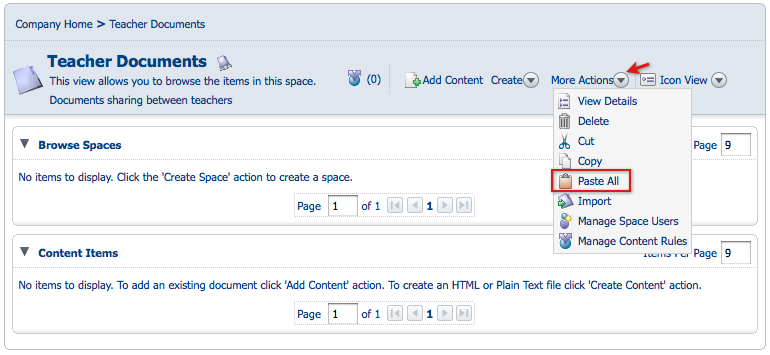
Next I select the space I want to move this content item to, in this case it will be the new Teacher Documents space. Go to the More Actions drop down menu and select Paste All.
Advanced Spaces
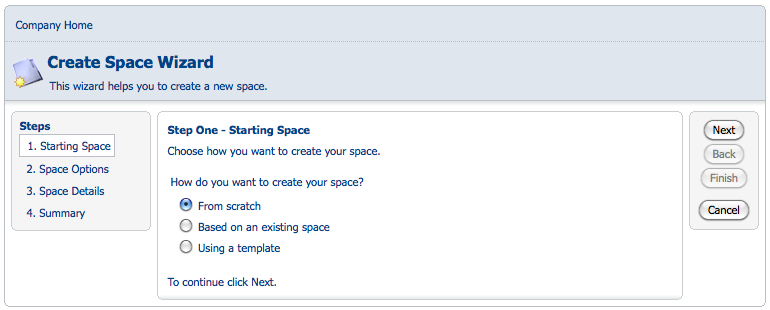
Advanced Spaces are created from the 'Create' drop down menu on the company home screen (shown on the first image of this page). The advanced space wizard has a 4 step process, shown in the left hand column of the image below.
Manage Repository Space Users
Users can be assigned to course spaces and other user's spaces in the repository. When adding users to the spaces, the users roles are assigned for that space.
This page shows an example of a repository space for teacher documents. We will add a user to this space. Managing users for a user space is done in the same way, except we would be starting from a User space instead of the Teacher Document space.
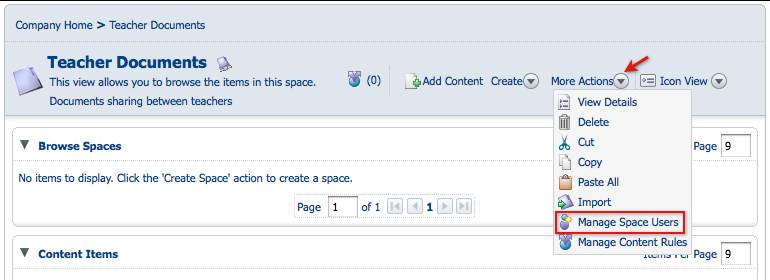
The following image shows the space Teacher Documents. Next we'll go to the More Actions menu, scroll down the list, and select Manage Space Users as shown in the next image. The View Details link from the same drop down menu will have a list of actions available also.
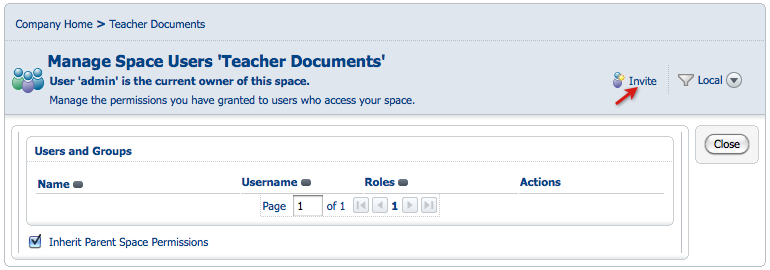
A new screen opens, Manage Space Users 'Teacher Documents'. To the right of this is the Invite link marked by the red arrow in the following image. Select the Invite link to manage users in the space.
The Invite link opens up a 3 step manage users wizard.
Step 1:
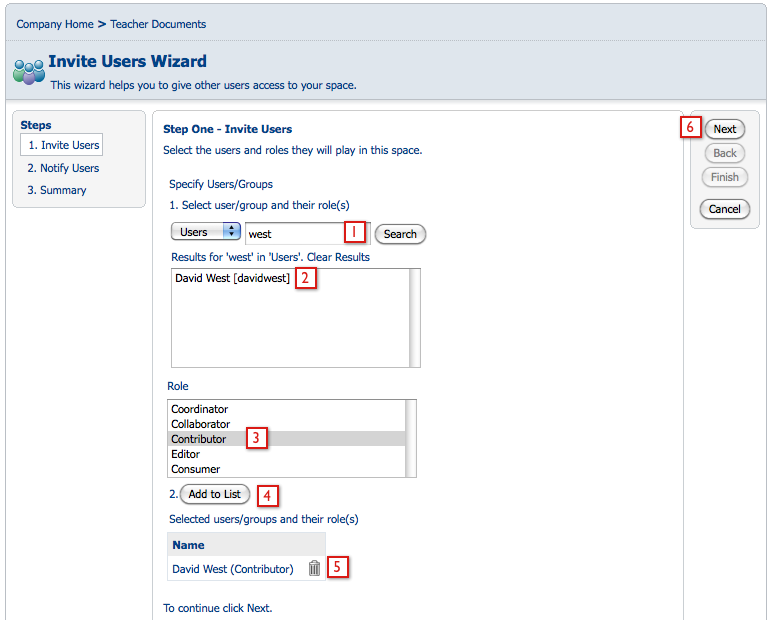
A (1)search will have to be performed to find a user/users to invite to the space. Once the user/users are (2)selected, choose the (3)role to be assigned to the user/users. Multiple users can be selected at once here. Select the (4)Add to list button to finish assigning the user to the role for the space. The user is added to the (5)selected users area. Select the (6)Next button on the right hand side of the screen to go to the next step.
Step 2:
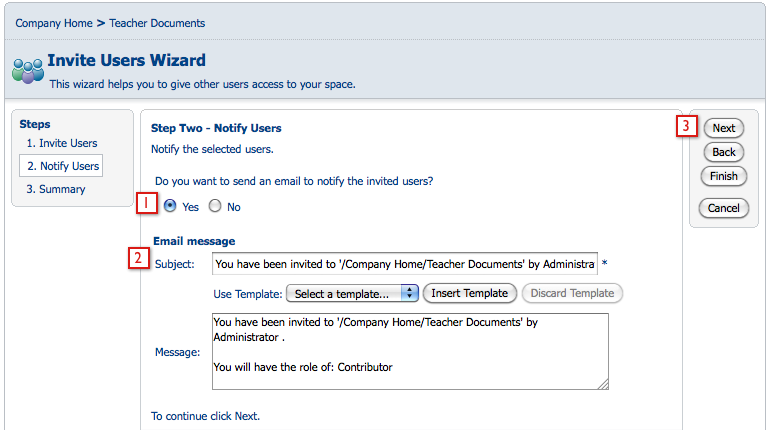
Choose (1)yes or no for email notification. Editing the (2)email message is optional. Select the (3)Next button to continue to the next step.
Step 3:
Step 3 provides a summary of the users added along with their roles in the space. Select the Finish button to complete the role assignment.
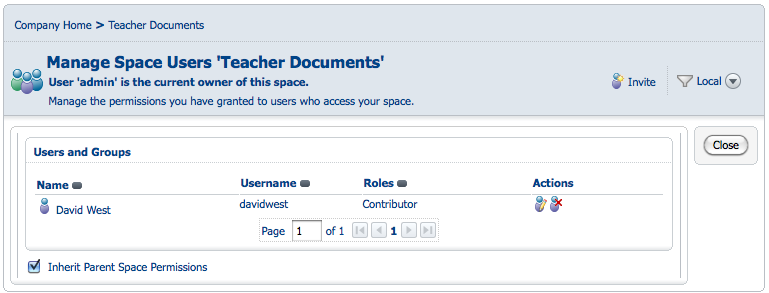
The following image is showing the updated view of the users for this space.
The users added to this space will be able to access this folder when they login to the repository. This folder will not be displayed in user's space, but users can search for the space or locate it on the Company Home screen in this instance.
The search window is located in the upper right hand corner of the screen. Use the drop down menu to narrow the items searched or to perform an advanced search.
