Managing blocks: Difference between revisions
(→Instances: add link to Manage blocks) |
(→Block deletion: "usually no reason" because... :)) |
||
| Line 21: | Line 21: | ||
==Block deletion== | ==Block deletion== | ||
Any block can be deleted using the link in the delete column. There is no reason for standard blocks to be deleted, however non-standard blocks may need to be deleted before upgrading. | Any block can be deleted using the link in the delete column. There is usually no reason for standard blocks to be deleted (they are usually hidden), however non-standard blocks may need to be deleted before upgrading. | ||
Note: To delete a block completely, in addition to deleting it on the blocks page, you also need to remove/delete the actual block folder from the ''moodle/blocks'' folder, otherwise Moodle will reinstall it next time you access the site administration. | :''Note:'' To delete a block completely, in addition to deleting it on the blocks page, you also need to remove/delete the actual block folder from the ''moodle/blocks'' folder, otherwise Moodle will reinstall it next time you access the site administration. | ||
==Block settings== | ==Block settings== | ||
Revision as of 13:45, 18 September 2011
Location: Site Administration > Plugins > Blocks > Manage Blocks
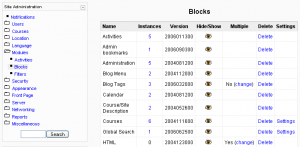
The blocks administration page enables administrators to manage installed blocks and their settings.
Hiding a block
The hide/show column allows selected blocks to be hidden i.e. they do not appear in any course "Add a block" dropdown menu and cannot be used in any course. To hide a block, click the eye icon so that it changes to a closed eye.
To reduce the length of course "Add a block" dropdown menus, you should hide blocks which will not be used, such as global search (unless you have enabled the global search feature in Administration > Miscellaneous > Experimental), mentees (unless you have added a mentor role) and network servers (unless you are using Moodle Network|Moodle Networking).
Instances
The blocks page also lists the number of instance for each block. Clicking on a number results in the list of courses containing that block being displayed. See Managing blocks for configuration settings that might be of interest to a site administrator or someone with Front Page editing permissions.
Multiple blocks
Some blocks, such as the HTML block, can be used more than once on a course page. You can choose whether or not to allow this by clicking the change link in the Multiple column.
Block deletion
Any block can be deleted using the link in the delete column. There is usually no reason for standard blocks to be deleted (they are usually hidden), however non-standard blocks may need to be deleted before upgrading.
- Note: To delete a block completely, in addition to deleting it on the blocks page, you also need to remove/delete the actual block folder from the moodle/blocks folder, otherwise Moodle will reinstall it next time you access the site administration.
Block settings
A few blocks have additional settings, which can be accessed via the links in the settings column.
Blocks (administrator) list
In edit mode, a Moodle page can show a block which contains a list of blocks that are available to add in that context for a role. There are special blocks only available to Administrator.
Examples of context include a Site's front page or a Course's main page. Teacher blocks are available to administrators in their contextual pull down menus.
The list below only includes those blocks available to administrator. All of these are available on the frontpage, only Admin bookmarks and Network Servers are found on the course level.
|
Contributed blocks
In addition to using the blocks included in the standard download, other Moodlers have developed their own blocks which they share with the Moodle community. You can download these contributed blocks from the Moodle.org Modules and plugins database.
Warning: Be aware that contributed blocks may have quality issues, may not work correctly, and may not work when you upgrade Moodle. You should test them thoroughly before using them and be prepared to uninstall them before upgrading.

