ELIS Programs: Difference between revisions
(Replaced content with " Category: ELIS Category: ELIS Programs") |
No edit summary |
||
| Line 1: | Line 1: | ||
<h3> <font size="4">Creating/Editing Programs</font></h3><br />Click on the Manage Programs link to create a new Program and or to edit the Programs you have already created.<br /><br />[[Image:elis_pmblock_manageprograms.png|frame|center|]]<br />If you have already defined Programs in your site, you will see the Programs listed here. The following image shows the manage Programs screen, the Programs names are listed in the left hand column. The icons will link to specific screens of each Program. Select one of the Add Program buttons to add a new Program, the buttons are located directly above and below the Programs list.<br /><br />[[Image:elis_manageprograms_page.png|frame|center|]]<br />When you click the Add Program button above, you will see the Add Program screen:<br /><br />[[Image:elis_addprogram_page.png|frame|center|]]<br />The following settings can be entered on the add Program screen:<br /> | |||
<ul> | |||
<li>ID Number - This field is required. The id number will display in reports.</li> | |||
<li>Name - This field is required.</li> | |||
<li>Long Description - A complete and thorough description will help administrators, teachers and students know if this Program is correct for them.</li> | |||
<li>Required Credits - The number of credits the learner must receive before the Program is complete.</li> | |||
<li>Display Priority - The lower the priority number, the higher the Program will display in the user's Learning Plan folder.</li> | |||
<li>Time to complete - The amount of time a user has to complete a Program once assigned to it. For example, enter 18m for 18 months.</li> | |||
<li>Expiration (not shown--must be enabled by administrator (Program Administration > Admin > Configuration)) - The frequency the Program must be completed, if necessary. For example, enter 4y for 4 years. The format for entries in the last two fields is described below them, shown in the image above.</li> | |||
<li>Archive Settings - Set to no, this Program will appear in the Learner Dashboard under the Current Learning Plans tab. Set to yes, this Program will appear in the Learner Dashboard under the Archived Learning Plans tab. The image below shows that the Program "Product Support Technician" has been marked as "Archived" and now appears in the Archived Learning Plans in the Learner Dashboard. This setting was created to alleviate confusion for users who had years of Learning Plan to navigate through. <span style="font-weight: bold;">When a Program is no longer in use, the Program administrator can simply mark it as archived.</span></li> | |||
<li>Program Fields - Custom Categories and fields can be created and added to Program when organizations need more information to be added to configuration screen. Custom fields can be added at Program Management > Admin > Custom Fields > Programs tab.<br /></li> | |||
</ul>The help icons link to a pop-up window with information about each field.<br /><br />Learner Dashboard: Archived Learning Plans tab selected:<br />[[Image:elis_archived_learningplanstab.png|frame|center|]]<br /> | |||
<h3>Bulk User Enrollment and Removal for Programs</h3><br />The following image is showing the Users tab of the Project Management program. When selecting the Users tab it opens on the Currently Assigned screen, which shows users assigned to the program already. To assign users to the program select the Assign Students link.<br /><br />[[Image:elis_manageusers.png|frame|center|]]<br />On the Assign Students screen there is a list of users that can be assigned to the program. Above the list of users are the filters. The filters are configurable, so you can add just the filters you will use. <br /> | |||
<ol> | |||
<li>To add a filter select the Add button and select the filter you want added to the list. ELIS custom user fields are added to the list of filters that can be selected.<br /></li> | |||
<li>To use a filter just click on the filter, then you can enter text or in some instances there will be a drop down menu that can be used as well. <br /></li> | |||
<li>To delete a filter select the X on the right hand side of the filter box.</li> | |||
</ol><br />[[Image:elis_manageusers.png|frame|center|]]<br />In the following example I selected the City/town filter and selected Omaha from the drop down menu. As soon as I select the Omaha checkbox the user list automatically filters to users in Omaha. If I was entering text, the filter would start filtering users as soon as I type a letter. <br /><br />To assign users:<br /> | |||
<ol> | |||
<li>Select the Assign icon located on the right hand side of the user row. Selecting the Assign icon opens a confirmation message, select the green check icon to confirm the assignment and proceed.</li> | |||
<li>Drag and drop users into the Bulk Assignment box on the bottom of the screen. Multiple users can be selected at once by using Shift + Select or Control + Select. <br /></li> | |||
<li>If you want all the users shown added to the Bulk Assignment box select the Add All Search Results button.</li> | |||
</ol> | |||
<br />[[Image:elis_manageusers.png|frame|center|]]<br /> | |||
<p>Once users are added to the Bulk Assignment box:</p> | |||
<ol> | |||
<li> The users can all be assigned at the same time by selecting the Assign link. Selecting the Assign link opens a confirmation message, select the green check icon to confirm the assignment and proceed.<br /></li> | |||
<li>Individual users can be removed from the list by selecting the <font color="#FF0000">X</font> icon next to their name. You have to hover over the user's row before the <font color="#FF0000">X</font> icon will appear.<br /></li> | |||
<li>All users can be removed from the bulk assignment list by selecting the Clear button.<br /></li> | |||
</ol><br />[[Image:elis_manageusers.png|frame|center|]]<br />After assigning users they are added to the Currently Assigned screen. From this screen users can be removed from the program in the same way they were added. Select the (1) Unassign icon at the right hand side of the user row or use the (2) Bulk Edits box to unassign users. There will always be a (3) confirmation message before users are assigned or unassigned.<br /><br />[[Image:elis_manageusers.png|frame|center|]]<br /> | |||
[[Category: ELIS]] [[Category: ELIS Programs|EAAb]] | |||
[[Category: ELIS]] [[Category: ELIS Programs]] | |||
Revision as of 19:18, 26 February 2014
Creating/Editing Programs
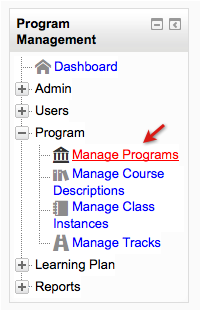
Click on the Manage Programs link to create a new Program and or to edit the Programs you have already created.
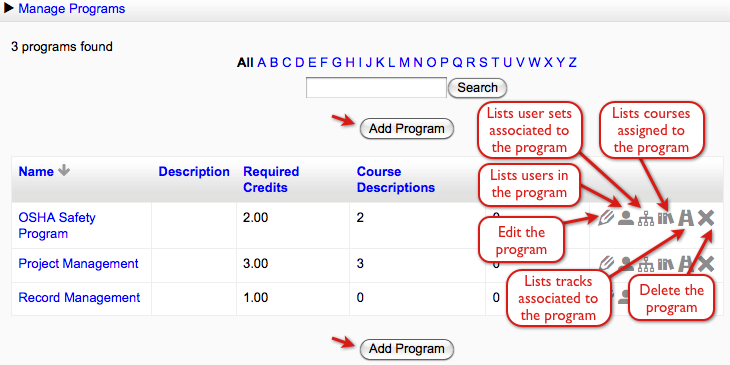
If you have already defined Programs in your site, you will see the Programs listed here. The following image shows the manage Programs screen, the Programs names are listed in the left hand column. The icons will link to specific screens of each Program. Select one of the Add Program buttons to add a new Program, the buttons are located directly above and below the Programs list.
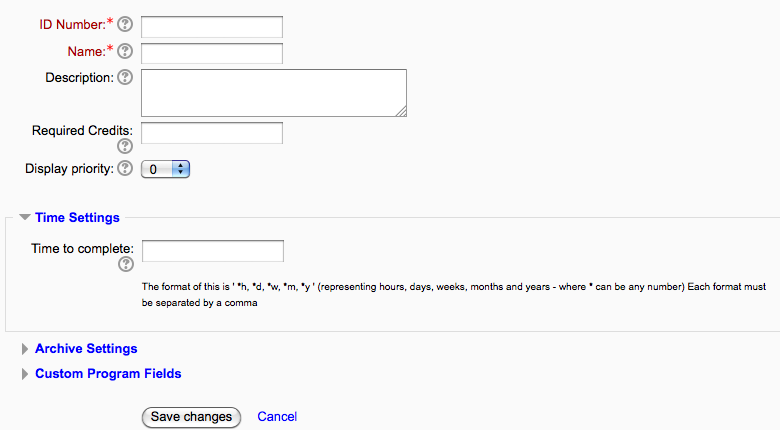
When you click the Add Program button above, you will see the Add Program screen:
The following settings can be entered on the add Program screen:
- ID Number - This field is required. The id number will display in reports.
- Name - This field is required.
- Long Description - A complete and thorough description will help administrators, teachers and students know if this Program is correct for them.
- Required Credits - The number of credits the learner must receive before the Program is complete.
- Display Priority - The lower the priority number, the higher the Program will display in the user's Learning Plan folder.
- Time to complete - The amount of time a user has to complete a Program once assigned to it. For example, enter 18m for 18 months.
- Expiration (not shown--must be enabled by administrator (Program Administration > Admin > Configuration)) - The frequency the Program must be completed, if necessary. For example, enter 4y for 4 years. The format for entries in the last two fields is described below them, shown in the image above.
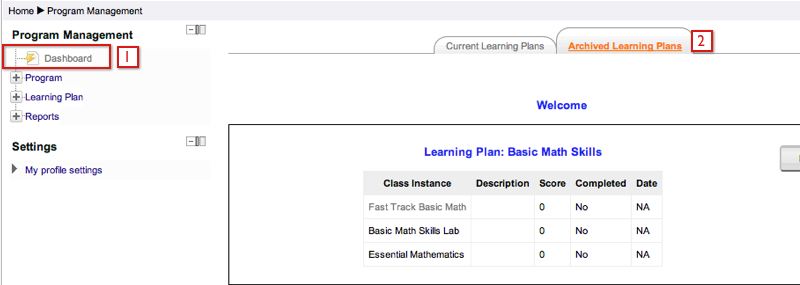
- Archive Settings - Set to no, this Program will appear in the Learner Dashboard under the Current Learning Plans tab. Set to yes, this Program will appear in the Learner Dashboard under the Archived Learning Plans tab. The image below shows that the Program "Product Support Technician" has been marked as "Archived" and now appears in the Archived Learning Plans in the Learner Dashboard. This setting was created to alleviate confusion for users who had years of Learning Plan to navigate through. When a Program is no longer in use, the Program administrator can simply mark it as archived.
- Program Fields - Custom Categories and fields can be created and added to Program when organizations need more information to be added to configuration screen. Custom fields can be added at Program Management > Admin > Custom Fields > Programs tab.
The help icons link to a pop-up window with information about each field.
Learner Dashboard: Archived Learning Plans tab selected:
Bulk User Enrollment and Removal for Programs
The following image is showing the Users tab of the Project Management program. When selecting the Users tab it opens on the Currently Assigned screen, which shows users assigned to the program already. To assign users to the program select the Assign Students link.
On the Assign Students screen there is a list of users that can be assigned to the program. Above the list of users are the filters. The filters are configurable, so you can add just the filters you will use.
- To add a filter select the Add button and select the filter you want added to the list. ELIS custom user fields are added to the list of filters that can be selected.
- To use a filter just click on the filter, then you can enter text or in some instances there will be a drop down menu that can be used as well.
- To delete a filter select the X on the right hand side of the filter box.
In the following example I selected the City/town filter and selected Omaha from the drop down menu. As soon as I select the Omaha checkbox the user list automatically filters to users in Omaha. If I was entering text, the filter would start filtering users as soon as I type a letter.
To assign users:
- Select the Assign icon located on the right hand side of the user row. Selecting the Assign icon opens a confirmation message, select the green check icon to confirm the assignment and proceed.
- Drag and drop users into the Bulk Assignment box on the bottom of the screen. Multiple users can be selected at once by using Shift + Select or Control + Select.
- If you want all the users shown added to the Bulk Assignment box select the Add All Search Results button.
Once users are added to the Bulk Assignment box:
- The users can all be assigned at the same time by selecting the Assign link. Selecting the Assign link opens a confirmation message, select the green check icon to confirm the assignment and proceed.
- Individual users can be removed from the list by selecting the X icon next to their name. You have to hover over the user's row before the X icon will appear.
- All users can be removed from the bulk assignment list by selecting the Clear button.
After assigning users they are added to the Currently Assigned screen. From this screen users can be removed from the program in the same way they were added. Select the (1) Unassign icon at the right hand side of the user row or use the (2) Bulk Edits box to unassign users. There will always be a (3) confirmation message before users are assigned or unassigned.
