Installing Moodle on SmarterASP.NET
Background
Often teachers and administrators want to use Moodle in a live shared web hosting environment instead of a private local computer install. Many hosting companies such as Go Daddy have a one-click install of Moodle. In the case of Go Daddy, they install Moodle 1.9 (as of 2/18/2013) but what if you want to run a later/newer version of Moodle or your web hosting company doesn't support Moodle one-click installs? This installation guide will walk you through the steps to install the latest version Moodle on SmarterASP.NET shared web hosting.
- General Moodle Install instructions, see install Moodle
- Reference video on installing Moodle, New Video Tutorial- How to Install Moodle on Shared Hosting via cPanel (Not Fantastico)
Obtain Domain Name
- Identify a desired domain name, for example www.journeyeducation.org or www.ccsdcurriculum.com
- If available, purchase domain from SmarterASP.NET or some other hosting company. Typical cost is $10 a year.
Purchase Web Hosting
- obtain web hosting account on SmarterASP.NET (if you like this tutorial, please support me by purchasing through my affliliate account)
- I purchased the .NET Premium shared hosting for $7.95 a month ($95.40 a year)
Configure Domain Name Server (DNS)
- If you purchased your domain from another hosting company, you will need to login to the control panel of that hosting company and have the DNS entry point to the SmarterASP.NET servers, ns1.dns-ez.com & ns2.dns-ez.com
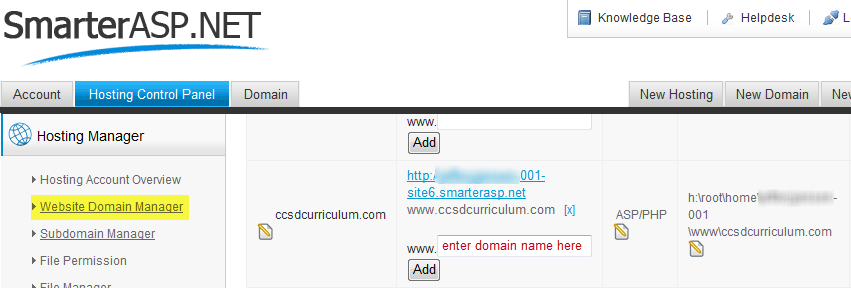
- login to SmarterASP.NET control panel add new site in the Hosting Manager → Website Domain Manager → Add New Site
- Website/Folder Name: ccsdcurriculum.com
- Programming Language: PHP
- rename site5 to ccsdcurriculum.com
- add domain www.ccsdcurriculum.com to site5

Create MySQL database
- login to the SmarterASP.NET control panel and navigate to Hosting Control Panel → Database Manager → MySQL Manager → click Create New Database
- enter a portion of the database name and a password
- write down the connection string info (Database Name, Server URL, Login Name and Password) as this will be used when creating the config.php file


Create website directory and moodledata subdirectory
- login to SmarterASP.NET control panel
- Hosting Control Panel → Hosting Manager → File Manager → New Folder and recommend giving it the same name as your domain name, i.e. ccsdcurriculum.com
- create a New Folder under ccsdcurriculum.com called moodledata. Note this SmarterASP.NET uses Windows Hosting so you cannot change permission like on linux systems using chmod 775
Setup FTP account
- Goal is to create an ftp account to transfer local files to SmarterASP.NET
- login to SmarterASP.NET control panel
- Hosting Control Panel → Hosting Manager → FTP Users Manager → Add FTP User. Enter a user name and password.
- Unable to create a ftp account at the root level with SmarterASP.NET, need to create a subdirectory. Recommend naming the file directory name the same as your domain name, for example ccsdcurriculum.org.
Setup subdomain ftp.ccsdcurriculum.com
- login to SmarterASP.NET control panel
- Hosting Control Panel → DNS Manager
- select domain name and click Manage button
- edit CNAME record to ftp.ccsdcurriculum.com and point this to the SmarterASP.NET ftp server IP address 208.118.63.62
Download Moodle
- download zip version of moodle, moodle-2.4.1.zip in my case, don't use the windows installer one because this includes apache, PHP and other server stuff which is not needed on a shared hosting environment.
- Typically shared hosting companies do not allow remote desktop access (windows) or telnet shell access (linux) to manually download files to the server.
Upload zip version of Moodle to web hosting
- Need to use an ftp client such as FileZilla or UltraEdit to upload the zip file.
- Example, ftp.ccsdcurriculum.com and enter the ftp account info above for the username and password.
- Then use SmarterASP.NET to File Manager from the control panel to unzip the file.
Check PHP Version Installed
- create a text file called phpinfo.php and type in the following code. Save and upload file via ftp to the SmarterASP.NET webserver, e.g. www.ccsdcurriculum.com/phpinfo.php
<?php
phpinfo();
?>
- if it returns 5.2.12 (default as of 2/18/2013 on smarterasp.net) then need to update the PHP version
- also see Installation FAQ - PHP - is it installed and what version do I have?
$CFG->dbtype = 'mysql'; // mysql or postgres7 (for now)
$CFG->dbhost = ; // eg localhost or db.isp.com
$CFG->dbname = 'moodle'; // database name, eg moodle
$CFG->dbuser = ; // your database username
$CFG->dbpass = ; // your database password
$CFG->prefix = 'mdl_'; // Prefix to use for all table names
Other variables must be defined as follows:
$CFG->wwwroot = 'http://www.';
$CFG->dirroot = '/homepages/12/d123456789/htdocs/yourdirectory';
$CFG->dataroot = '/homepages/12/d123456789/htdocs/moodledata';
So far, this gets me into the Moodle setup program on the server, but I get errors when trying to install Moodle. It can't seem to correctly set up the database. Please edit this page to provide more information to the many users of 1and1. Thank you.
In my experience you need to add .htaccess file which contains this line AddType x-mapp-php5 .php to your moodle folder as described in Installation hangs when setting-up database tablesFAQ.
You also need to use a MySQL 5.0 database for moodle 1.8.
I can confirm the above. I struggled with a fresh installation of Version 1.9 with a MySQL 5.0 db set up. The addition of AddType x-mapp-php5 .php as a single entry in the .htaccess file of the moodle directory solved the problem - the unattended installation worked well without error.
I also can confirm the above - mostly. I had trouble to start with because I didn't understand how the 1and1 MySql setup worked and because I took the above instructions literally, thinking that I shouldn't fill in the dbhost, dbuser and dbpass.
Here are my settings in config.php - munged a bit for security, but you get the idea:
<config.php>
$CFG->dbtype = 'mysql'; // mysql or postgres7 (for now)
$CFG->dbhost = 'db8954.perfora.net'; // eg localhost or db.isp.com
$CFG->dbname = 'dbXXXXXXX78'; // database name, eg moodle
$CFG->dbuser = 'dboXXXXXXX78'; // your database username
$CFG->dbpass = 'MyPassword'; // your database password
$CFG->prefix = 'mdl_'; // Prefix to use for all table names
$CFG->wwwroot = 'http://basener.org/moodle'; // real site - go take a look
$CFG->dirroot = '/homepages/4/d3XXXXXXXX/htdocs/moodle';
$CFG->dataroot = '/homepages/4/d3XXXXXXXX/htdocs/moodledata';
</config.php>
I can't speak to the necessity of the .htaccess file, I just used it and it worked fine. I never tried without.
Just as a note. After installing Moodle 1.9.11 I tried Moodle 2.0.2 without much success. After messing around with the Unicode settings in the database I got the installation to run to a point where it apparently ran out of RAM (memory allocation error). I just accessed the site after that and it seemed to work, I was able to set up the admin account. But after that I kept trying things that would result in blank pages. So I reverted to 1.9. 2.0 is pretty slick and I run it at work, but I would rather have a working system than 'slick'.