Insert image: Difference between revisions
mNo edit summary |
Mary Cooch (talk | contribs) (updated and linked to Image page) |
||
| (69 intermediate revisions by 6 users not shown) | |||
| Line 1: | Line 1: | ||
This page gives more details about the process of inserting images. For general information, see [[Images]]. The Image Icon [[File:Picture insert icon.png|16px]] on the [[HTML editor|text editor's toolbar]] brings up this popup window. We should mention here that JPG, GIF and PNG files are recognized Moodle images file types. | |||
This page | |||
==Insert/Edit image in Moodle== | |||
After clicking on the "Insert/Edit image" icon you will be ready to start. | |||
After | |||
===Minimum steps=== | |||
# Click on the Insert image icon | |||
# Click on "Find or upload and image.." . This is the Insert/edit image popup window tool. | |||
# Use [[File picker]] to select and existing image or upload a new one. | |||
# After selecting the file it will appear in the "Insert/edit image" window | |||
# Next put in an image description (alternative text) which will appear when the student moves their mouse over the image. | |||
# Insert. You have done the minimum and you will then return text editor tool. | |||
====Example ==== | |||
The teacher wanted to add the "Insert/Edit image" icon in a line of text. In the text editor tool, the teacher typed some words, used the insert/edit image tool, inserted their picture and went on adding more text. | |||
[[File:HTML Insert Image tool result1.png]] | |||
'''Overview of more things you can do''' | |||
Before saving, or by clicking on the image and the using the insert image icon, you can do other things to the image with the tool. This includes [[Insert image#Uploading an image file|uploading an image]] into the course file structure, [[Insert image#Layout|changing the layout]], [[Insert image#Spacing|spacing]] and [[Insert image#Resizing|resizing]] the displayed image, as well as some [[Insert image#Selection or file maintenance|file maintenance]]. | |||
# | |||
# | |||
The sections below will cover each of these operations. | |||
===General settings=== | |||
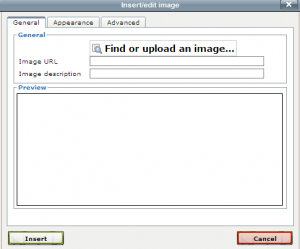
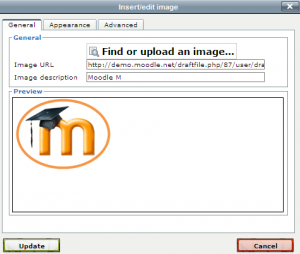
The general tab is the place to start to upload or change the image. It will show the current image location, the image title and give a preview of the image. | |||
[[Image:HTMLeditor_Insert_image_1.png|thumb|center|300px|General tab in Moodle 2.0]] | |||
[[Image:HTMLeditor_Insert_image_2.png|thumb|center|300px|General tab in Moodle 2.0 after an image was added]] | |||
[[Insert image#Table of Contents|Top]] | |||
===Appearance settings=== | |||
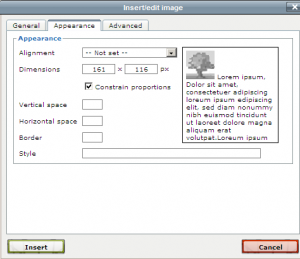
The appearance tab is the place to | |||
*Set alignment (with a generic preview screen to show the position of the picture) | |||
*Adjust the picture size | |||
*Surround the picture with vertical and/or horizontal space | |||
*Create a border | |||
*Style | |||
[[Image:HTMLeditor_Insert_image_appearance_3.png|thumb|center|300px|Appearance tab in Moodle 2.0]] | |||
[[Insert image#Table of Contents|Top]] | |||
===Advanced settings=== | |||
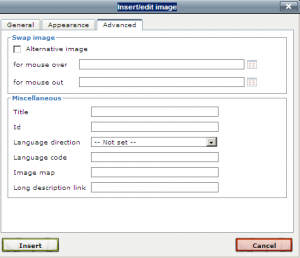
The advanced tab allows you to: | |||
*Swap images on mouse roll over and mouse roll off. Both use the [[File picker]]. | |||
**When student puts mouse on image it changes to the roll over and will not change unless rolloff is set | |||
**The rolloff image is what the student sees when the mouse leaves the image. If no rolloff is set, the image does not change. | |||
*Miscelleous contains more image information | |||
[[Image:HTMLeditor_Insert_image_advanced_4,.png|thumb|center|300px|Advanced tab in Moodle 2.0]] | |||
[[Insert image#Table of Contents|Top]] | |||
[[Insert image#Table of Contents|Top]] | |||
==Resizing== | |||
The width and height of the displayed image can be adjusted 2 ways. The teacher can click on the image and then grab one of the resizing points along the edge and visually re-size it. Or the teacher can click on the image and then on the . Then go to the appearance tab to set the dimensions. | |||
===Example resizing=== | |||
The teacher has favorite course image that is placed in every activity called "Moodle.jpg". This file was uploaded once and was 240 pixels wide and 60 pixels high. On the first page of a lesson activity the teacher wants the image to be only 120 pixels wide. Using the "Insert/edit image" icon the teacher sets their first dimension box for 120 (width) and the second box (height) at 30. | |||
[[Image:HTML Insert Image tool. result2.JPG|center]] | |||
[[Insert image#Table of Contents|Top]] | |||
==Layout== | ==Layout== | ||
Alignment and border thickness | Alignment and border thickness allow the image to be adjusted in relation to the line of text and place a border around the image. There is a popup window for alignment. "Not set" is the default. | ||
*[[Image:HTML toolbar Inser image alignment menu.JPG]] | |||
When creating content in Moodle, especially web pages, it is often desirable to make your content with images visually appealing. Using the image align dropdown menu (pictured above in the image editor) can help you do this. After uploading and clicking to insert an image, you have the option to align the image in relation to the text. Two most common uses of this align feature are align "left" or align "right". | |||
[[Image:ImageAlignRight_small.jpg]] | |||
<br/> | |||
The image above has been aligned to the <strong>right</strong> of the text so that the text flows around the image. | |||
<br/> | |||
[[Image:ImageAlignLeft_small.jpg]] | |||
<br/> | |||
The image above has been aligned to the <strong>left</strong> of the text so that the text flows around the image. | |||
===Example layout=== | |||
Here the teacher added a 5 pixel border and aligned the image with the bottom. | |||
[[Image:HTML Insert Image tool. result3.JPG]] | |||
[[Insert image#Table of Contents|Top]] | |||
==Spacing== | ==Spacing== | ||
Horizontal and Vertical | Horizontal and Vertical refers to the area that surrounds the image. Adding pixels of padding around the image moves text away from the image. See the appearance tab. | ||
===Example spacing=== | |||
Here the teacher added 10 pixels of horizontal spacing to separate the image from the text. | |||
[[Image:HTML Insert Image tool. result4.JPG]] | |||
== | [[Insert image#Table of Contents|Top]] | ||
==Radical example== | |||
The teacher decided to play with the image to see what some different effects might have upon the original. | |||
[[Image:HTML Insert Image tool. result5.JPG]] | |||
[[Insert image#Table of Contents|Top]] | |||
==Selection or file maintenance== | |||
The selection part of the Insert image tool allows the teacher to delete, move, zip,and rename files and folders in a course. | |||
==Tips & cautions== | |||
*Don't forget the Insert image tool can edit existing images. Click on the image you want to edit. You will see the corner boxes appear around it that indicates you have selected it. Now click on the Insert image icon on the toolbar. | |||
*If you are going to use a lot of pictures, consider zipping many of them into 1 file on your computer. Then upload the single zip file to a folder using [[File picker]]. This will allow you to unzip them and not have to upload each one separately with the insert image tool. | |||
*Want to replace an image and keep the same file name? Create the new image on your computer and give it the same name as the old file. Using the Insert image tool, delete the old file, then upload the new file to the same folder. If both the old and new images are the same height and width, you will not need to make any adjustments. | |||
* | *The Insert image tool creates HTML code. You can use the HTML toolbar's "Toggle HTML source" icon to see and edit that code. | ||
* | *Images can enhance course content. Be careful if you are always reducing the size that the image appears. A 2000x2000px image file reduced to 20x20px will still take as long to load on the screen as the original size. A best practice is to resize the image before you upload it into your course. | ||
[[Insert image#Table of Contents|Top]] | |||
==See also== | |||
*[[HTML editor]] | |||
*[[Course files]] - describes pre and Moodle 2.0 or [[File bank]] | |||
Latest revision as of 13:40, 10 January 2012
This page gives more details about the process of inserting images. For general information, see Images. The Image Icon ![]() on the text editor's toolbar brings up this popup window. We should mention here that JPG, GIF and PNG files are recognized Moodle images file types.
on the text editor's toolbar brings up this popup window. We should mention here that JPG, GIF and PNG files are recognized Moodle images file types.
Insert/Edit image in Moodle
After clicking on the "Insert/Edit image" icon you will be ready to start.
Minimum steps
- Click on the Insert image icon
- Click on "Find or upload and image.." . This is the Insert/edit image popup window tool.
- Use File picker to select and existing image or upload a new one.
- After selecting the file it will appear in the "Insert/edit image" window
- Next put in an image description (alternative text) which will appear when the student moves their mouse over the image.
- Insert. You have done the minimum and you will then return text editor tool.
Example
The teacher wanted to add the "Insert/Edit image" icon in a line of text. In the text editor tool, the teacher typed some words, used the insert/edit image tool, inserted their picture and went on adding more text.
Overview of more things you can do
Before saving, or by clicking on the image and the using the insert image icon, you can do other things to the image with the tool. This includes uploading an image into the course file structure, changing the layout, spacing and resizing the displayed image, as well as some file maintenance.
The sections below will cover each of these operations.
General settings
The general tab is the place to start to upload or change the image. It will show the current image location, the image title and give a preview of the image.
Appearance settings
The appearance tab is the place to
- Set alignment (with a generic preview screen to show the position of the picture)
- Adjust the picture size
- Surround the picture with vertical and/or horizontal space
- Create a border
- Style
Advanced settings
The advanced tab allows you to:
- Swap images on mouse roll over and mouse roll off. Both use the File picker.
- When student puts mouse on image it changes to the roll over and will not change unless rolloff is set
- The rolloff image is what the student sees when the mouse leaves the image. If no rolloff is set, the image does not change.
- Miscelleous contains more image information
Resizing
The width and height of the displayed image can be adjusted 2 ways. The teacher can click on the image and then grab one of the resizing points along the edge and visually re-size it. Or the teacher can click on the image and then on the . Then go to the appearance tab to set the dimensions.
Example resizing
The teacher has favorite course image that is placed in every activity called "Moodle.jpg". This file was uploaded once and was 240 pixels wide and 60 pixels high. On the first page of a lesson activity the teacher wants the image to be only 120 pixels wide. Using the "Insert/edit image" icon the teacher sets their first dimension box for 120 (width) and the second box (height) at 30.
Layout
Alignment and border thickness allow the image to be adjusted in relation to the line of text and place a border around the image. There is a popup window for alignment. "Not set" is the default.
When creating content in Moodle, especially web pages, it is often desirable to make your content with images visually appealing. Using the image align dropdown menu (pictured above in the image editor) can help you do this. After uploading and clicking to insert an image, you have the option to align the image in relation to the text. Two most common uses of this align feature are align "left" or align "right".

The image above has been aligned to the right of the text so that the text flows around the image.

The image above has been aligned to the left of the text so that the text flows around the image.
Example layout
Here the teacher added a 5 pixel border and aligned the image with the bottom.
Spacing
Horizontal and Vertical refers to the area that surrounds the image. Adding pixels of padding around the image moves text away from the image. See the appearance tab.
Example spacing
Here the teacher added 10 pixels of horizontal spacing to separate the image from the text.
Radical example
The teacher decided to play with the image to see what some different effects might have upon the original.
Selection or file maintenance
The selection part of the Insert image tool allows the teacher to delete, move, zip,and rename files and folders in a course.
Tips & cautions
- Don't forget the Insert image tool can edit existing images. Click on the image you want to edit. You will see the corner boxes appear around it that indicates you have selected it. Now click on the Insert image icon on the toolbar.
- If you are going to use a lot of pictures, consider zipping many of them into 1 file on your computer. Then upload the single zip file to a folder using File picker. This will allow you to unzip them and not have to upload each one separately with the insert image tool.
- Want to replace an image and keep the same file name? Create the new image on your computer and give it the same name as the old file. Using the Insert image tool, delete the old file, then upload the new file to the same folder. If both the old and new images are the same height and width, you will not need to make any adjustments.
- The Insert image tool creates HTML code. You can use the HTML toolbar's "Toggle HTML source" icon to see and edit that code.
- Images can enhance course content. Be careful if you are always reducing the size that the image appears. A 2000x2000px image file reduced to 20x20px will still take as long to load on the screen as the original size. A best practice is to resize the image before you upload it into your course.
See also
- HTML editor
- Course files - describes pre and Moodle 2.0 or File bank


