Creating a Moodle specific TinyMCE plugin
First steps creating a Moodle specific TinyMCE plugin (for dummies)
Moodle 2.5 This page describes the first steps of how to custom a Moodle specific TinyMCE plugin implemented in Moodle 2.5
We took some information from the TinyMCE_plugins page.
Overview
First of all, lets clarify that the plugin structure for TinyMCE in Moodle is a bit diferent than the pure TinyMCE plugin, so dont confuse them.
The directory
/lib/editor/tinymce/plugins/
contains Moodle specific TinyMCE plugins. It supports all standard Moodle plugin features. Static files (JS, CSS, images) are loaded via PHP loader, this prevents caching problems and it may improve performance. Original JavaScript based localisation files are not supported.
Subplugin Directory Structure
These are the directorys you can find in a Moodle specific TinyMCE plugin (
/lib/editor/tinymce/plugins/name_of_your_plugin
):
- /db/*
- Installation, upgrades, events, etc. It is not recommended to use database tables in these plugins.
- /lang/yourplugin/tinymce_name_of_your_plugin.php
- Language strings. All strings used from TinyMCE JavaScript files must start with prefix.
"name_of_your_plugin:*"
- /tinymce/editor_plugin.js
- The actual TinyMCE plugin code.
- /tinymce/*
- Static files used from plugin code. Use for links pointing to upstream TinyMCE code. Use
tinyMCE.baseURL
when referencing non-static plugin files.ed.getParam("moodle_plugin_base")
- /lib.php
- Moodle plugin code, it has to contain at least class with
tinymce_name_of_your_pluginmethod.update_init_params()
- /settings.php
- Moodle plugin settings (optional).
- /version.php
- Moodle plugin version (required).
- /*
- Other PHP scripts used by plugin.
What are the minimum files needed to start a Moodle specific TinyMCE plugin?
We created a really basic example of a Moodle specific TinyMCE plugin, it's a button that when clicked calls an html file. We will base our explanations from a plugin called “example".
You can find the source code of this example plugin HERE.
Download it, install it on your Moodle and make changes on the code to understand how it works.
Remember that you have to replace “example” by the name of your plugin everywhere if you create your own plugin following this descriptions.

In your PLUGIN DIRECTORY (
/lib/editor/tinymce/plugins/example
) you need to have:
- folder
/lang
- folder
/pix
- folder
/tinymce
- file
/lib.php
- file
/version.php
1) lib.php
file
lib.php
lib.php
contains Moodle plugin code, it has to contain at least tinymce_name_of_your_plugin class with update_init_params() method
<?php

defined('MOODLE_INTERNAL') || die();

class tinymce_example extends editor_tinymce_plugin {
    /** @var array list of buttons defined by this plugin */
    protected $buttons = array('example');

    protected function update_init_params(array &$params, context $context,
            array $options = null) {

        // Add button after 'spellchecker' in advancedbuttons3.
        $this->add_button_after($params, 3, 'example', 'spellchecker');

        // Add JS file, which uses default name.
        $this->add_js_plugin($params);

    }
}
The
add_button_after
function sets the position of our plugin in the TinyMCE editor regarding the existing plugin
spellchecker
.
2) version.php
file
version.php
version.php
contains the Moodle plugin versions
<?php

defined('MOODLE_INTERNAL') || die();

// The current plugin version (Date: YYYYMMDDXX).
$plugin->version   = 2012112900;
// Required Moodle version.
$plugin->requires  = 2012112900;
// Full name of the plugin (used for diagnostics).
$plugin->component = 'tinymce_example';
3) /lang
folder
/lang

/lang
contains all the language strings in their respective language folder. In our example plugin we have the
/en
folder containing the
tinymce_example.php
file where the english strings are defined
<?php

$string['pluginname'] = 'Example';
'pluginname'
dont have to be changed, and
'Example'
is the human-readable name of your plugin.
4) /pix
folder
/pix
![]()
/pix
contains the icon of your plugin, the name of your icon have to be
icon
and it usually is a
.png
extension 20x20
5) /tinymce
folder
/tinymce

/tinymce
contains the static files used from your plugin code.
This folder contains:
a) /img
folder
/img
![]()
In our example plugin we have a
/img
folder that contains
example.gif
that is the image that will apears on the editor in Moodle while we use it. We usually put the same name of our plugin to the image, and it use to be a
.gif 20x20
b) example.html
file
example.html
We have a
example.html
file that is not mandatory to have to make our plugin works, but in our example we open this file when we execute the plugin, when we click on the button of our plugin.
As you can see, this file is just a silly example
<html>
   <head>
       <title>EXAMPLE</title>
       <meta http-equiv="Content-Type" content="text/html; charset=UTF-8">
   </head>
   <body>
!!!EXAMPLE!!! </body>
</html></syntaxhighlight>
c) editor_plugin.js
 file
Here we have the code of our plugin, where we will code what the plugin will do. This is the content of
editor_plugin.js
(function() {
       // Load plugin specific language pack
       tinymce.PluginManager.requireLangPack('example');
       tinymce.create('tinymce.plugins.Example', {
               /**
                * Initializes the plugin, this will be executed after the plugin has been created.
                * This call is done before the editor instance has finished it's initialization so use the onInit event
                * of the editor instance to intercept that event.
                *
                * @param {tinymce.Editor} ed Editor instance that the plugin is initialized in.
                * @param {string} url Absolute URL to where the plugin is located.
                */
               init : function(ed, url) {
                       // Register the command so that it can be invoked by using tinyMCE.activeEditor.execCommand('mceExample');
                       ed.addCommand('mceExample', function() {
                               ed.windowManager.open({
                                       file : ed.getParam("moodle_plugin_base") + 'example/tinymce/example.html',
                                       width : 520 + ed.getLang('example.delta_width', 0),
                                       height : 320 + ed.getLang('example.delta_height', 0),
                                       inline : 1
                               }, {
                                       plugin_url : url
                                   });
                       });
                       // Register example button
                       ed.addButton('example', {
                               title : 'Example Plugin',
                               cmd : 'mceExample',
                               image : url + '/img/example.gif'
                       });

               },
               /**
                * Returns information about the plugin as a name/value array.
                * The current keys are longname, author, authorurl, infourl and version.
                *
                * @return {Object} Name/value array containing information about the plugin.
                */
               getInfo : function() {
                       return {
                               longname : 'Example plugin',
                               author : 'Some author',
                               authorurl : ,
                               infourl : ,
                               version : "1.0"
                       };
               }
       });
       // Register plugin
       tinymce.PluginManager.add('example', tinymce.plugins.Example);
})();</syntaxhighlight>
We start loading the plugin specific language pack and then we create the plugin.
We iniciate the plugin with the
init
function:
init : function(ed, url) {
                       ed.addCommand('mceExample', function() {
                               ed.windowManager.open({
                                       file : ed.getParam("moodle_plugin_base") + 'example/tinymce/example.html',
                                       width : 520 + ed.getLang('example.delta_width', 0),
                                       height : 320 + ed.getLang('example.delta_height', 0),
                                       inline : 1
                               }, {
                                       plugin_url : url
                                   });
                       });</syntaxhighlight>
As can see, the
add.Command
function, where we put what we want the plugin to do, in this case we open a window with
windowManager.open
and we load the
example.html
file.
We add the button on the editor:
ed.addButton('example', {
                               title : 'Example Plugin',
                               cmd : 'mceExample',
                               image : url + '/img/example.gif'
                       });</syntaxhighlight>
The
getInfo
function returns information about the plugin as a name/value array:
getInfo : function() {
                       return {
                               longname : 'Example plugin',
                               author : 'Some author',
                               authorurl : ,
                               infourl : ,
                               version : "1.0"
                       };
               }</syntaxhighlight>
The plugin is added to TinyMCE:
tinymce.PluginManager.add('example', tinymce.plugins.Example);</syntaxhighlight>
Install the "example" plugin in your Moodle
Download the source code from HERE.
Put the "example" folder in
moodle/lib/editor/tinymce/plugins/
Execute your Moodle and follow the install instructions.
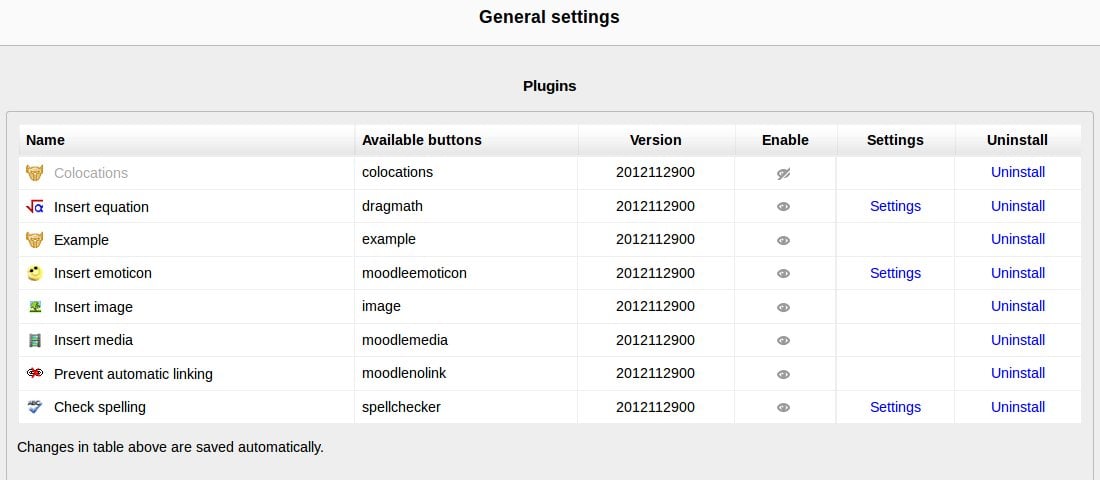
When installed you can manage your tinyMCE plugins in Moodle following:
Settings->Site Administration->Plugins->Text editors->TinyMCE HTML editor->General Settings
You will see it this way:
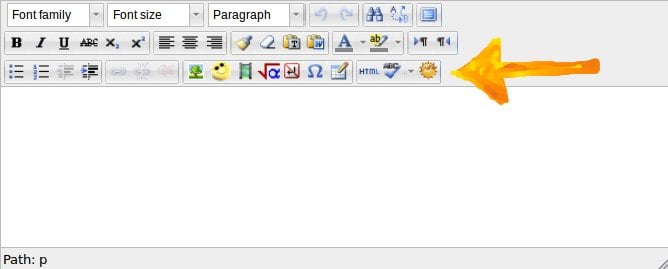
When installed, the example plugin should be shown in the editor this way: