Editor file management: Difference between revisions
No edit summary |
|||
| Line 1: | Line 1: | ||
This document is a specification that describes how how the handling of embedded media and attachments will work with and around the editor in Moodle 2.0. | This document is a specification that describes how how the handling of embedded media and attachments will work with and around the editor in Moodle 2.0. | ||
==Embedding media in a text=== | |||
Embedded media includes images, videos and sounds that are embedded within a single given HTML text. These are added using the HTML editor (which in Moodle 2.0 is a modified version of TinyMCE) and stored in the "file area" associated with the text. This applies to all HTML texts in Moodle 2.0, ranging from simple forum posts to full pages in the Resource module. These files can be stored in one flat virtual folder, they do not need to be in sub-directories. | Embedded media includes images, videos and sounds that are embedded within a single given HTML text. These are added using the HTML editor (which in Moodle 2.0 is a modified version of TinyMCE) and stored in the "file area" associated with the text. This applies to all HTML texts in Moodle 2.0, ranging from simple forum posts to full pages in the Resource module. These files can be stored in one flat virtual folder, they do not need to be in sub-directories. | ||
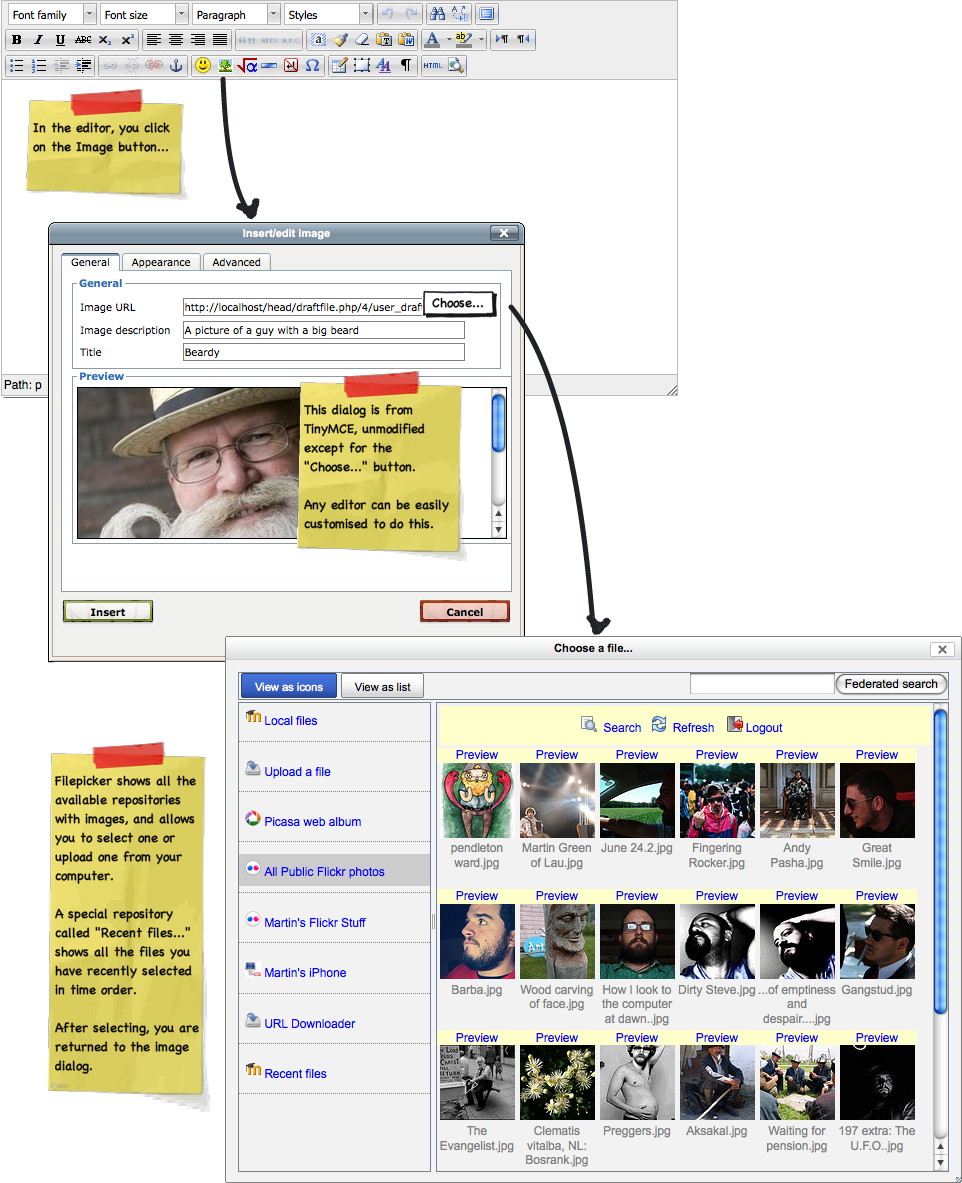
The basic procedure for embedding an image is: | |||
* Click on the image button in the editor | |||
* Click on the Browse button in the editor dialog | |||
* Use Filepicker to select the file from a repository (or recent files, or upload) with a name | |||
* IF A FILE WITH THAT NAME ALREADY EXISTS THEN ALTER THE NAME IN MOODLE (eg file.jpg --> file2.jpg) | |||
* Add metadata and preferences in the editor dialog | |||
* Insert the image into the text | |||
The procedure is very similar for video and audio files as well. | |||
Note: Like most operating system "Open file" dialogs, the filepicker only shows those media types that you are searching for at that time. For example, if you are looking for video files then repositories which don't support video files are not shown, and only video files are shown in the remanining repositories (even if other files may be there). | |||
[[Image:Adding_an_image.png]] | |||
(click on this diagram to see the full-sized version of this example) | |||
===Adding attachments=== | |||
Attached files are for whenever you have a set of files that you want to store and display. These include forum attachments, assignment submissions, and resource files (including whole mini web-sites). Attachments need to support subdirectories and require more file management. | |||
The file manager form element is designed for this. | |||
* Click on "Add" in the file manager form element | * Click on "Add" in the file manager form element | ||
| Line 57: | Line 33: | ||
* File is added | * File is added | ||
This is what the new "file manager" form element | This is what the new "file manager" form element will look like (screenshots from MDL-16597): | ||
http://tracker.moodle.org/secure/attachment/18132/File+manager+interface+%28on+root%29.png | http://tracker.moodle.org/secure/attachment/18132/File+manager+interface+%28on+root%29.png | ||
Revision as of 07:43, 7 August 2009
This document is a specification that describes how how the handling of embedded media and attachments will work with and around the editor in Moodle 2.0.
Embedding media in a text=
Embedded media includes images, videos and sounds that are embedded within a single given HTML text. These are added using the HTML editor (which in Moodle 2.0 is a modified version of TinyMCE) and stored in the "file area" associated with the text. This applies to all HTML texts in Moodle 2.0, ranging from simple forum posts to full pages in the Resource module. These files can be stored in one flat virtual folder, they do not need to be in sub-directories.
The basic procedure for embedding an image is:
- Click on the image button in the editor
- Click on the Browse button in the editor dialog
- Use Filepicker to select the file from a repository (or recent files, or upload) with a name
- IF A FILE WITH THAT NAME ALREADY EXISTS THEN ALTER THE NAME IN MOODLE (eg file.jpg --> file2.jpg)
- Add metadata and preferences in the editor dialog
- Insert the image into the text
The procedure is very similar for video and audio files as well.
Note: Like most operating system "Open file" dialogs, the filepicker only shows those media types that you are searching for at that time. For example, if you are looking for video files then repositories which don't support video files are not shown, and only video files are shown in the remanining repositories (even if other files may be there).
(click on this diagram to see the full-sized version of this example)
Adding attachments
Attached files are for whenever you have a set of files that you want to store and display. These include forum attachments, assignment submissions, and resource files (including whole mini web-sites). Attachments need to support subdirectories and require more file management.
The file manager form element is designed for this.
- Click on "Add" in the file manager form element
- Select a file from a repository (or upload)
- File is added
This is what the new "file manager" form element will look like (screenshots from MDL-16597):
http://tracker.moodle.org/secure/attachment/18132/File+manager+interface+%28on+root%29.png
And once you click on any folder you can go down in the tree:
http://tracker.moodle.org/secure/attachment/18130/File+manaager+interface+%28on+subdir%29.png
When moving a file or folder, you get a little popup browser to choose the destination.
http://tracker.moodle.org/secure/attachment/18128/moving+file+interface.png
Discussion
Discussion: RFC: Editor file management in Moodle 2.0 Discussion document: August 3 version of this page
