Box.net portfolio: Difference between revisions
From MoodleDocs
No edit summary |
Helen Foster (talk | contribs) (copying text from 26 wiki) |
||
| Line 1: | Line 1: | ||
{{Portfolios}} | {{Portfolios}} | ||
= | <p class="note">'''IMPORTANT''': From December 14 2013, the way Moodle and Box.net connect is changing. See [[Box.net APIv1 migration]] for details.</p> | ||
==Enabling the Box.net portfolio== | |||
To use the Box.net portfolio, your Moodle site must use HTTPS. An admin can then enable the Box.net portfolio as follows: | |||
[ | # Obtain a ''client ID'' and ''secret'' from [https://app.box.com/developers/services Box.net] (This step is not necessary if you have a client ID and secret already for the Box.net repository.) | ||
# Go to ''Administration > Site administration > Plugins > Portfolios > Manage Portfolios'' | |||
# Activate the Box.net portfolio by selecting 'Enable and visible' in the dropdown menu | |||
# Configure each portfolio by entering the client ID and secret | |||
# Save changes | |||
==Sending/"pushing" your files to Box.net== | ==Sending/"pushing" your files to Box.net== | ||
| Line 20: | Line 18: | ||
[[File:Exporttobox.net.png]] | [[File:Exporttobox.net.png]] | ||
*Click the words "export to portfolio" and then select from the dropdown Box.net (If it is the only portfolio enabled, it | *Click the words "export to portfolio" and then select from the dropdown Box.net (If it is the only portfolio enabled, it will be the only choice!) | ||
*On the next screen, choose your sharing options and which folder to export to: | *On the next screen, choose your sharing options and which folder to export to: | ||
| Line 33: | Line 31: | ||
[[File:Boxnetexportcomplete.png]] | [[File:Boxnetexportcomplete.png]] | ||
[[Category:Site administration]] | [[Category:Site administration]] | ||
[[de:Box.net Portfolio]] | [[de:Box.net Portfolio]] | ||
Revision as of 14:34, 8 November 2013
IMPORTANT: From December 14 2013, the way Moodle and Box.net connect is changing. See Box.net APIv1 migration for details.
Enabling the Box.net portfolio
To use the Box.net portfolio, your Moodle site must use HTTPS. An admin can then enable the Box.net portfolio as follows:
- Obtain a client ID and secret from Box.net (This step is not necessary if you have a client ID and secret already for the Box.net repository.)
- Go to Administration > Site administration > Plugins > Portfolios > Manage Portfolios
- Activate the Box.net portfolio by selecting 'Enable and visible' in the dropdown menu
- Configure each portfolio by entering the client ID and secret
- Save changes
Sending/"pushing" your files to Box.net
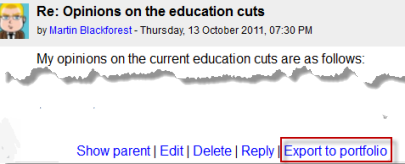
- You can export items such as assignments, chat and forum posts to enabled portfolios such as Box.net. Here is an example with a forum post:
- At the bottom of your completed forum post are the words "export to portfolio".
- Click the words "export to portfolio" and then select from the dropdown Box.net (If it is the only portfolio enabled, it will be the only choice!)
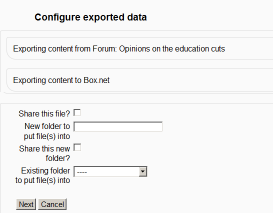
- On the next screen, choose your sharing options and which folder to export to:
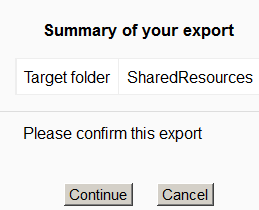
- Click to confirm the export:
- Click "Continue". If you haven't done this before you will be prompted to log in to your account. Agree and log in.
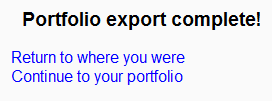
- The "export complete" message will appear. Clicking "continue" will take you to Box.net if you wish.


