Wiki settings: Difference between revisions
Helen Foster (talk | contribs) (remove see also link) |
Jeus Perez (talk | contribs) mNo edit summary |
||
| (63 intermediate revisions by 21 users not shown) | |||
| Line 1: | Line 1: | ||
{{Wiki}} | {{Wiki}} | ||
==Wiki settings | ==Adding a wiki== | ||
*With the editing turned on, in the section you wish to add your wiki, click the "Add an activity or resource" link (or, if not present, the "Add an activity" drop down menu )and choose ''Wiki''. | |||
*This will take you to the wiki settings page titled "Adding a new wiki". | |||
*In an existing wiki, the wiki settings can be found in ''Settings > Wiki administration > Edit settings''. | |||
The | ==Wiki administration settings== | ||
===Wiki name=== | |||
*The name you give to your wiki here will appear as the link on the course page for your students to click. | |||
===Wiki description=== | |||
*Explain the purpose of your wiki here. (This description may or may not be compulsory depending on your admin's settings.) | |||
====Display description on course page==== | |||
If this box is checked, then the description you added above will appear with the wiki link on the course page. | |||
[[File:wikisettings.png]] | |||
== | ===First page name=== | ||
*The name you add here will form the first page of your new wiki. It is a required field and once a name has been entered,it can't be changed. | |||
[[ | ===Wiki mode=== | ||
[[ | *Choose between "Individual wiki" where each student gets their own, or "Collaborative wiki" where students work together on a single wiki. | ||
===Default format=== | |||
*Set the default type of editing your wiki will use. Chooose from | |||
**HTML - editing using the normal text editor | |||
**Creole - a popular wiki editing language. If this is selected, a small editing toolbar will appear. | |||
[[File:creolenwiki.png]] | |||
**NWiki - a wiki editing language used in the contributed NWiki module. | |||
===Force format=== | |||
If you check this box then students cannot choose their own method of editing the wiki. | |||
===Common module settings=== | |||
The [[Common module settings]] section appears in many modules besides wiki. It sets [[Groups]] interactions levels and the ID number. | |||
===Restrict access settings=== | |||
The [[Restrict_access_settings|Restrict access]] area becomes visible in Moodle activities and resource settings if [[Conditional_activities|Conditional Activities]] have been enabled. | |||
==Locally assigned roles== | |||
In ''Settings > Wiki administration > Locally assigned roles'' selected users can be given additional roles in the activity. | |||
==Wiki permissions== | |||
Role permissions for the activity can be changed in ''Settings > Wiki administration > Permissions''. (you need to be Administrator or have permission for doing this.) | |||
[[fr:Ajouter/modifier un wiki]] | [[fr:Ajouter/modifier un wiki]] | ||
[[de:Wiki anlegen]] | |||
[[ja:Wikiを追加/編集する]] | |||
Latest revision as of 19:36, 27 December 2013
Adding a wiki
- With the editing turned on, in the section you wish to add your wiki, click the "Add an activity or resource" link (or, if not present, the "Add an activity" drop down menu )and choose Wiki.
- This will take you to the wiki settings page titled "Adding a new wiki".
- In an existing wiki, the wiki settings can be found in Settings > Wiki administration > Edit settings.
Wiki administration settings
Wiki name
- The name you give to your wiki here will appear as the link on the course page for your students to click.
Wiki description
- Explain the purpose of your wiki here. (This description may or may not be compulsory depending on your admin's settings.)
Display description on course page
If this box is checked, then the description you added above will appear with the wiki link on the course page.
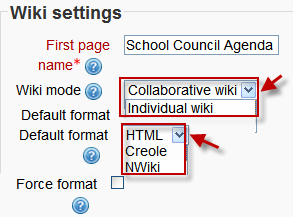
First page name
- The name you add here will form the first page of your new wiki. It is a required field and once a name has been entered,it can't be changed.
Wiki mode
- Choose between "Individual wiki" where each student gets their own, or "Collaborative wiki" where students work together on a single wiki.
Default format
- Set the default type of editing your wiki will use. Chooose from
- HTML - editing using the normal text editor
- Creole - a popular wiki editing language. If this is selected, a small editing toolbar will appear.
- NWiki - a wiki editing language used in the contributed NWiki module.
Force format
If you check this box then students cannot choose their own method of editing the wiki.
Common module settings
The Common module settings section appears in many modules besides wiki. It sets Groups interactions levels and the ID number.
Restrict access settings
The Restrict access area becomes visible in Moodle activities and resource settings if Conditional Activities have been enabled.
Locally assigned roles
In Settings > Wiki administration > Locally assigned roles selected users can be given additional roles in the activity.
Wiki permissions
Role permissions for the activity can be changed in Settings > Wiki administration > Permissions. (you need to be Administrator or have permission for doing this.)

