Quickmail block: Difference between revisions
Mark Nielsen (talk | contribs) No edit summary |
Mark Nielsen (talk | contribs) No edit summary |
||
| Line 2: | Line 2: | ||
==Installation== | ==Installation== | ||
Download Quickmail with the provided link in the Links section. After unzipping the file, you will find the quickmail directory in block_quickmail_1.5/blocks/. Copy this quickmail directory to your Moodle's blocks directory. Then visit Moodle's admin screen so that Quickmail can install itself. After that, you can add Quickmail to any course. | Download Quickmail with the provided link in the Links section. After unzipping the file, you will find the quickmail directory in block_quickmail_1.5/blocks/. Copy this quickmail directory to your Moodle's blocks directory. Then visit Moodle's admin screen so that Quickmail can install itself. After that, you can add Quickmail to any course. | ||
==Block Display== | ==Block Display== | ||
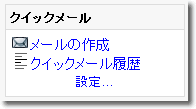
[[Image:Quickmail-Block-screenshot.gif|right]] | |||
The image to the right shows how Quickmail will appear when added to a course. The three links are described as follows: | |||
*''Compose Email'' takes you to Quickmail's email composition page. | |||
*''Quickmail History'' takes you to a history of all emails sent by Quickmail in the current course. | |||
*''Settings'' takes you to Quickmail's configuration screen. This link only appears for course Teachers and Administrators and it goes to the same configuration screen as the block's edit button when course editing is turned on. | |||
==Compose Email== | |||
When composing an email, the following fields must be set: | |||
*'''To:''' this area contains a series of check boxes, one for each course user. Each user who has their check box check, will be emailed. Also, there is a handy button that can ''Check All'' or ''Uncheck All'' users. | |||
*'''Subject:''' whatever is written here will appear as the email's subject. | |||
*'''Message:''' this area is used to compose the email message or body. You can use the [[HTML_editor | HTML editor]] for this section if you have it turned on in your user profile. Otherwise, you can select one of Moodle's [[Formatting_options | formats]]. | |||
*'''Attachment:''' this is the only optional field and it behaves differently for Students and for Teachers. | |||
**Students can select a file from their hard drive to attach to the email. This file is only temporarily stored on the server and it deleted after the email has been sent. | |||
**Teachers use the standard course files interface. These files are stored in the course files and are never removed by Quickmail. | |||
==Links== | ==Links== | ||
Revision as of 00:16, 28 July 2006
The quickmail block adds a link to a tool that has a checkbox list of all students in the course, and a mail composition text area. You can check the students you like, and email those and only those. This enhances the existing communications systems of messaging (one user) and subcribed forums (all subscribers) by allowing teachers to select a specific subset of students. It was developed by Michael Penney's team at Humboldt.
Installation
Download Quickmail with the provided link in the Links section. After unzipping the file, you will find the quickmail directory in block_quickmail_1.5/blocks/. Copy this quickmail directory to your Moodle's blocks directory. Then visit Moodle's admin screen so that Quickmail can install itself. After that, you can add Quickmail to any course.
Block Display
The image to the right shows how Quickmail will appear when added to a course. The three links are described as follows:
- Compose Email takes you to Quickmail's email composition page.
- Quickmail History takes you to a history of all emails sent by Quickmail in the current course.
- Settings takes you to Quickmail's configuration screen. This link only appears for course Teachers and Administrators and it goes to the same configuration screen as the block's edit button when course editing is turned on.
Compose Email
When composing an email, the following fields must be set:
- To: this area contains a series of check boxes, one for each course user. Each user who has their check box check, will be emailed. Also, there is a handy button that can Check All or Uncheck All users.
- Subject: whatever is written here will appear as the email's subject.
- Message: this area is used to compose the email message or body. You can use the HTML editor for this section if you have it turned on in your user profile. Otherwise, you can select one of Moodle's formats.
- Attachment: this is the only optional field and it behaves differently for Students and for Teachers.
- Students can select a file from their hard drive to attach to the email. This file is only temporarily stored on the server and it deleted after the email has been sent.
- Teachers use the standard course files interface. These files are stored in the course files and are never removed by Quickmail.
