PresenterModule
Manual for the Presenter Activity Module for Moodle
Introduction
The purpose of the Presenter Activity Module for Moodle is to create presentation activities based on rich media such as streaming video, audio and pictures.
Installation
Requirements
The import functionality needs 'xmlreader' in order to function properly. Please make sure that 'xmlreader' is enabled on your server. Please make sure you have the 'php_zip' extension enabled. If it is disabled the presenter mod will try to run linux shell commands with exec to zip/unzip.
New install
Unpack the zip file. Put the folder presenter inside your /moodle/mod directory.
From the admin page, click on the 'Notifications' link - all the tables required for this module will be created and the module will be installed.
Update from an older version
Perform a backup of your Moodle site. Overwrite the files in the /mod/presenter directory with the new files. All your old settings will be preserved.
Installation of Yamdi in Linux and Windows
With Moodle Presenter running under Moodle 1.9.x it's possible to automatically inject metadata into a video file while uploading the file to Moodle. To make that possible you must install Yamdi.
Yamdi stands for Yet Another MetaData Injector and is a metadata injector for FLV files. It adds the onMetaData event to your FLV files. yamdi runs under *BSD, Linux and Win32 (tested with FreeBSD, MacOSX, Ubuntu and Windows XP) and is published under the BSD license.
Unfortunately automatic metadata injection using Yamdi it's not implemented in the Moodle 2.0 version of Presenter. This is due to the fact that Moodle 2.0 handles file differently than previous Moodle versions.
Installing Yamdi in Linux
Download the source code from http://yamdi.sourceforge.net
Extract the source:
tar xzf yamdi-1.4.tar.gz
Change into the yamdi directory and compile the source code with:
cd yamdi-1.4
gcc yamdi.c -o yamdi -O2 -Wall
Copy the file yamdi to /usr/bin/ or any other directory that fits you.
Configuring the path
To complete configuring Presenter in Moodle 1.9.x, visit the Site Administration block choose Activities->Presentation and enter the path to Yamdi in the "Path to metadata injector file".
Description
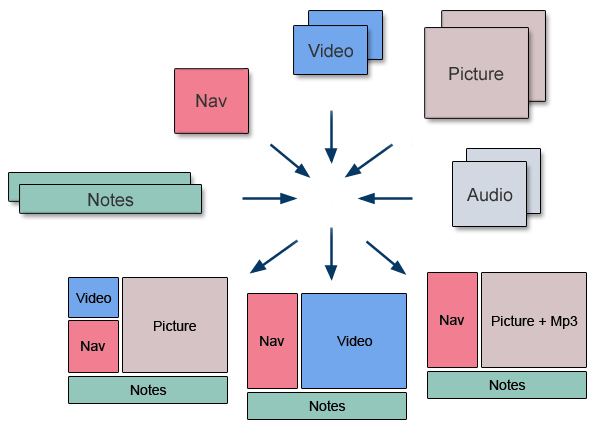
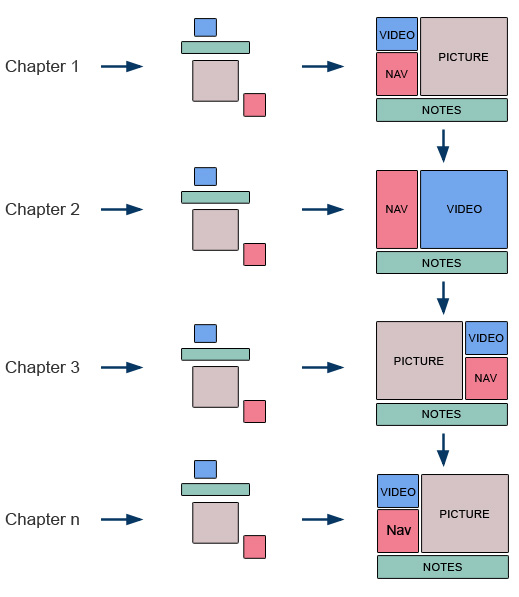
The rich media elements are combined into presentation chapters according to a layout. The navigation feature lets the user play through the chapters automatically or choose a specific chapter.
The media elements of a presentation
Video
There are two options for using video.
   * URL to a YouTube movie
   * upload a Flash Video (FLV) file into your Moodle course.
If you choose to upload Flash Video files to your Moodle Course there are two options to send them to clients.
   * progressive download
   * php-streaming
Progressive download works like an ordinary download. For php-streaming to work the Flash Video files must be injected with metadata determining the exact starting position in bytes and timecode of each keyframe. This can be done server-side by installing a software called Yamdi and configuring it's installation path in the settings for the Moodle 1.9.x version of Presenter. Information about installing Yamdi can be found in the file "How to install.txt" that comes with the distribution package. Download Yamdi from http://yamdi.sourceforge.net/
Since installing Yamdi might not be an alternative for everybody, metadata injection can also be done manually with Buraks FLV MetaData Injector, get it from:
The video player used for YouTube movies is Googles native player. To play Flash Video files stored in your course, flowplayer free edition is used. More information about flowplayer can be obtained at http://www.flowplayer.org
Limitations for video
Values for "Video start" and "Video end" can be used only with Flash Video files, this makes it possible split a file and play only part of a movie.
YouTube movies accept only values for "Video start", the "Video end" must be set to the time value for the end of the movie.
Time values are entered in the format hours:minutes:seconds. If nothing is entered then it starts from the begining of the movie
Picture
Picture files can be of .png, .jpg, .jpeg, .gif and .bmp type. The files must be uploaded into the Moodle course.
Audio
mp3 files can be used for the audio option. The files must be uploaded into the Moodle course.
Limitations for audio
Start and End times for mp3 files can not be set. The audio will start from second 0 of the audio file.
Notes
Notes are usually comments or observation related to a chapter. A HTML editor is provided to enter text notes.
Layout templates
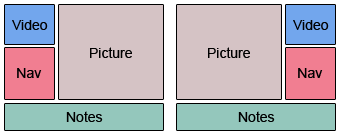
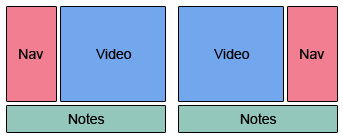
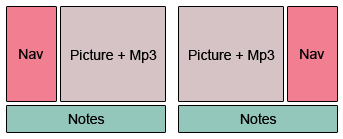
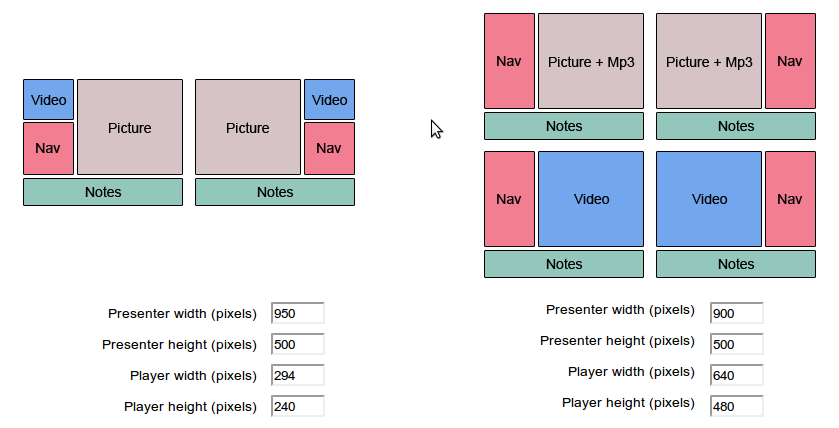
Presentation chapters are created by grouping media elements according to six layout templates. There are 3 basic layout templates, by mirroring them in the vertical plane we obtain a total of 6.
Navigation-Video-Picture-Notes (and mirror)
Navigation-Video-Notes (and mirror)
Navigation-Picture-Audio-Notes (and mirror)
General settings
The size of the presentation area is set by the values of "Presentation width" and "Presentation height". In templates that include video the size of the video player is set by the values "Player width" and "Player height". The same values are used to define the size of the picture area in the templates including Navigation-Picture-Audio-Notes
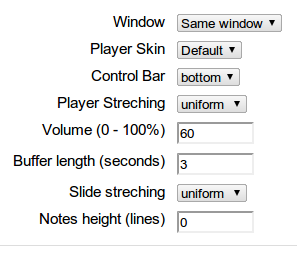
The size of the "Notes" field is given in lines and is not included in the presentation area.
Creating a presentation
A presentation is created by defining one or more chapters. Chapters are created according to the six layout models available.
Choose a layout for the chapter and enter the relevant values. The settings that are not valid for the layout chosen are grayed out.
Exporting and importing presentations
Creating presentations can be a time consuming process, sometimes presentations can be shared among different courses. To facilitate the creation and sharing process there is an option to export/import presentations as zipped xml files.
Keep in mind that presentations that use Flash video files stored locally can be quite big, downloading or uploading them might be an issues depending on your servers settings for the "Maximum upload size" or "Maximum download size". Since compressing and uncompressing files is a CPU intensive process performance can be greatly improved by allowing Moodle to use the system zip/unzip commands (rather than PHP-based zip libraries).
License
The Presentation Activity Module for Moodle software package is Copyright © 2008 onwards NetSapiensis AB and is provided under the terms of the GNU GENERAL PUBLIC LICENSE Version 3 (GPL).
Reporting bugs
Report bugs at:
Please send us information about the following:
- Operating system name and version
- Database name and version
- PHP version
- Moodle version
- Presenter Activity Module version (read it in version.php)
- Theme used
- Steps to reproduce the bug
- Send a few screenshots
See also
- Presenter module in the modules and plugins database
- Using Moodle Presenter module forum discussion
