Building Lesson
This page really needs improving. Please see the page comments for suggestions of what to include, then remove this template when you're done.
This page is about how to strucure a Moodle lesson once you have created it with the Lesson settings.
Planning your lesson
- A lesson is made up of pages which may have content for the student to read or questions for them to answer. The questions can be created by the teacher or imported. The teacher decides the order in which these pages appear.
- You need to have a clear idea beforehand of what you want to do with this lesson. Is it to be a graded, linear learning experience? Or an ungraded, non-linear practice session? Will students be able to go back and revisit areas or is it just a once-only opportunity?
- Even those who are very comfortable working directly online might find it useful to note down on paper the direction they want their lesson pages to go in, rather than having to remember and visualise the navigation in their head.
- For hints and ideas about using the Lesson module, look at Using Lesson and [Lesson FAQ]]
Adding content and questions to your lesson
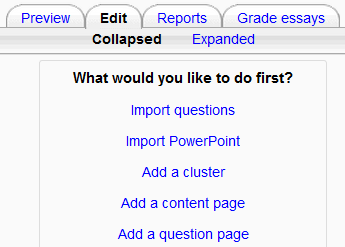
- When you have set up your lesson with the Lesson settings,click "Save and display" and you will be taken to the screen in the screenshot below.
- If you click "Save and return to course" instead, then click the "update" icon next to the lesson on the page and click "edit" in the Settings block>Lesson Administration
Import questions
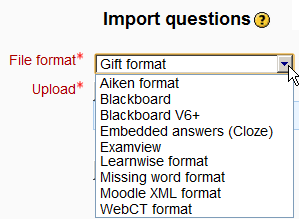
- If you have some questions in the following formats, you can import them to use in your lesson by clicking the Import questions link.
Import a powerpoint
- Although this setting is available, it really does not work and is not advised. See Import PowerPoint for alternatives.
Add a cluster
(work in progress)
Add a content page
- This is a page where a teacher can provide information to move the lesson forward but without requiring the student to answer specific questions.
- The student sees the page's title, some information and then one or more buttons at the bottom to select.
- When the student clicks on a button, they go to the next page but their choice is not scored.
Title
- The title of a content page appears to the student at the top of the page.
- A teacher will also see the title in the collapsed edit mode when they are working on the Lesson, and they will also be able to choose the title (and hence this page) from the drop down "jump" lists.
- The title in a content page is also used with the "display left menu" setting.
Page contents
This is where the tacher can add information for the student,making use of the Text editor and its multimedia features.
Content
- Here the teacher writes the words they want the student to click on to get to the next part of the lesson.
- These words will appear to the student as a button.
- The teacher can check the box to have the buttons appear horizontally, or uncheck it for them to appear centred vertically.
Format
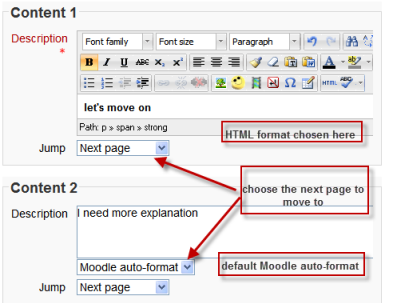
There are 4 format types to choose from when editing text in the content description box. If you wish to have the usual rich text editing icons,choose HTML format. (Note - once you have selected an option, you cannot then go back and change your mind!)However, if you DO choose HTML format, be warned that the student will not see the changes (such as bold or different colours) in the button.
Number of options available
- How many of these you have depends on your choice in the Maximum Number of Answers setting in Lesson settings
The Jump
- Each Description in a Content page has a Jumps menu. "Jumps" take a student from one page to another.
- The teacher chooses from the dropdown the correct page to send the student to if they click on the button that will be made from this particular description. Any pages created by the teacher will have their titles appear in this dropdown, allowing them to be selected.
- When a student clicks on a description button, they are sent to the page defined in the Jump associated with the button.
Add a question page
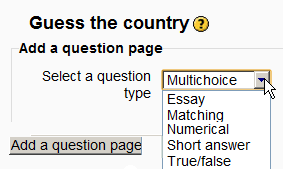
- From this link you can choose from a variety of question types which will then be added as pages to your lesson:
See Lesson questions for more information about using specific question types with this module. Remember that the powerful HTML tool bar will allow the teacher to add pictures to content and to question answers.
Multiple choice
In a multiple choice question, the student is given a question and a list of answers. In a Lesson, the answer list will be shuffled every time the question is view by a student. In a multiple choice question, the student selects one answer.
With multianswer box checked
A check in the multianswer box allows the teacher to determine that more than 1 answer is required for the student to receive credit for the question. There is no partial credit and the student must select just correct answers from a list.
See also Multiple_Choice_question_type which is a quiz question and works differently.
Short answer
In a short answer question the student is expected to answer with one word or a few words. Short-Answer question type gives more information about this kind of question
There are two different student answer analysis systems available for the Short Answer type of question in the Lesson Module: the simple system and the new regular expressions system. The simple system is the default and is the same used by the Quiz Module. There is a "Use Regular Expressions" option box on the Edit Question Page screen in the Lesson Module.
We suggest first reading about the Short answer question page with the examples of the "simple analysis", and then read the Short answer analysis page that gives more information about "Regular Expression analysis".
True / false
The True/False question type is a special case of the multiple choice question. The student is prompted to choose which is the correct option. See multiple choice question above for details.
Matching questions
Matching questions consist of a list of names or statements, or pictures which must be correctly matched against another list. For example "Match the letter with its position in the alphabet. One list would have A, B, C, D, Z and the other in a pull down menu next to each item would have 2, 4, 3, 1, 26 .
See Matching question type for more information.
Numerical Question
This type of question requires a number as the answer. In it's simplest form it requires just one answer to be specified. For example "What is 2 plus 2?", where 4 is the correct answer. A numerical question will also accept a number in a range as being correct. The answers are similar to short answer, where the order that the teacher lists the answers is important.
See Numerical question type for more information about a Quiz question.
The lesson numerical question differs from the numerical quiz question and the numerical embedded question (Cloze)when it evaluates answers. For example there is no wild card.
Essay Questions
Short essay questions were introduced in Moodle version 1.5. These are meant for short, paragraph or two type of essays one often finds on exams. Thus we did not use the html editor, preferring a simple text field. For longer essays, the assignment module is a better choice.
The student simply enters their essay in the box provided. The teacher sees ungraded essay questions when opening the lesson. After grading, the teacher can email their responses to the student.
Essay question type page has more information.
Branches and content pages
If your lesson delivers quite a lot of information, you can divide it into sections that are called "branches". One way of moving between these branches is by adding a content page.
- Tip: You can also move between branches with a question page. For example: a poor answer choice might send the student to a branch for some additional information.
Content pages are pages which have a set of jumps/links to other pages in the lesson. The student sees labeled buttons under the page content to provide their choices. Content pages are similar to many question page types. They have a title, content section, student choices (called descriptions) and jumps associated with each choice. Content pages are grade neutral, so there are no scores. Content pages also can be put to special uses by a teacher. To help understand these concepts we are going to call one use a "ordered branch" and the other a "classic branch".
Ordered branches
A table of contents is an example of a use of ordered branches. Typically a lesson may start with a Content page with the title "Table of Contents". The student selects a Description button and jumps to a page in the edit order that starts a series of pages about that subject. At the end of an ordered branch, the student is given several options by a question or a content page, such as: "Go to the next page", "Start of the series again", "End the lesson", or "Return to the Table of Contents.
Classic branches
The classic branch is an advanced navigational feature. It introduces random movement within a series of pages that the teacher determines. A classic branch needs a Branch Table at the start of the series and a special navigation page called "End of Branch" at the end of the series.
The default jump in an "End of Branch" page is the preceding content page as an absolute jump. After a classic branch has been created, the teacher will see 3 new relative jump options: "Unseen question within a branch", "Random question within a branch" and "Random branch page". The classic branch with its "end of branch" navigation page is similar to a cluster.
- Tip: As with any advanced navigational feature, it is best to add it after the basic question and content pages have been created. Checking the Lesson's behavior in a student role is another best practice with highly adaptive lesson formats.
Tips when using branches
- The number of links shown when setting up or editing a content or a question page is set by the Lesson settings. This parameter can be changed on the fly by clicking on the Settings block >Lesson administration >edit settings link.
- When a lesson includes one or more ordered or classic branches, teachers need to decide if their students must visit every branch. By adding a question or two in each branch, the teacher can set the "Edit settings" Minimum number of Questions]]" parameter to some reasonable number of questions that must be answered. Without this parameter a student might visit a single branch in the lesson, answer all its questions correctly and leave the lesson with the maximum grade based upon their attempts, not the total number of available questions.
- Remember that using branches may encourage a student to revisit a question page more than once. This can impact scoring. Since scores can not be displayed for a teacher, it is a good practice for a new Moodling Teacher to log in as a student to check how the score is kept in their Lesson.
- Choice pages gives detailed help about editing a branch . Adding a content page (branch table) reviews process.
Lesson dependencies and linking
Dependency
Lesson has dependency setting similar to Conditional activities. It allows the current lesson to be dependent upon a student's performance in one specific lesson that is in the same course. If the conditions(s) is not met, then the student will not be able to access the current lesson. This feature is independent of Restrict access settings which only will appear if [[Conditional access} has been enabled on the site.
These "Dependent on" conditions include: time spent, completed or receive a better than grade one specific lesson. Any combination of the conditions can be used. Please note, a Lesson must include one question for the dependent "completed" condition to be met.
- A typical use of this feature is to "daisy chain" a series of Lessons to make sure the students take the lessons in order. This might be useful in a training type of course which has no open or close dates because it can be started and finished at any time.
Links to other places
Use the "Link to" in the Lesson settings to offer the student a direct link button to another activity in the course when they complete the lesson.
Another handy Lesson setting "Pop-Up to file or web page" will create a window the student can view while in the lesson.
- Tip:More advanced Moodlers can figure out how to place HTML links on a lesson page. Thus it is possible to create a link to another lesson/activity, a lesson/activity in another course, or even to a specific page in a lesson. While this method can be useful, the student may not be able to find their way back to the page with the link. In general, the links can be created by copying the location of the desired link from the browser's address bar, then pasting it as a link.


