Working with files: Difference between revisions
From MoodleDocs
(→Orientation within the File Picker: do not like my column labels but linked to Repositories, will fix broken links in a bit) |
Mary Cooch (talk | contribs) (adding French link) |
||
| (39 intermediate revisions by 6 users not shown) | |||
| Line 1: | Line 1: | ||
{{ | {{Managing content}} | ||
*Moodle provides an easy way for a teacher to present materials to their students. These materials may take the form of files such as word-processed documents or slideshow presentations. The materials can be displayed on the page either as individual items or bundled together inside folders. One teacher might for instance wish to share a single research document in pdf format; another might have a folder of sample past examination papers for students to download. | |||
*Most types of files can be uploaded and accessed through Moodle but the student needs to have the correct software to be able to open them. | |||
*To add files or folders, a teacher needs to have the editing turned on in their course and then select either [[File]] or [[Folder]] from the ''Add a resource'' drop down menu as in the following screenshot: | |||
[[File:Workingwithfiles.png]] | |||
*The screen for uploading and displaying a file (or folder of files) includes an "add" button. Clicking on this button takes you to Moodle's [[File picker]] which is the name given to the file storage and access area within Moodle. Find out more about the places you can upload or add files from in the [[File picker]] page | |||
[[File:Filepickeraddbutton.png]] | |||
[[File | ==See also== | ||
*How to share a single file with students: [[File]] | |||
*How to share a folder of files with students: [[Folder]] | |||
*Questions about the file picker: [[File picker FAQ]] | |||
*[http://www.youtube.com/watch?v=IrOKxYRJvGU How teachers upload files in Moodle 2 video] | |||
[[de:Arbeiten mit Dateien und Verzeichnissen]] | |||
[[fr:Utilisation de fichiers]] | |||
[[ | |||
Latest revision as of 16:47, 17 April 2012
- Moodle provides an easy way for a teacher to present materials to their students. These materials may take the form of files such as word-processed documents or slideshow presentations. The materials can be displayed on the page either as individual items or bundled together inside folders. One teacher might for instance wish to share a single research document in pdf format; another might have a folder of sample past examination papers for students to download.
- Most types of files can be uploaded and accessed through Moodle but the student needs to have the correct software to be able to open them.
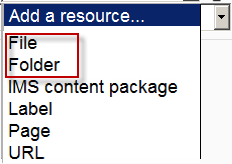
- To add files or folders, a teacher needs to have the editing turned on in their course and then select either File or Folder from the Add a resource drop down menu as in the following screenshot:
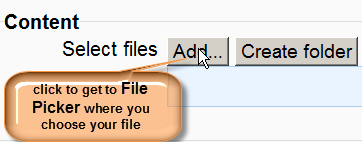
- The screen for uploading and displaying a file (or folder of files) includes an "add" button. Clicking on this button takes you to Moodle's File picker which is the name given to the file storage and access area within Moodle. Find out more about the places you can upload or add files from in the File picker page
See also
- How to share a single file with students: File
- How to share a folder of files with students: Folder
- Questions about the file picker: File picker FAQ
- How teachers upload files in Moodle 2 video

