Groups: Difference between revisions
(→Groups tab: Brief intro) |
Mary Cooch (talk | contribs) (copied from 2.2 docs) |
||
| (32 intermediate revisions by 11 users not shown) | |||
| Line 1: | Line 1: | ||
{{ | {{Grouping users}} | ||
A teacher can organise users into groups within the course or within particular activities. | |||
==Why use groups?== | |||
*You are a teacher in a course where you have several classes and you want to filter your activities and gradebook so you only see one class at a time. | |||
*You are a teacher sharing a course with other teachers and you want to filter your activities and gradebook so you don’t see the students from your colleagues’ classes. | |||
*You want to allocate a particular activity or resource to just one class or set of users and you don’t want others to see it. See [[Groupings]]. | |||
==Group levels== | |||
A group or grouping can be used on two levels: | |||
The | *Course level - The group mode defined at the course level is the default mode for all activities defined within that course. To use groups you need first to set a group mode in ''Settings>Course administration>Edit settings.'' | ||
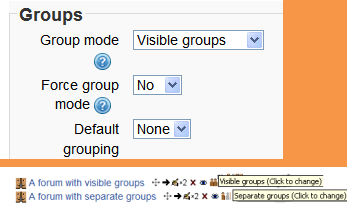
*Activity level - Each activity that supports groups can also have its own group mode defined. If the course setting "Force group mode" is set to "Yes" then the option to define the group mode for individual activities is not available. If it is set to "No", then the teacher may change the group mode: | |||
[[File:groupmodecourse.png]] | |||
== | ===Group modes=== | ||
There are three group modes | |||
*No groups - There are no sub groups, everyone is part of one big community | |||
*Separate groups - Each group can only see their own group, others are invisible. | |||
*Visible groups - Each group works in their own group, but can also see other groups. (The other groups' work is read-only.) | |||
For example, enabling either separate or visible groups on an assignment drop-box enables staff to filter the student submissions to see only those from a particular tutor group. With visible groups, students can see which other groups are doing the same activities as they are; with separate groups, they do not know which other groups are doing the same activities. | |||
Using groups with discussion forums allow teachers to restrict interaction between students. Separate groups mean only students in the same group can see and participate in discussions within a particular forum. Visible groups allow students to see other group's discussions, but only participate in their own group's discussions. | |||
To | ===To create a group=== | ||
#Click the 'Create group' button in ''Settings > Course administration > Users > Groups'' | |||
#Add a group name and optional description (displayed above the list of group members on the participants page), enrolment key and picture (displayed on the participants page and next to forum posts) | |||
#Click the 'Save changes' button | |||
#Select the group to which you want to add participants, then click the 'Add/remove users button | |||
# In the "Potential members" list, select the users you want to add to the group. Multiple users may be selected using the Crtl key. | |||
# Click the Add button to add the users to the group | |||
[[File:groups.png]] | |||
==Auto-create groups== | |||
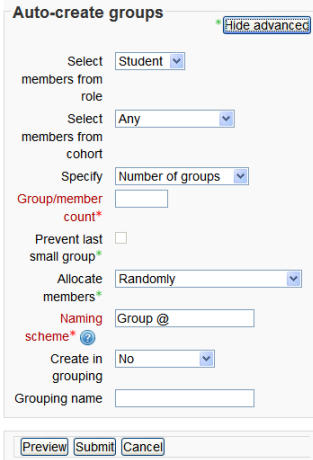
Groups may be created automatically via the 'Auto-create groups' button in ''Settings > Course administration > Users > Groups''. To see all the settings, click the Show Advanced button. | |||
[[File:autocreategroupsmoodle2.png]] | |||
''Select members from ...'' allows you to choose from roles or available cohorts. | |||
'''Specify''' and '''Group/Member count''' work together. | |||
You can specify if you would like to create | |||
*x number of Groups or | |||
*each group contain x number of students | |||
:When selecting '''Members per group''' the '''Prevent last small group''' will allocate additional members to an existing group rather then create a new group with fewer members than x. | |||
A | A '''naming scheme''' can be created automatically. # is replaced by sequential numbers, and @ by letters. For example: | ||
*''Group @'' will create group with a naming scheme Group A, Group B, Group C . . . | |||
*''Group #'' will create group with a naming scheme Group 1, Group 2, Group 3 . . . | |||
'''Create in grouping''' and '''Grouping name''' allows you to create a new grouping and allocate the new autocreated groups to be created to it. | |||
Prior to creating the groups, you can view the groups. | |||
==Groups overview== | |||
'' | A overview of groups and groupings is available via the Overview tab in ''Settings > Course administration > Users > Groups''. | ||
[[ | The table may be filtered to display particular [[Groupings|groupings]] or groups. | ||
==Groups capabilities== | |||
*[[Capabilities/moodle/course:managegroups|Manage groups]] | |||
*[[Capabilities/moodle/site:accessallgroups|Access all groups]] | |||
*[[Capabilities/moodle/calendar:managegroupentries|Manage group calendar entries]] | |||
[[ | |||
[[ | |||
==See also== | ==See also== | ||
*[[Upload users]] - for importing users into groups | *[[Upload users]] - for importing users into groups | ||
[[de:Gruppen]] | [[de:Gruppen]] | ||
[[fr:Groupes]] | [[fr:Groupes]] | ||
[[ja:グループ]] | [[ja:グループ]] | ||
Latest revision as of 15:49, 5 October 2012
A teacher can organise users into groups within the course or within particular activities.
Why use groups?
- You are a teacher in a course where you have several classes and you want to filter your activities and gradebook so you only see one class at a time.
- You are a teacher sharing a course with other teachers and you want to filter your activities and gradebook so you don’t see the students from your colleagues’ classes.
- You want to allocate a particular activity or resource to just one class or set of users and you don’t want others to see it. See Groupings.
Group levels
A group or grouping can be used on two levels:
- Course level - The group mode defined at the course level is the default mode for all activities defined within that course. To use groups you need first to set a group mode in Settings>Course administration>Edit settings.
- Activity level - Each activity that supports groups can also have its own group mode defined. If the course setting "Force group mode" is set to "Yes" then the option to define the group mode for individual activities is not available. If it is set to "No", then the teacher may change the group mode:
Group modes
There are three group modes
- No groups - There are no sub groups, everyone is part of one big community
- Separate groups - Each group can only see their own group, others are invisible.
- Visible groups - Each group works in their own group, but can also see other groups. (The other groups' work is read-only.)
For example, enabling either separate or visible groups on an assignment drop-box enables staff to filter the student submissions to see only those from a particular tutor group. With visible groups, students can see which other groups are doing the same activities as they are; with separate groups, they do not know which other groups are doing the same activities.
Using groups with discussion forums allow teachers to restrict interaction between students. Separate groups mean only students in the same group can see and participate in discussions within a particular forum. Visible groups allow students to see other group's discussions, but only participate in their own group's discussions.
To create a group
- Click the 'Create group' button in Settings > Course administration > Users > Groups
- Add a group name and optional description (displayed above the list of group members on the participants page), enrolment key and picture (displayed on the participants page and next to forum posts)
- Click the 'Save changes' button
- Select the group to which you want to add participants, then click the 'Add/remove users button
- In the "Potential members" list, select the users you want to add to the group. Multiple users may be selected using the Crtl key.
- Click the Add button to add the users to the group
Auto-create groups
Groups may be created automatically via the 'Auto-create groups' button in Settings > Course administration > Users > Groups. To see all the settings, click the Show Advanced button.
Select members from ... allows you to choose from roles or available cohorts. Specify and Group/Member count work together.
You can specify if you would like to create
- x number of Groups or
- each group contain x number of students
- When selecting Members per group the Prevent last small group will allocate additional members to an existing group rather then create a new group with fewer members than x.
A naming scheme can be created automatically. # is replaced by sequential numbers, and @ by letters. For example:
- Group @ will create group with a naming scheme Group A, Group B, Group C . . .
- Group # will create group with a naming scheme Group 1, Group 2, Group 3 . . .
Create in grouping and Grouping name allows you to create a new grouping and allocate the new autocreated groups to be created to it.
Prior to creating the groups, you can view the groups.
Groups overview
A overview of groups and groupings is available via the Overview tab in Settings > Course administration > Users > Groups.
The table may be filtered to display particular groupings or groups.
Groups capabilities
See also
- Upload users - for importing users into groups


