Talk:Upload users: Difference between revisions
(getting there edited all old stuff except file format, that is next) |
(→Tips on upload file creation: re arrange, comments in bold) |
||
| Line 189: | Line 189: | ||
'''Roles amendments''': Note that since roles have been added in Moodle 1.7, there is a new (better) fieldname to use for enrolments and that is ''role''. You can use ''role'' field instead of the legacy ''type'' field to specify roles directly - use either role short name or id (numeric names of roles are not supported). | '''Roles amendments''': Note that since roles have been added in Moodle 1.7, there is a new (better) fieldname to use for enrolments and that is ''role''. You can use ''role'' field instead of the legacy ''type'' field to specify roles directly - use either role short name or id (numeric names of roles are not supported). | ||
===Tips on upload file creation=== | ===Tips on upload file creation=== | ||
* Commas within the data should be encoded as , - the script will automatically decode these back to commas. | * Commas within the data should be encoded as , - the script will automatically decode these back to commas. '''CHRIS QUESTION: WHAT ABOUT PUTTING DOUBLE QUOTES AROUND FIELD, DOES THAT PRESERVE EVERYTHING INSIDE? Wonder if [[Flat file]] tips will apply here.''' | ||
* For Boolean fields, use 0 for false and 1 for true. | * For Boolean fields, use 0 for false and 1 for true. | ||
* Types are used to tell Moodle whether the user is a student or a teacher if a corresponding course exists (e.g. type2 corresponds to course2). 1 = Student, 2 = Editing Teacher, and 3 = Non-editing Teacher. If type is left blank, or if no course is specified, the user is default to student | * Types are used to tell Moodle whether the user is a student or a teacher if a corresponding course exists (e.g. type2 corresponds to course2). In earlier versions of Moodle there were only 3 choices: 1 = Student, 2 = Editing Teacher, and 3 = Non-editing Teacher. If type is left blank, or if no course is specified, the user is default to student. | ||
* For courses, use the short name for the course | * For courses, use the short name for the course | ||
* Note: If a user is already registered in the Moodle user database, this script will return the userid number (database index) for that user, and will enrol the user as a student in any of the specified courses WITHOUT updating the other specified data. | * Note: If a user is already registered in the Moodle user database, this script will return the userid number (database index) for that user, and will enrol the user as a student in any of the specified courses WITHOUT updating the other specified data. | ||
*'''Older Moodle version tips''' | |||
** Turn email off: The parameter '''emailstop''' must be set to 1 if the email address should not work. If you set it to 0 then the email address is switched on. If you want to have all the email addresses active then you do not need the additional parameter in your upload file. | |||
** Force password change: Set the password field for desired users to '''changeme'''. | |||
===Sample Upload user text file=== | |||
Here is an example of a valid import file: | Here is an example of a valid import file: | ||
Revision as of 13:00, 25 July 2008
I copied text from the help file to this page. Please let me know if this is not the way to go. I felt that the Docs should be self-sufficient without the "online help files". --Samuli Karevaara 02:39, 1 September 2006 (CDT)
- Hi Samuli, it's not necessary to copy all help file text into the documentation wiki, however it can sometimes help. --Helen Foster 03:09, 4 October 2007 (CDT)
Possible inconsistency or lack of clarity
It's not obvious whether these two sections contradict each other:
- Note: If a user is already registered in the Moodle user database, this script will return the userid number (database index) for that user, and will enrol the user as a student in any of the specified courses WITHOUT updating the other specified data
- By default Moodle assumes that you will be creating new user accounts, and skips records where the username matches an existing account. However, if you set "Update existing accounts" to Yes, the existing user account will be updated.
Is the former an exception to the latter? Does adding an existing user to a course and/or group count as 'updating'? --David Scotson 13:37, 6 September 2006 (CDT)
What is meant "set "Update existing accounts" to Yes" ?? Where can i find it in moodle?
As far as I can tell, uploading users with "update" off doesn't affect enrollments in any way. This is from personal experience and from looking at the code. The help file is incorrect.
Can some more clarity be added about csv file types, it seems that the instructions for uploading files for user accounts say just .txt files ( Since a CSV file is a simple text file (ASCII or Unicode) maybe it should be listed as a acceptable file type for uploading. GM 05/28/08 Moodle rooms assignment 14.1
Changes in 1.9
It is worth noting that in version 1.9 the interface for batch-uploading users is significantly different than in 1.8 and previously. In 1.9 the options have been split into two pages; first the file gets uploaded and parsed, then you tell Moodle what you want it to do with that file. E.g. you do not get to choose whether the file should update existing accounts until page 2.
This page needs serious work for 1.9
In MoodleSpeak of 1.9 this page can use some serious work. I suspect the language is left from older versions of Moodle.
In short: Upload Users is about Authentication, Flat File is about Enrolment. Flat File is probably a poor name but we can not do anything about it except not use it on this page. While both Authentication and Enrolment use a special text file for bulk uploads, each has a different set of data fields and each is processed differently by the interface.--Chris collman 15:08, 24 July 2008 (CDT)
Proposed changes July 2008
I have walked through 3 or 4 Upload users and snapped some screen shots on a local host in 1.9. Since I am "new" at this process, I will propose changes to the page in hopes someone who is more about the process will catch errors.
While this page should contain much of the same information as help, it should not be a duplication of help. This page should have lots of links.
- NOTE TO SELF: For example, at the moment I am showing every option in say default. Many of these options should be (but are they?) shown in other parts of the documentation. I have not checked. Instead of showing every possible option here, we could have a link to another part of MoodleDocs that would show the options in case the site administrator forgot or did not know what they were.
INTRODUCTION Location: Administration > Users > Accounts > Upload users
The upload users utility is a simple but powerful way to upload user information into Moodle. It is possible to either create authenticate users, or to create authenticate users and enrol them into a course at once.
- Note: that recent versions of Moodle have tools to keep the site administrators personal maintenance work down besides this particular form of manual authentication. For example, connecting to existing external databases or letting the users create their own accounts. See the Authentication section in the admin menus.
The user data text file must follow a certain format, as described below.
Basic Steps
The uploading users process uses 3 screens and has many options to consider.
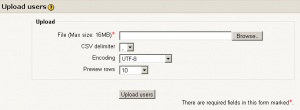
1 User upload screen
- Open up the Upload users screen in Site Administration >Users>Accounts>Upload users
- Upload file using the browse button
- CSV delimiter= review and change if necessary the separating value (comma, colon, semi colon and tab (/t)
- Encoding language - should match the Moodle site
- Preview rows: Set the number of records to display in the next preview screen
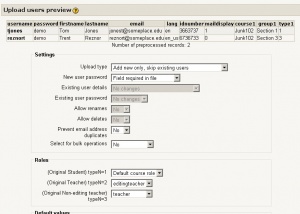
2 Upload user preview screen
There are 4 parts to this screen: Preview of text file, Settings, Roles and Default values.
Preview of text file
At the top of the page are the first records in the file. It is always a best practice to look at them to make sure the field information is in the correct place.
Settings
Upload type:
- Add new only, skip existing users
- Add all, append counter (a number) to name if needed
- Add new and update existing users
- Update existing users only
New user password: (Will not effect existing users passwords)
- Field required in text file
- Create password if necessary
Existing user details
- No changes
- Override file
- Override with file and defaults
- Fill in missing with file from defaults
Existing user password
- No changes
- Update
Allow renames
- Yes or No
Allow deletes
- Yes or No
Prevent email address duplicates
- Yes or No
Select for bulk operations (this can make global changes to all users like Bulk user changes)
- No
- New users
- Updated users
- All users
Roles
You may assign a user any one of 3 roles when using Update user. Each user in the text file mayhave been assigned a role (see below) and that will appear in the Type1 column in the preview section.
Select the role from a pulldown menu for each of the numeric types. For example, we could change type 3 from a non-editing teacher to an editing teacher.
- (Original Student) typeN=1 Type 1
- (Original Teacher) typeN=2
- (Original Non-editing teacher) typeN=3
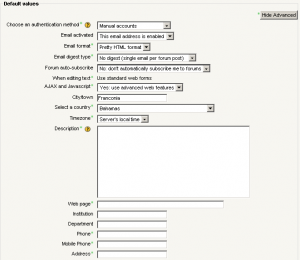
Default values
Notice there is an advanced settings button. Values placed in these screens are refered to in the Settings section when the term "defaults" is used.
Choose an authentication method (Advanced setting)
- Manual accounts
- No login
- Email based self-registration
Email activated
- This email address is enabled
- This email address is not enabled
Email format (Advanced setting)
- Pretty HTML
- Basic text
Email digest type (Advanced setting)
- No digest, single email per forum post
- Complete, daily emails with full posts
- Subjects only, daily emails with subjects only
Forum auto-subscribe
- No, don't automatically subscribe me in forums
- Yes, when I post subscribe me to that forum
When editing text (Advanced setting)
- Use standard web forms
AJAX and Javascript (Advanced setting)
- Yes, use advanced web features
- No, use basic web featgures
City/town
- Fill in the default you want to use
Select a country (Advanced setting)
- Use the pulldown menu to select a default country
Timezone (Advanced setting)
- Use the pulldown menu to select a default country
Description (Advanced setting)
- A field with the HTML edit tool to put in a standard user description
Web page (Advanced setting)
Institution
- Fill in the default you want to use
Department
- Fill in the default you want to use
Phone (Advanced setting)
- Fill in the default you want to use
Mobile Phone (Advanced setting)
- Fill in the default you want to use
Address (Advanced setting)
- Fill in the default you want to use
Upload users results screen
This screen reviews some of the changes that have been made.
- Always exciting, did the site administrator fill in all the options correctly? If not, start to plan the steps to fix the errors.
- As a best practice is is a good idea to perform a quality control check of some users and a course to makes sure the upload users command had the intended results.
Upload file format
Users may be imported, enrolled on courses and organised into groups via flat file.
If you are sure you want to import multiple user accounts from a text file, then you need to format your text file as follows:
- Each line of the file contains one record
- Each record is a series of data separated by commas
- The first record of the file is special, and contains a list of fieldnames. This defines the format of the rest of the file.
- Required fieldnames: these fields must be included in the first record, and defined for each user
username, password, firstname, lastname, email
- Default fieldnames: these are optional - if they are not included then the values are taken from the primary admin
institution, department, city, country, lang, auth, timezone
- Optional fieldnames: all of these are completely optional. The course names are the "shortnames" of the courses - if present then the user will be enrolled as students in those courses. Group names must be associated to the corresponding courses, i.e. group1 to course1, etc.
idnumber, icq, phone1, phone2, address, url, description, mailformat, maildisplay, htmleditor, autosubscribe, course1, course2, course3, course4, course5, group1, group2, group3, group4, group5, type1, type2, type3, type4, type5
Roles amendments: Note that since roles have been added in Moodle 1.7, there is a new (better) fieldname to use for enrolments and that is role. You can use role field instead of the legacy type field to specify roles directly - use either role short name or id (numeric names of roles are not supported).
Tips on upload file creation
- Commas within the data should be encoded as , - the script will automatically decode these back to commas. CHRIS QUESTION: WHAT ABOUT PUTTING DOUBLE QUOTES AROUND FIELD, DOES THAT PRESERVE EVERYTHING INSIDE? Wonder if Flat file tips will apply here.
- For Boolean fields, use 0 for false and 1 for true.
- Types are used to tell Moodle whether the user is a student or a teacher if a corresponding course exists (e.g. type2 corresponds to course2). In earlier versions of Moodle there were only 3 choices: 1 = Student, 2 = Editing Teacher, and 3 = Non-editing Teacher. If type is left blank, or if no course is specified, the user is default to student.
- For courses, use the short name for the course
- Note: If a user is already registered in the Moodle user database, this script will return the userid number (database index) for that user, and will enrol the user as a student in any of the specified courses WITHOUT updating the other specified data.
- Older Moodle version tips
- Turn email off: The parameter emailstop must be set to 1 if the email address should not work. If you set it to 0 then the email address is switched on. If you want to have all the email addresses active then you do not need the additional parameter in your upload file.
- Force password change: Set the password field for desired users to changeme.
Sample Upload user text file
Here is an example of a valid import file:
username, password, firstname, lastname, email, lang, idnumber, maildisplay, course1, group1, type1

jonest, verysecret, Tom, Jones, jonest@someplace.edu, en, 3663737, 1, Junk102, Section 1, 1

reznort, somesecret, Trent, Reznor, reznort@someplace.edu, en_us, 6736733, 0, Junk102, Section 3, 3
(Text copied from Upload users help file.)
Tips and Tricks
- When updating existing accounts you can change usernames as well. Set "Allow renames" to Yes and include in your file a field called
oldusername. ( Pre 1.9 Moodle instruction?)
- Caution: any errors updating existing accounts can affect your users badly. Be careful when using the options to update.
- Prior to Moodle 1.9, the file must have the same encoding as your language pack. In Moodle 1.7 and 1.8 it is always UTF-8. In Moodle 1.9 onwards, the encoding may be selected.
- The country should be written as a two letter code, e.g. BE for Belgium, NL for the Netherlands, and should be written in capitals. If not, it gets abbreviated to two letters, which can cause an invalid country entry in the database.
Spreadsheet tips
If you use a spreadsheet program such as Excel to create your .csv file, check the resulting output in a text editor before you upload it.
- A csv file is a simple text file (ASCII or Unicode) that can be used to upload user accounts
- It is possible to get trailing commas on each line from an empty field in the spreadsheet if you have added and deleted columns of information prior to saving the final file
- In the spreadsheet, check the character encoding in the output file settings
- Caution:Excel translates passwords that begin with - (minus) or + (plus) as zero. Even when saving as .csv and saying "Yes" to "Keep this format, and leave out any incompatible features." Check for this before uploading, as a zero halts the upload process.
See also
Using Moodle forum discussions:


