Groups: Difference between revisions
Ruby Costea (talk | contribs) |
Helen Foster (talk | contribs) (major rewrite incorporating content from other group pages) |
||
| (47 intermediate revisions by 19 users not shown) | |||
| Line 1: | Line 1: | ||
{{ | {{Grouping users}} | ||
A teacher can organise users into groups within the course or within particular activities. | |||
==Creating a group== | |||
To create a group | |||
[[ | #Click the 'Create group' button in ''Settings > Course administration > Users > Groups'' | ||
#Add a group name and optional description (displayed above the list of group members on the participants page), enrolment key and picture (displayed on the participants page and next to forum posts) | |||
#Click the 'Save changes' button | |||
#Click the 'Add/remove users button | |||
# In the "Potential members" list, select the users you want to add to the group. Multiple users may be selected using the Crtl key. | |||
# Click the Add button to add the users to the group | |||
[[File:Create group.png]] | |||
==Auto-create groups== | |||
Groups may be created automatically via the 'Auto-create groups' button in ''Settings > Course administration > Users > Groups''. | |||
[[File:Auto-create groups.png]] | |||
'''Specify''' and '''Group/Member count''' work together. | |||
You can specify if you would like to create | |||
*x number of Groups or | |||
*each group contain x number of students | |||
:When selecting '''Members per group''' the '''Prevent last small group''' will allocate additional members to an existing group rather then create a new group with fewer members than x. | |||
A '''naming scheme''' can be created automatically. # is replaced by sequential numbers, and @ by letters. For example: | |||
*''Group @'' will create group with a naming scheme Group A, Group B, Group C . . . | |||
*''Group #'' will create group with a naming scheme Group 1, Group 2, Group 3 . . . | |||
'''Create in grouping''' and '''Grouping name''' allows you to create a new grouping and allocate the new autocreated groups to be created to it. | |||
Prior to creating the groups, you can view the groups. | |||
== | ==Groups overview== | ||
A overview of groups and groupings is available via the Overview tab in ''Settings > Course administration > Users > Groups''. | |||
The table may be filtered to display particular [[Groupings|groupings]] or groups. | |||
* Activity level - | ==Using groups== | ||
Using groups on the course or activity level will allow the teacher to: | |||
*Completely isolate groups of students by sight and activity from each other. | |||
*Partially separate groups, where one group can see other groups and each groups' activity, but not interact with the other group(s). | |||
*Identify each group with an icon. | |||
===Group levels=== | |||
A group or grouping can be used on two levels: | |||
*Course level - The group mode defined at the course level is the default mode for all activities defined within that course. This is determined in the course settings. | |||
*Activity level - Each activity that supports groups can also have its own group mode defined. If the course setting "Force group mode" is set to "Yes" then the option to define the group mode for individual activities is not available. | |||
[[Image:forceNo.png]] | |||
'''AND''' | |||
[[Image:forceYes.png]] | |||
: | |||
===Group modes=== | |||
There are three group modes: | |||
* | *No groups - There are no sub groups, everyone is part of one big community | ||
* | *Separate groups - Each group can only see their own group, others are invisible. | ||
* | *Visible groups - Each group works in their own group, but can also see other groups. (The other groups' work is read-only.) | ||
==See also== | ==See also== | ||
*[[Upload users]] - for importing users into groups | *[[Upload users]] - for importing users into groups | ||
[[de:Gruppen]] | |||
[[fr:Groupes]] | [[fr:Groupes]] | ||
[[ja:グループ]] | [[ja:グループ]] | ||
[[pl:Grupy]] | [[pl:Grupy]] | ||
Latest revision as of 12:39, 13 October 2011
A teacher can organise users into groups within the course or within particular activities.
Creating a group
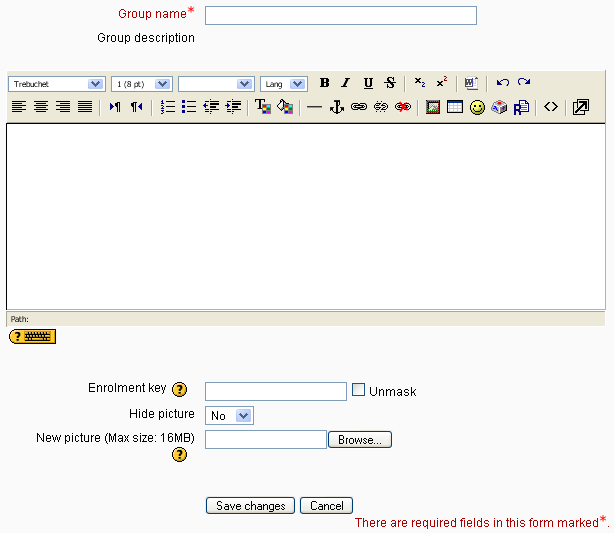
To create a group
- Click the 'Create group' button in Settings > Course administration > Users > Groups
- Add a group name and optional description (displayed above the list of group members on the participants page), enrolment key and picture (displayed on the participants page and next to forum posts)
- Click the 'Save changes' button
- Click the 'Add/remove users button
- In the "Potential members" list, select the users you want to add to the group. Multiple users may be selected using the Crtl key.
- Click the Add button to add the users to the group
Auto-create groups
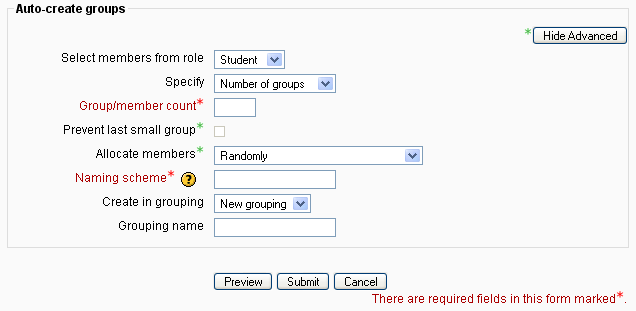
Groups may be created automatically via the 'Auto-create groups' button in Settings > Course administration > Users > Groups.
Specify and Group/Member count work together.
You can specify if you would like to create
- x number of Groups or
- each group contain x number of students
- When selecting Members per group the Prevent last small group will allocate additional members to an existing group rather then create a new group with fewer members than x.
A naming scheme can be created automatically. # is replaced by sequential numbers, and @ by letters. For example:
- Group @ will create group with a naming scheme Group A, Group B, Group C . . .
- Group # will create group with a naming scheme Group 1, Group 2, Group 3 . . .
Create in grouping and Grouping name allows you to create a new grouping and allocate the new autocreated groups to be created to it.
Prior to creating the groups, you can view the groups.
Groups overview
A overview of groups and groupings is available via the Overview tab in Settings > Course administration > Users > Groups.
The table may be filtered to display particular groupings or groups.
Using groups
Using groups on the course or activity level will allow the teacher to:
- Completely isolate groups of students by sight and activity from each other.
- Partially separate groups, where one group can see other groups and each groups' activity, but not interact with the other group(s).
- Identify each group with an icon.
Group levels
A group or grouping can be used on two levels:
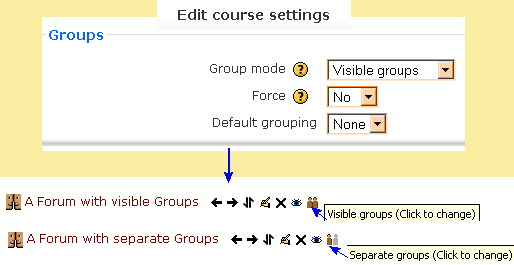
- Course level - The group mode defined at the course level is the default mode for all activities defined within that course. This is determined in the course settings.
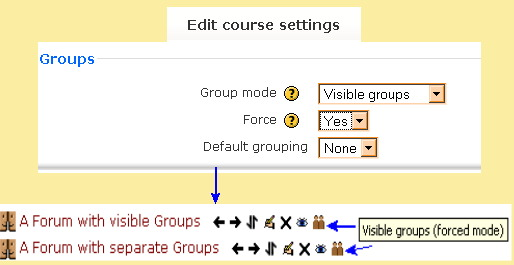
- Activity level - Each activity that supports groups can also have its own group mode defined. If the course setting "Force group mode" is set to "Yes" then the option to define the group mode for individual activities is not available.
AND
Group modes
There are three group modes:
- No groups - There are no sub groups, everyone is part of one big community
- Separate groups - Each group can only see their own group, others are invisible.
- Visible groups - Each group works in their own group, but can also see other groups. (The other groups' work is read-only.)
See also
- Upload users - for importing users into groups


