Building Quiz: Difference between revisions
(Added content, not yet done, screenshots still missing) |
|||
| (89 intermediate revisions by 15 users not shown) | |||
| Line 1: | Line 1: | ||
{{ | {{Improve}} | ||
{{Quiz}} | |||
Navigation > Courses > Course Name > Topic/section > Info | |||
Once a quiz has been added to the course and the [[Quiz settings]] established,the teacher can start to build the quiz. The teacher can use the Navigation menu to get to the quiz's "info" link or click directly on the Quiz name on the course's home page. | |||
==Image of blank quiz== | |||
Here is a quiz just after it was created: | |||
[[File:Quiz info editing new 21.PNG|thumb|500px|left|A blank quiz in 2.1 ready to be built]] | |||
== | ==The basic ideas of quiz-making== | ||
The basic idea is in building a quiz is to add questions from the question bank, organize them by page and determine the value of each question. | |||
There are several ways to add questions. From the editing quiz tab, the teacher can add question by using the "Question bank contents {Show)" link to find an existing question or use the "Add a question" button to create a new question that is automatically added to the question bank. | |||
In the question bank you can create categories, which are similar to folders in your computer file system. You can use Categories to create a hierarchy for organising your questions. Depending upon permissions, you might have access to questions created for other courses by other teachers in the question bank. | |||
You can use random questions so that different students get different questions, or so that one student gets different questions each time they attempt the quiz. When a student starts an attempt at the quiz, the random question will be replaced by an actual question, picked at random from a certain category in the question bank. | |||
===A paper quiz example=== | |||
As an example, think of the quiz like a simple traditional paper test. You have a blank piece of paper in front of you and an overall plan for the quiz. You may have a filing cabinet ([[Question bank]]) next to you with all the questions you or other teachers have written for your course, your department or school. When you decide to add a new question, you will decide what type of question it is going to be. Or you can go to the filing cabinet that has individual questions neatly organized ([[Question categories]]) and look at it. You will then start typing the question (Question text) and its answers (Choices) according to it's type. You will make a side note of the correct answer(s), determine how much full or partial credit (grade) you will give for each answer and how much the question is worth in your quiz. When you are done with a question, you go onto the next question and repeat the process. | |||
In our paper example, we did not mention that every question gets written on its own form. New questions are always put in the filing cabinet. You find an existing question, edit it and save it as a new question to use in your quiz. When you create a question, you might have thought about suggestions (hints) you could give your students in class about each question, or what you would like to tell the student about their answer(feedback). Moodle has a place to record these kinds of things, if you want to use them. | |||
Your overall plan for the paper quiz, probably will include how many points the quiz is worth in the course. Most teachers like to write the score on the students exam, with some sort of note based upon the score. As part of the quiz plan, the teacher has decided what kind of grading system ([[Scales]]) they will use or not use. Moodle can store this information in its "Update settings" area. | |||
While in theory is possible for a teacher to create an individual paper quiz for each student, it is not practical because of the required effort. However, you will discover that such things are possible with less effort by using different features of the quiz module and the question bank. We will keep it simple but you might be thinking about creative ways to use various settings. | |||
==Compiling a new quiz== | |||
===Adding questions to a quiz=== | ===Adding questions to a quiz=== | ||
Once you’ve created your questions, you’ll need to add them to the quiz. | Once you’ve created your questions, you’ll need to add them to the quiz. There are many types in the [[Question bank]] that you can use. Alternatively, you may choose to [[Import questions|import questions]]. | ||
Your first decision is whether to click on "Add a question" button, or show the question bank contents, or add a random question from the question bank with the button. Since we will describe [[Using question bank]] in more detail elsewhere, we will create a question "on the fly". It will be automatically be added to the question bank in the default category for our quiz. | |||
# Click on the "Add a question" button | |||
# Select your question type (We will select Multiple choice) | |||
# Complete the question form [[Building a question]] and save the question. | |||
[[File:Quiz_after_first_question_added.PNG|thumb|center|A quiz with 1 question]] | |||
You can keep adding questions this way. | |||
[[File:Quiz after first 3 question added.PNG|thumb|center|A quiz with 3 questions,each on their own page]] | |||
===Ordering and paging in a quiz=== | |||
Settings >Quiz administration > Edit Quiz > Ordering and paging | |||
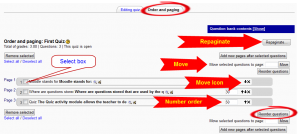
There are several ways to change the order of the questions in a quiz. You can "repaginate" by setting the number of questions per page. After setting the number of questions per page, you can move questions so that there are a different number of questions on each page. | |||
:TIP: Remember, one of the quiz setting will randomize the questions and this will over-ride any previous number of questions that were put on a page. | |||
Lets put 2 questions on each page, then change the order. | |||
[[File:Quiz_order and paging 3 pages 3 questions.PNG|thumb|center|Order and Paging tab with 3 pages of questions]] | |||
#In on the Edit Quiz page, click on the "Ordering and paging" tab | |||
#Click on the "Repaginate" button | |||
#Use pulldown menu to repaginate with 2 questions per page | |||
#Click "Go" | |||
Now we have set up 2 questions per page. Page 2 only has 1 question because we only have 3 questions in our quiz. | |||
:Tip: Best practice is to get all your questions in your quiz if you plan to have different numbers of questions on each page. Repaginate will regroup the questions. | |||
You now have a choice when it comes to moving questions. You can use: | |||
*Move icon - move 1 question up or down in the order | |||
*"Move selected questions to page" tool - adds selected to the page you select | |||
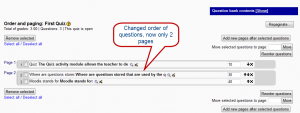
*Change the number order and click one of the "Reorder questions" buttons - will automatically renumber the question in increments of 10. But it will recognize single digit numbers when it reorders questions. | |||
[[File:Quiz_order and paging reordered questions and pages.PNG|thumb|center|2 pages of questions, changed the order of questions and number of pages]] | |||
===Assign points per questions === | |||
''Settings > Quiz administration > Edit quiz > Editing quiz'' | |||
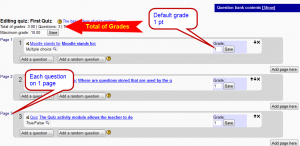
In our example, we assigned the quiz 10 points in the quiz settings. By default the Quiz module said each question was worth 1 point. Thus each question is worth the same. You can change how much a question is worth by changing the number in the grade box and then clicking on save. | |||
:Tip: Each save button is independent of each other. Thus if you change 2 grade boxes and click on the "Save" button, only the grade next to that button will be saved. Your other changes will revert to what they were before. Best practice is to change the grade and save one question at a time. | |||
[[File:Quiz changing grade on question.PNG|thumb|center|Here we changed the grade on the first question to 3]] | |||
Notice in the above example, the total of grades is 5 and the quiz is worth 10 points in the course. The quiz module will do the math, so the 2 point question is worth 2 times more when the Quiz module determines how many point out of 10 to award the student. | |||
<p class="note">''"This page is still under revision to update it to 2.x. From this point on the page has not been double checked against a 2.0 Moodle. However, most of the instructions still apply. Please move or delete this note as necessary--[[User:chris collman|chris collman]] 01:18, 29 August 2011 (WST)</p> | |||
===Adding random questions=== | |||
A random question places a link that will select a unique question at random from a specific question category. Random questions are selected when the quiz is generated for a specific student attempt. | |||
This means that different students are likely to get a different selection of questions when they attempt this quiz. For example, when a quiz has 10 random questions that draw on a question category with 30 questions. If a quiz allows multiple attempts for each student then each attempt will also contain a new selection of questions. | |||
The same question will never appear twice in a quiz. If you include several random questions then different questions will always be chosen for each of them. If you mix random questions with non-random questions then the random questions will be chosen so that they do not duplicate one of the non-random questions. This does imply that you need to provide enough questions in the category from which the random questions are chosen, otherwise the student will be shown a friendly error message. The more questions you provide the more likely it will be that students get different questions on each attempt. | |||
The | The grade for the randomly chosen question will be rescaled so that the maximum grade is what you have chosen as the grade for the random question. | ||
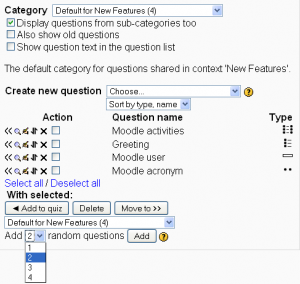
To add random questions, select the question category you wish to use, then use the drop-down menu at the bottom of the Question Bank in the right column. Select the number of random questions you wish to add, and click 'Add'. The random question link will appear on the quiz question list in the left column. | |||
[[Image:Quiz Random Question select.png|thumb|center|Here we are selecting 2 random question from the "Default for New Features" category]]<br style="clear:both;"> | |||
===Previewing questions=== | |||
After you have added questions to the quiz, they will appear on the left. Notice the preview and edit icons next to the fixed questions. | |||
[[File:Quiz preview of 1 page with 2 questions.PNG|thumb|center|A 2 question, 1 page quiz in preview mode]] | |||
This quiz will work like a real quiz. Submit the quiz to see your answers. Here is the same quiz, where we missed the question. It shows feedbacks. | |||
[[File:Quiz preview of 1 page with 2 questions after submitting.PNG|thumb|center|A preview quiz in review as the students would see it.]] | |||
==After quiz has been attempted== | ==After quiz has been attempted== | ||
If the quiz | If one or more students have taken the quiz, you will see a list of all the questions in the quiz and a notice saying that you cannot add or remove questions. | ||
You can move questions in a different order, re grade questions, preview an individual question and click on an question edit link that will allow you to directly edit the question stored in the question bank. | |||
[[Image:Quiz_Edit_after_attempts.png|thumb|center|Quiz after 2 students have made attempts]] | |||
:''TIP:'' You can delete all quiz attempts by students and then edit the quiz as if no students had attempted it. To do this, go to the "Info" tab, select the Attempts link. This will present a list of students and their scores. Use the check box on the left of each student and the delete button/menu item. | |||
:''TIP:'' There are several ways to deal with bad questions in a quiz. | |||
::*Change the grade for the bad question to 0 in the quiz. | |||
::*Edit the question, changing what you will accept as a correct answer, then regrading the exam. Remember when changing a question that the next time it is used it will be as it was in the last edit. Also, regrading will only effect one quiz at a time. | |||
::*You can edit the question to explain the situation to the student and then you can set the grade for the question to zero. After you make such changes you should regrade the quiz by clicking on the '''Results''' tab and then the '''Regrade''' tab. This will change the grade for all students who have taken the quiz so far. Remember, if the question is used by another quiz, your "explanation" will appear as part of that quiz. | |||
::*You can change the grade for the bad question and then move or delete the question from your question category. The question will still appear on the quiz. Some places do not like to delete any question, but will move them to a "dead" or "bad" question category. | |||
::*When you discover a bad question in your quiz, it may effect the question bank. Remember that a final might be made up of a certain number of random questions drawn from different question categories, the same categories used in a smaller subject quiz. It can be very important do something about bad or invalid questions in a question category when the categories are use in other places. | |||
==See also== | |||
*[[Questions]] in [[Managing a Moodle course]] | |||
*[http://www.youtube.com/watch?v=rFnoNNrTx3c How to create a quiz video] | |||
[[de:Test bearbeiten]] | |||
[[ | |||
Latest revision as of 09:10, 24 July 2012
This page really needs improving. Please see the page comments for suggestions of what to include, then remove this template when you're done.
Navigation > Courses > Course Name > Topic/section > Info
Once a quiz has been added to the course and the Quiz settings established,the teacher can start to build the quiz. The teacher can use the Navigation menu to get to the quiz's "info" link or click directly on the Quiz name on the course's home page.
Image of blank quiz
Here is a quiz just after it was created:
The basic ideas of quiz-making
The basic idea is in building a quiz is to add questions from the question bank, organize them by page and determine the value of each question.
There are several ways to add questions. From the editing quiz tab, the teacher can add question by using the "Question bank contents {Show)" link to find an existing question or use the "Add a question" button to create a new question that is automatically added to the question bank.
In the question bank you can create categories, which are similar to folders in your computer file system. You can use Categories to create a hierarchy for organising your questions. Depending upon permissions, you might have access to questions created for other courses by other teachers in the question bank.
You can use random questions so that different students get different questions, or so that one student gets different questions each time they attempt the quiz. When a student starts an attempt at the quiz, the random question will be replaced by an actual question, picked at random from a certain category in the question bank.
A paper quiz example
As an example, think of the quiz like a simple traditional paper test. You have a blank piece of paper in front of you and an overall plan for the quiz. You may have a filing cabinet (Question bank) next to you with all the questions you or other teachers have written for your course, your department or school. When you decide to add a new question, you will decide what type of question it is going to be. Or you can go to the filing cabinet that has individual questions neatly organized (Question categories) and look at it. You will then start typing the question (Question text) and its answers (Choices) according to it's type. You will make a side note of the correct answer(s), determine how much full or partial credit (grade) you will give for each answer and how much the question is worth in your quiz. When you are done with a question, you go onto the next question and repeat the process.
In our paper example, we did not mention that every question gets written on its own form. New questions are always put in the filing cabinet. You find an existing question, edit it and save it as a new question to use in your quiz. When you create a question, you might have thought about suggestions (hints) you could give your students in class about each question, or what you would like to tell the student about their answer(feedback). Moodle has a place to record these kinds of things, if you want to use them.
Your overall plan for the paper quiz, probably will include how many points the quiz is worth in the course. Most teachers like to write the score on the students exam, with some sort of note based upon the score. As part of the quiz plan, the teacher has decided what kind of grading system (Scales) they will use or not use. Moodle can store this information in its "Update settings" area.
While in theory is possible for a teacher to create an individual paper quiz for each student, it is not practical because of the required effort. However, you will discover that such things are possible with less effort by using different features of the quiz module and the question bank. We will keep it simple but you might be thinking about creative ways to use various settings.
Compiling a new quiz
Adding questions to a quiz
Once you’ve created your questions, you’ll need to add them to the quiz. There are many types in the Question bank that you can use. Alternatively, you may choose to import questions.
Your first decision is whether to click on "Add a question" button, or show the question bank contents, or add a random question from the question bank with the button. Since we will describe Using question bank in more detail elsewhere, we will create a question "on the fly". It will be automatically be added to the question bank in the default category for our quiz.
- Click on the "Add a question" button
- Select your question type (We will select Multiple choice)
- Complete the question form Building a question and save the question.
You can keep adding questions this way.
Ordering and paging in a quiz
Settings >Quiz administration > Edit Quiz > Ordering and paging
There are several ways to change the order of the questions in a quiz. You can "repaginate" by setting the number of questions per page. After setting the number of questions per page, you can move questions so that there are a different number of questions on each page.
- TIP: Remember, one of the quiz setting will randomize the questions and this will over-ride any previous number of questions that were put on a page.
Lets put 2 questions on each page, then change the order.
- In on the Edit Quiz page, click on the "Ordering and paging" tab
- Click on the "Repaginate" button
- Use pulldown menu to repaginate with 2 questions per page
- Click "Go"
Now we have set up 2 questions per page. Page 2 only has 1 question because we only have 3 questions in our quiz.
- Tip: Best practice is to get all your questions in your quiz if you plan to have different numbers of questions on each page. Repaginate will regroup the questions.
You now have a choice when it comes to moving questions. You can use:
- Move icon - move 1 question up or down in the order
- "Move selected questions to page" tool - adds selected to the page you select
- Change the number order and click one of the "Reorder questions" buttons - will automatically renumber the question in increments of 10. But it will recognize single digit numbers when it reorders questions.
Assign points per questions
Settings > Quiz administration > Edit quiz > Editing quiz
In our example, we assigned the quiz 10 points in the quiz settings. By default the Quiz module said each question was worth 1 point. Thus each question is worth the same. You can change how much a question is worth by changing the number in the grade box and then clicking on save.
- Tip: Each save button is independent of each other. Thus if you change 2 grade boxes and click on the "Save" button, only the grade next to that button will be saved. Your other changes will revert to what they were before. Best practice is to change the grade and save one question at a time.
Notice in the above example, the total of grades is 5 and the quiz is worth 10 points in the course. The quiz module will do the math, so the 2 point question is worth 2 times more when the Quiz module determines how many point out of 10 to award the student.
"This page is still under revision to update it to 2.x. From this point on the page has not been double checked against a 2.0 Moodle. However, most of the instructions still apply. Please move or delete this note as necessary--Chris collman 01:18, 29 August 2011 (WST)
Adding random questions
A random question places a link that will select a unique question at random from a specific question category. Random questions are selected when the quiz is generated for a specific student attempt.
This means that different students are likely to get a different selection of questions when they attempt this quiz. For example, when a quiz has 10 random questions that draw on a question category with 30 questions. If a quiz allows multiple attempts for each student then each attempt will also contain a new selection of questions.
The same question will never appear twice in a quiz. If you include several random questions then different questions will always be chosen for each of them. If you mix random questions with non-random questions then the random questions will be chosen so that they do not duplicate one of the non-random questions. This does imply that you need to provide enough questions in the category from which the random questions are chosen, otherwise the student will be shown a friendly error message. The more questions you provide the more likely it will be that students get different questions on each attempt.
The grade for the randomly chosen question will be rescaled so that the maximum grade is what you have chosen as the grade for the random question.
To add random questions, select the question category you wish to use, then use the drop-down menu at the bottom of the Question Bank in the right column. Select the number of random questions you wish to add, and click 'Add'. The random question link will appear on the quiz question list in the left column.
Previewing questions
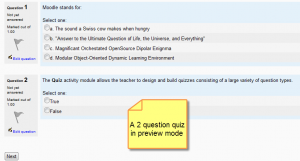
After you have added questions to the quiz, they will appear on the left. Notice the preview and edit icons next to the fixed questions.
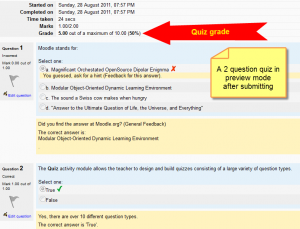
This quiz will work like a real quiz. Submit the quiz to see your answers. Here is the same quiz, where we missed the question. It shows feedbacks.
After quiz has been attempted
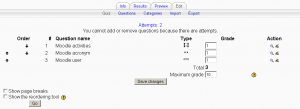
If one or more students have taken the quiz, you will see a list of all the questions in the quiz and a notice saying that you cannot add or remove questions.
You can move questions in a different order, re grade questions, preview an individual question and click on an question edit link that will allow you to directly edit the question stored in the question bank.
- TIP: You can delete all quiz attempts by students and then edit the quiz as if no students had attempted it. To do this, go to the "Info" tab, select the Attempts link. This will present a list of students and their scores. Use the check box on the left of each student and the delete button/menu item.
- TIP: There are several ways to deal with bad questions in a quiz.
- Change the grade for the bad question to 0 in the quiz.
- Edit the question, changing what you will accept as a correct answer, then regrading the exam. Remember when changing a question that the next time it is used it will be as it was in the last edit. Also, regrading will only effect one quiz at a time.
- You can edit the question to explain the situation to the student and then you can set the grade for the question to zero. After you make such changes you should regrade the quiz by clicking on the Results tab and then the Regrade tab. This will change the grade for all students who have taken the quiz so far. Remember, if the question is used by another quiz, your "explanation" will appear as part of that quiz.
- You can change the grade for the bad question and then move or delete the question from your question category. The question will still appear on the quiz. Some places do not like to delete any question, but will move them to a "dead" or "bad" question category.
- When you discover a bad question in your quiz, it may effect the question bank. Remember that a final might be made up of a certain number of random questions drawn from different question categories, the same categories used in a smaller subject quiz. It can be very important do something about bad or invalid questions in a question category when the categories are use in other places.


