「認証の管理」の版間の差分
Mitsuhiro Yoshida (トーク | 投稿記録) |
Mitsuhiro Yoshida (トーク | 投稿記録) |
||
| 61行目: | 61行目: | ||
In addition to setting reCAPTCHA keys, email-based self-registration should be set as the self registration authentication plugin in the manage authentication common settings and the reCAPTCHA element should be enabled in the [[Email-based self-registration]] settings. | In addition to setting reCAPTCHA keys, email-based self-registration should be set as the self registration authentication plugin in the manage authentication common settings and the reCAPTCHA element should be enabled in the [[Email-based self-registration]] settings. | ||
== | ==プロファイルフィールドデータのマッピングおよびロック== | ||
Most (but not all) authentication plugins that use an external source for the user account details allow us to retrieve some user profile details (like first name, last name, email, etc.). By using the Data Mapping section on those authentication plugins configuration page we can configure what, when and how to manage all those user profile details. | Most (but not all) authentication plugins that use an external source for the user account details allow us to retrieve some user profile details (like first name, last name, email, etc.). By using the Data Mapping section on those authentication plugins configuration page we can configure what, when and how to manage all those user profile details. | ||
2009年9月9日 (水) 15:08時点における版
作成中です - Mitsuhiro Yoshida 2009年8月27日 (木) 17:29 (UTC)
ロケーション: サイト管理 > ユーザ > 認証 > 認証の管理 (または、Moodle1.9以前のバージョンの場合、サイト管理 > ユーザ > 認証)
認証メソッドの設定
認証メソッドを閲覧するには:
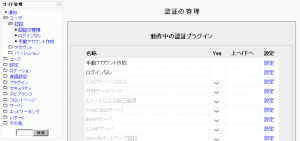
- 「サイト管理 > ユーザ > 認証 > 認証の管理」にアクセスしてください。
- 「認証の管理」ページで、あなたが選択した認証プラグインを有効にするには、閉じた目のアイコンをクリックしてください。Moodle 1.8以降、あなたは、1つ以上の認証プラグインを選択することができます (下記、複数認証をご覧ください)。プラグインの順番を変更するには、上下矢印を使用してください。ユーザのログインは、ページ最上部にあるプラグインから順に処理します。
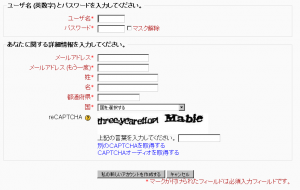
- あなたがEメールによる自己登録を選択して、潜在的ユーザが自分のアカウントを作成できるようにしたい場合、共通設定セクションの自己登録ドロップダウンメニューにて、「Eメールによる自己登録」を選択してください。潜在的ユーザに対して、「新しいアカウントを作成する」ボタンが、ログインページに表示されます。
- あなたが、ゲストアクセス可能なコースを持っている場合、「ゲストログインボタン」を表示するよう、設定してください。
- 「変更を保存する」ボタンをクリックしてください。
- あなたが選択した認証プラグインの反対側にある「設定」をクリックしてください。
- 必要な設定項目を選択および入力した後、「変更を保存する」ボタンをクリックしてください。
複数認証
Moodle 1.8
Moodle 1.8以降のバージョンでは、複数認証がサポートされます。それぞれの認証プラグインは、合致するユーザ名/パスワードを探すために使用されます。合致するユーザ名/パスワードが見つかった場合、Moodleサイトにユーザがログインして、その後、代わりのプラグインは使用されます。そのため、認証サーバに対する負荷を減らすため、多くのログインを処理するプラグインは、ページの最上部に移動してください。
共通設定
自己登録
例えば、自己登録のように、あなたがユーザに自分のアカウントを作成できるようにしたい場合、ドロップダウンメニューより、Eメールによる自己登録を選択してください (または、LDAPのように自己登録をサポートしている他のプラグインを有効にしてください) 。この設定により、ログインページに「はじめての方ですか?」インストラクションおよび「新しいアカウントを作成する」ボタンが表示されます。
警告: 自己登録を有効にすることで、結果として、スパム発信者がフォーラム投稿、ブログエントリ等をスパムに使用するため、アカウントを作成する可能性が生じます。「許可されるメールアドレスのドメイン」にて、メールアドレスを特定のドメインに限定することで、このリスクを最小にすることはできます (下記参照)。代わりに、短い期間のみユーザがアカウントを作成できるようにして、その後無効にすることもできます。
メモ: Eメールによる自己登録 特定のプラグインを使用して、過去に自己登録したユーザのログインを許可するため、そのプラグインは有効にしておく必要があります。Eメールによる自己登録を有効にすることで、潜在的なユーザが自己登録できるようになります。
ゲストログインボタン
あなたは、ログインページのゲストログインボタンを表示または非表示にすることができます。ゲストボタンを非表示にすることで、Moodleサイトへのゲストアクセスが無効にされます。しかし、ログインユーザに関しては、ゲストアクセスが許可されているコースすべてに対して、受講登録せずに入ることができます。
代替ログインURI
正しくないURIを入力することで、ログインページがあなたを締め出す可能性があるため、この設定には十分に注意する必要があります。あなたが回復不能な状態になった場合、MySQL用のphpMyAdmin等を使って、当該データベース (テーブル mdl_config) のエントリを削除することができます。
パスワード喪失URI
Moodle 1.9
パスワード喪失に関して、完全にMoodle外部のシステム (例 ヘルプデスクのみ) で処理する場合、あなたは、そのサービスのURIをここで設定することができます。Moodleの「パスワード喪失」リンクをクリックしたユーザすべて、このURIにリダイレクトされます。この設定により、使用中の認証メソッドに関わらず、すべてのMoodleパスワード喪失リカバリオプションが無効にされることに留意してください。
許可および拒否されるメールアドレスのドメイン
認証において、Eメールによる自己登録を使用する場合、例えば、学生が所属している大学のメールアドレスのみログインできるよう、メールアドレスを特定のドメインに限定することができます。
(メモ: Moodle 1.9以前のバージョンでは、「許可されるメールアドレスのドメイン」「拒否されるメールアドレスのドメイン」は、「サイト管理 > サーバ > Eメール」にて見つけることができます。
メールアドレスの変更時、ドメインを制限する
Moodle 1.9
Eメールによる自己登録を使用してユーザがアカウントを作成する場合、Moodle 1.9.3以降のバージョンでは、メールアドレスのドメインを制限することができます。例えば、アカウント作成後、ユーザはメールアドレスを異なるドメインへ変更することができます。
ReCAPTCHA
CAPTCHAでは、ユーザが人間かコンピュータかを判別することができます。botまたはスパムを自動入力するプログラムからの不正利用を防ぐため、CAPTCHAは、多くのウェブサイトで使用されています。ゆがんだテキストを人間と同じように解読するコンピュータは、存在しません。そのため、botは、CAPTCHAで防御されたサイトを操作することはできません。
Moodle 1.9
From Moodle 1.9.1以降、Eメールによる自己登録の新規アカウント作成フォームにCAPTCHAを使ったスパムプロテクションが追加されました - ユーザが人間かどうか確認するため、チャレンジレスポンス方式のテストが使用されます。
ReCAPTCHAキーは、http://recaptcha.netにて、signing up for an account経由でアカウント登録することにより入手することができます (無料)。アカウント作成後、ドメインを入力してください。パブリックキーおよびプライベートキーは、「認証の管理」ページの「共通設定」内にある「recaptchapublickey」および「recaptchaprivatekey」フィールドにコピー&ペーストすることができます。その後、「変更を保存する」ボタンをクリックしてください。
In addition to setting reCAPTCHA keys, email-based self-registration should be set as the self registration authentication plugin in the manage authentication common settings and the reCAPTCHA element should be enabled in the Email-based self-registration settings.
プロファイルフィールドデータのマッピングおよびロック
Most (but not all) authentication plugins that use an external source for the user account details allow us to retrieve some user profile details (like first name, last name, email, etc.). By using the Data Mapping section on those authentication plugins configuration page we can configure what, when and how to manage all those user profile details.
These fields are optional. You can choose to pre-fill some Moodle user fields with information from the external authentication source (if you are using one), from the fields that you specify here. If you leave these fields blank, then nothing will be transferred from the external authentication source and Moodle defaults will be used instead. In either case, the user will be able to edit all of these fields after they log in.
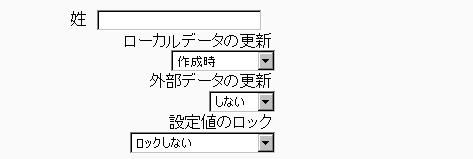
In addition to specifying how to fill this fields, we can set how to update them (in both directions, to Moodle or from Moodle), and whether we want to lock them (so the user cannot modify their value) or not:
- Update local: When the user field will be updated from the external authentication source:
- On creation: when the user account is created during the first login
- On every login: every time the user logs in (or there is a user synchronization, for those authentication plugins that support it). Fields set to update locally should be locked.
- Update external: When the external authentication source will be updated from the user field:
- Never: never update the external authentication source from Moodle.
- On update: the external authentication source will be updated when the user profile is updated. Fields should be unlocked to allow edits.
- Lock value: To prevent users from altering some fields (e.g. students changing profile information to inappropriate or misleading information), the site administrator can lock profile fields. It's usually a good idea to lock profile fields if you are maintaining this data in the external authentication system.
- Unlocked: The field is unlocked and can be edited by the user at any time.
- Unlocked if empty: The field is unlocked if it is empty, but once the user fills in some information, it becomes locked and cannot be edited any more.
- Locked: The field is locked and cannot be edited by the user.
If you are using a mixture of authentication types (such as IMAP and manual), then the fields you map and lock in the authentication options are specific to that particular authentication plugin. Each authentication plugin has its own set of mapped and locked fields.
Remember to test the field locking by logging in with the proper type of account! If you test with a manual account but have set the field locking to apply to IMAP accounts, you will not be able to tell if it worked!
関連情報
- 認証 - for list of authentication plugins
- Multi authentication in Upgrading to Moodle 1.8
- Using Moodle: User authentication forum
- Using Moodle Do users need e-mail addresses? forum discussion
- Using Moodle Admin approving self registrations? forum discussion


