The rolesdebug.php roles debugging script: Difference between revisions
John Isner (talk | contribs) |
John Isner (talk | contribs) |
||
| Line 20: | Line 20: | ||
* Role assignment | * Role assignment | ||
* Role override | * Role override | ||
From here on, I will assume that the person running the script and the person interpreting the output are the same person, namely YOU. | |||
==Overview of a script session== | ==Overview of a script session== | ||
Revision as of 02:47, 25 March 2008
Moodle1.9
Rolesdebug.php is a stand-alone script that is useful for debugging problems related to roles and permissions. The output can be interpreted by anyone who has a basic understanding of Moodle's Roles and capabilities system.
You can download rolesdebug.php from the Modules and Plugins database. To install the script, simply drop it into the Moodle root directory or any directory under the root directory.
Rolesdebug.php requires a login, so only someone with a Moodle user account who is currently logged in can use it. Since it is a php script, you will see the output in your browser. No one else will see it (unless they're looking over your shoulder).
Rolesdebug.php reads permission data from the Moodle database but does not modify the database in any way. In this respect, it is similar to other debug scripts in the standard distribution, like the TeX notation debugger.
You can use rolesdebug.php to debug problems with YOUR permissions, or the permissions of users you can "login as" (moodle/course:loginas). While this is desirable from a security standpoint, it can be a problem when you're trying to help a less knowledgable user with a problem (e.g., a fellow teacher or a user posting to a moodle.org forum). In such cases, have the user run the script and show you the output. They can copy and paste the output from the script into an e-mail or forum post for you to interpret. Never ask another user for their username and password. To do so is a serious security violation.
Essential roles and capabilities concepts
To run rolesdebug.php requires only the ability to follow simple directions. Anyone can do it. However to interpret the output requires at least a basic understanding of the concepts listed below. If any of these concepts are unfamiliar, you can read about them in the roles and capabilities documentation.
- Contexts
- Capability
- Permission
- Role
- Role assignment
- Role override
From here on, I will assume that the person running the script and the person interpreting the output are the same person, namely YOU.
Overview of a script session
First, you will log in to Moodle and navigate to the context of interest. Perhaps this is a quiz which Moodle, for some unknown reason, is preventing you from attempting. Then, without logging out of Moodle, point your browser at rolesdebug.php. You will enter the context you're interested in and (optionally) the name of a capability to investigate, then press the Go button. The script returns a page with a table presenting a spatial view of your role assignments and overrides. From the table, you will quickly be able to see why Moodle concluded that you either have or do not have a certain permission in this context.
Using the script
The script takes two inputs: a context and an optional capability
- If you only want to see your role assignments and overrides, you need only specify the context
- If you want to analyze a particular permission in the context, you must also specify a capability.
The context is specified using two parameters:
- the context type
- the context id
STEP1
This step is done in Moodle. We don't use the script until STEP 2. Login to Moodle and navigate into the target context. Once you get there, you'll make note of the context id, which is needed in STEP 2. I'll tell you how to determine the context id later.
Incidentally, even if you know the context id, it is essential that you actually navigate into the target context. This is because Moodle loads certain permission data only when it needs to. Navigating into the context forces Moodle to load the data.
For example, suppose the target context is a Quiz in some course. You must enter the course and (as a minimum) click on the Quiz icon. Now you will either enter the quiz or get an error message (if Moodle is preventing you from entering the quiz).
Do not log out!
STEP 2
Open a second browser window. In the window, point your browser at the script. The script URL will be something like
http://yoursite/moodle/rolesdebug.php
Rolesdebug.php will NOT ask you to login because you are already logged in. The script asks for three inputs:
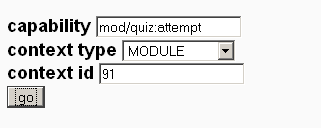
- CAPABILITY. You can leave the capability field empty if you're only interested in seeing your role assignments and overrides. If you're interested in analyzing a particular permission, you'll need to enter the capability name. For example, if you're interested in the capability that controls your ability to attempt quizzes, enter mod/quiz:attempt.
- CONTEXT TYPE. Choose the type of context you're in from the context dropdown menu:
- COURSE
- MODULE
- BLOCK
- COURSECAT
- USER
- SYSTEM
- CONTEXT ID. The context id is the number that you noted in STEP 1. The context id is at the end of the URL of the page you found in STEP 1. See How to determine the context id below.
Incidentally, MODULE means activity or resource. There is no FRONT PAGE context. If you're interested in the Front page context, choose COURSE and specify a context id of 1.
Here's an example of input:
STEP 3
Press the Go button. Rolesdebug.php will return a page of information. The main item on the page is a table giving a spatial view of all the role assignments and overrides that affect the context.
How to read the output
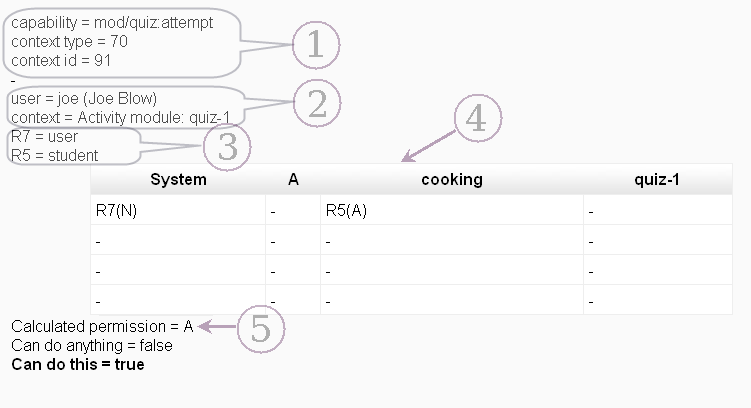
Let's look at a typical output for the input parameters from the last section.

The first three lines of output (1) simply echo your input values, and the next two lines (2) remind you of who YOU are, and tell you the actual name of the context you have selected. Check these carefully to make sure you are who you think you are, and have specified the correct context.
For each of your roles, you will see a line of the form alias = role name where
- role name is the actual role name
- alias is the name used to represent the role in the table
In the example, R7 = user means the the role user (the shortname of Authorized user) will be represented in the table by the alias R7. Aliases are used because long role names could make the table very wide, forcing you to scroll horizontally. By using aliases, the table will hopefully fit in a window, allowing you to see the entire table in a single a glance.
Next comes the table (4). I'll have a lot more to say about the table below.
If you specified a capability, then below the table, you'll see the value of the permission that Moodle calculated (5). "True" means you are allowed to perform the action and "False" means that you are prevented from performing the action.
How to read the table
If the target context is N levels deep, the table will have N rows and N columns, one for each context level.
In the example above, there are four levels:
   System
      |
      |
   Category "A"
      |
      |
   Course "cooking"
      |
      |
   Module "quiz-1"
The column headings give the names of the contexts. These are listed in order of increasing depth: System, A, cooking, quiz-1.
To save space, the table does not have row headings. If it did, they would be the same as the column headings. For example, row 1 would be labeled "System" and row 4 would be labeled "quiz-1".
Row one of the table contains the role assignments at each context level. In the example, you can see that R7 (Authorized user) was assigned in the System context and R5 (Student) was assigned in the course context. If there are no overrides (as in this example) you will only see entries in row 1.
The letters N and A in parentheses are the values of the capabilities in the role definitions. The possible values are:
   N - Not set
   A - Allow
   P - Prevent
   X - Prohibit
"Not set" means that the role doesn't say anything about the capability. In the example, we see that the Student role allows quiz attempts, while the Authorized user role doesn't have anything to say about quiz attempts.
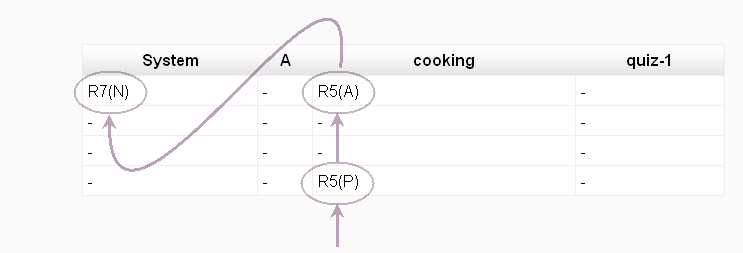
If there are role overrides, you will see additional entries in the table. If you override a role, you will see the override in the same COLUMN as the role it is overriding, and in the row corresponding to the context in which the override is made.
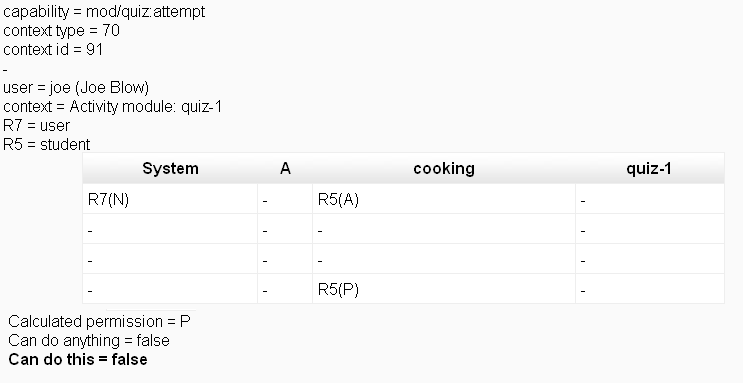
To make this clear, let's override the Student role in the Quiz context, setting mod/quiz:attempt to Prevent, and then rerun rolesdebug.php. Of course before running the script, the student must attempt the quiz (this time, he will be prevented because of the override. Now we run the script and get the following output:

Notice the newly added R5(P). This is the override. It is in the fourth row because the override was made in the quiz context, and it is in the course column because the Student role was assigned in the Course context.
Finally, notice that Moodle now tells us that the calculated permission is "false," exactly as we expect.
How Moodle calculates the final permission
By scanning the table in a certain way, you can see how Moodle arrives at its calculated permission. You can always do this with a quick visual scan, regardless of how many role assignments and overrides the table contains.
For the original example (where we only had role assignments in row 1),
scan row 1 from right to left,

- if there is an X anywhere in the row, the operation is prevented
- otherwise, scan the row from right to left, ignoring N's
- if the first R you hit is an A, the operation is allowed
- if the first R value you hit is P, the operation is prevented
- if a column contains one or more A's AND one or more P's cancel pairs of A-P pairs until either (1) all pairs cancel or (2) you are left with one or more A's or P's. If you are left with A's, the operation is allowed. If you are left with P's, the operation is prevented.
- if your scan takes you all the way to the leftmost column and you still haven't found a conclusive result, the operation is prevented.
When there are overrides, you do the same thing, but your scan follows a different path.

To see a more complicated example, visit the article "How permissions are calculated"
How to determine the context id
Here are rules for determining the context id for each context type.
COURSE
The context id is the course id. You can get the course id from the URL that appears in the address bar when when you're on the course page. For example when I point my browser at the "Features" course on demo.moodle.org, I see this:
The course id, and therefore the context id for this course is 2.
If Moodle won't let you enter the course for some reason, but you can see a link to the course, let your mouse hover over the link as in the following screenshot. Your browser will show you the address at the bottom of the window.
The front page of a Moodle site is also a course, but you can't use either of the above tricks to get the id. The front page course id is 1.
MODULE (activity or resource)
The context id is the activity or resource id. You can get the id from the URL that appears in the address bar when you're viewing the activity or resource, or from the bottom of the browser window when you let your mouse hover over a link. Here are some examples:
   http://demo.moodle.org/mod/choice/view.php?id=25
   http://demo.moodle.org/mod/forum/view.php?id=28
   http://demo.moodle.org/mod/lesson/view.php?id=38
   http://demo.moodle.org/mod/quiz/view.php?id=61
   http://demo.moodle.org/mod/resource/view.php?id=10
   http://demo.moodle.org/mod/resource/view.php?id=48
The context id's for these modules are 25, 28, 38, 61, 10, and 48.
BLOCK
The context id is the "contextid" of the block. To get the contextid, turn editing on and click the "roles" icon in the block header. Then take the contextid from URL that appears in the address bar when you're looking at the roles page. For example:
http://demo.moodle.org/admin/roles/assign.php?contextid=84
The context id for this block is 84.
COURSECAT
The context id is the category id. You can get the id from the URL that appears in the address bar when you're on the category page. If the site has only one category (usually called "Miscellaneous") the id is 1. If there is more than one category, the easiest way to get the category id for a specific category is to have a Category list or a Combo list on the front page of the site (or a Courses block) and let your mouse hover over one of the links. For example:
http://mysite/course/category.php?id=3
The context id for this category is 3
USER
The context id is the user id. You can get the id from the URL that appears in the address bar when you're on a profile page, or from the bottom of the browser window when you let your mouse hover over a user's name. For example:
http://demo.moodle.org/user/view.php?id=6&course=1
The context id for this user is 6
SYSTEM
There is only one System context. Its id is 1.


