Tests/Resource
[RES001TA]: Testing Plain Text Resource
- Open ‘A Text Page’ Resource page and you should see the text box just like the following:

- Click the Update this Resource button on the top right corner page.
- You should get a setting page where you can modify the text resource. Play around with it, add some text (or smilies) in the Full Text box.
- Click Save Changes and you should get the updated page, with the last modified date has been changed to today’s date.

[RES002TA]: Testing Markdown Format Text Resource
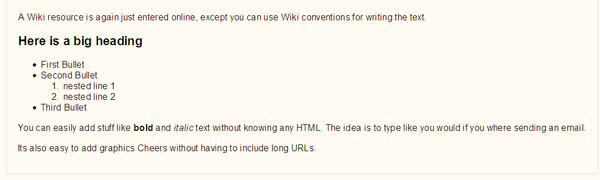
- Open A Text Page (markdown formatting) Resource page and you should see the text box below:
- Click the Update this Resource button on the top right corner page.
- You should get a setting page where you can modify the text resource. The difference with the previous resource is formatting of the text. The formatting of this resource is Markdown Format. Markdown format tries to make it easy as possible to type well-formatted XHTML pages using nothing but text written more or less like you would write an email. You can click the help button
 to get more information about Markdown Format.
 - Add the following text into the text box:

# Emphasizing Text
*italic* -> italic
**bold** -> bold
***bold italic*** -> bold italic
Emphasis can be added to single words, a sequence of words, or even parts of words:
a *single* word -> a single word
***a sequence of words*** -> a sequence of words
in**distinguish**able -> indistinguishable
# Headings
# section heading
## sub-section heading
### sub-sub-section heading
section heading
===============
subsection heading
------------------
# Lists
## bullet point lists
* first point
* second point
* third point
## numbered lists
* top level bullet one
* sub-bullet
* sub-bullet 2
* top level bullet two
1. numbered point one
1. nested numbered point
2. numbered point two
# quoted paragraphs
> This is a quoted paragraph
> spread over two lines
# web links
An [example link](http://example.com/ "Optional Title") in a sentence.
# images

6. Now, as the last test, click the Update this Resource button again. In the Window setting, choose the New Window Display this resource in a new popup window. Un-tick the allow window to be resized (only works in Internet Explorer)
7. Click Save Changes.
8. You should be directed to the resource page, and you should see a link A Text Page (markdown formatting) that will pop-up a new window when you click it, in case the pop-up did not appear automatically.
[RES003TA]: Testing Web Page Resource
- Open the ‘A Web Page’ Resource page and you should see the text box below:

- Now, click the button Update this Resource. You should see a similar configuration-setting page.
- Add the following HTML and simple Javascript to the text box:

      <h1>Heading of your paragraph.</h1>

      <p>This is where you enter the text of your document.</p>

      This is how to write a link:
      <a href="http://www.moodle.org">Moodle.org Home Page</a><br /><br />

      If you can see the text below saying <b>'Hello world!' </b> then the javascript works.<br /><br />

      <!-- Javascript test -->
      <script>
          document.write (‘Hello, world!’)
      </script>
4. Click the Save Changes button
5. You should see the page gets updated as below:

6. Now, as the last test, click the Update this Resource button again. In the Window setting, choose the New Window Display this resource in a new popup window. Un-tick the allow window to be resized (only works in Internet Explorer) 7. Click Save Changes. 8. You should be directed to the resource page, and you should see a link A Web Page that will pop-up a new window when you click it, in case the pop-up did not appear automatically.
[RES004TA]: Testing File Resource
- Click the Turn editing on button on the top right corner window.
- And go to the Resources topic, click the Add a resource… dropdown box and choose Link to a file or a website.
- A form to add new resource should appear, in the name text-box, type An Office file and in the summary text-box, type ‘This is an office document file’.
- On the Location: click the Choose or upload a file. A new window listing file list should appear, click the Media_examples folder. You should get couple of files with different format, such as Powerpoint, pdf, and mp3 file.
- Choose the powerpoint file by clicking the choose hyperlink.
- Leave the other options as they were. And click Save changes.
- Your browser should be re-directed to download the file directly. When you go to the Moodle Features main course page, you should see the resource that you have just added, with an icon that looks like this

- Every resources are assigned to different icons. Repeat all the steps in RES004TA to add different type of resources. Below are types of resources with their icons:
* An image file :* A MP3 file :
* A flash file :
* A windows media file :
* A PDF file :
