Tests/Quiz: Difference between revisions
From MoodleDocs
| Line 50: | Line 50: | ||
# You should be able to see all the same three questions along with the answers that you gave from the attempt before. As shown in the screenshot below:[[Image:Tests-quiz6.jpg]] | # You should be able to see all the same three questions along with the answers that you gave from the attempt before. As shown in the screenshot below:[[Image:Tests-quiz6.jpg]] | ||
===[QIZ005S] : Testing Quiz ( | ===[QIZ005S] : Testing Quiz (Grading Method)=== | ||
---- | ---- | ||
Revision as of 02:47, 4 April 2006
[QIZ001TAS] : Testing Quiz
- Click the Turn editing on button on the top right corner window.
- And go to the Quiz topic, click the Add an activity… dropdown box and choose Quiz
- Type Test Quiz as the name of the quiz and type anything in the Introduction text-box. Leave the other options as their default values. Click Save Changes and Edit Questions.
- If you have installed Moodle Test Course, then you should have couple of questions ready to be chosen. Otherwise, get the course backup files here (https://docs.moodle.org/Tests)
- Choose these three following questions from the list by clicking the << sign, right on the left of the question:
- What’s in a name?
- Phone Home
- Life, the universe and everything
- You can see each question added in the quiz (from the left column) each time you click the << button. Play around with the question ordering as well.
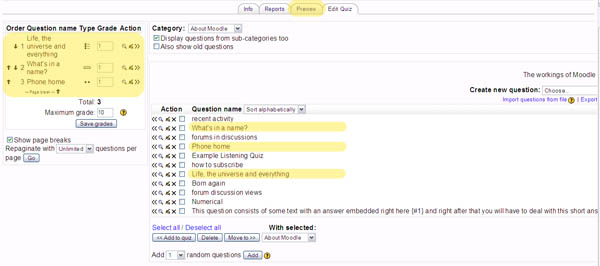
- Choose these three following questions from the list by clicking the << sign, right on the left of the question:
- Click the preview button on the tab bar at the top you should see the preview of the quiz. The question order should be exactly as what you have just set.

[QIZ002TAS] : Testing Quiz Timer
- From the admin’s browser, click Update this Quiz button on the top left corner. You should be presented with the quiz setting page.
- Set Time limit to 1 Minutes and click Save Changes
- Click the Preview tab-bar and you can see there is timer counting down on the top left corner which shows how much time left to finish the quiz.
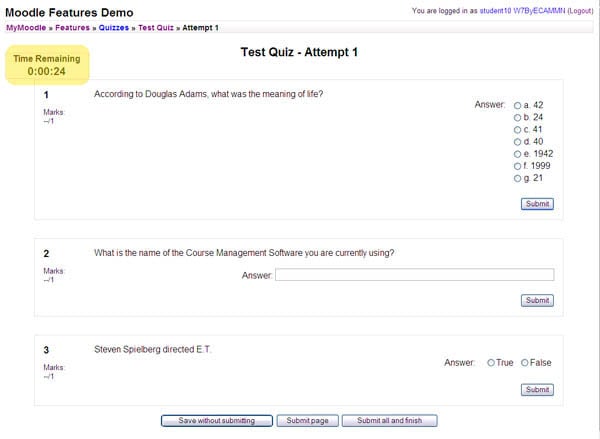
- When it reaches 00:00 you should be redirected to the result page.

[QIZ003S] : Testing Quiz
- From the admin’s browser, click Update this Quiz button on the top left corner. You should be presented with the quiz setting page.
- Change the following settings:
- Questions per page: 1. There will be only one question per page
- Shuffle questions: Yes. Questions will be shuffled.
- Shuffle answers: Yes. Multiple choice answers will be shuffled.
- Attempts allowed: 2 attempts. Click Save Changes.

- Click the preview tab and you should notice couple of differences with the previous quiz.
- You should only see one question per page
- The order of questions will be randomized
- Multiple choice answers will be randomized
- Now, switch to the student’s browser view and attempt the quiz. We would test the number of maximum attempt. This should be your second attempt, if you have attempted more than twice, then change the value of Attempts allowed so that this attempt will be your last attempt.
- Attempt the quiz and submit the page. When you see the result page, you should get a message saying “No more attempts are allowed”


[QIZ004S] : Testing Quiz (Each attempt builds on the last)
- From the admin’s browser, click Update this Quiz button on the top left corner. You should be presented with the quiz setting page.
- Change the Each attempt builds on the last: from No to Yes. And also change Attempts allowed back to Unlimited attempts.
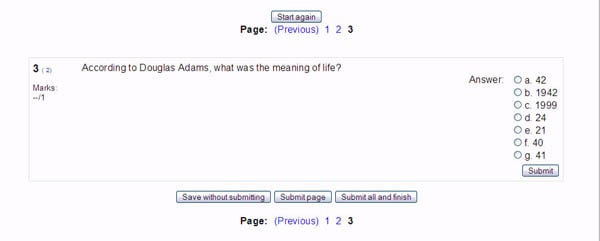
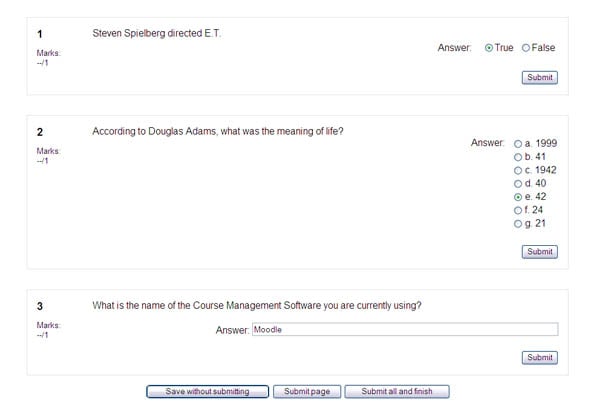
- Now switch to student’s browser and re-attempt the test (the questions appear randomly):
- Steven Spielberg directed E.T: True
- According to Douglas Adams, what was the meaning of life? 42
- What is the name of the Course Management Software you are currently using? Moodle
- Click Submit all and finish. You should be redirected to the result page. Click continue.
- On the grade page, click the Re-attempt quiz button to take the test again.
- You should be able to see all the same three questions along with the answers that you gave from the attempt before. As shown in the screenshot below:

[QIZ005S] : Testing Quiz (Grading Method)
- From the admin’s browser, click Update this Quiz button on the top left corner. You should be presented with the quiz setting page.
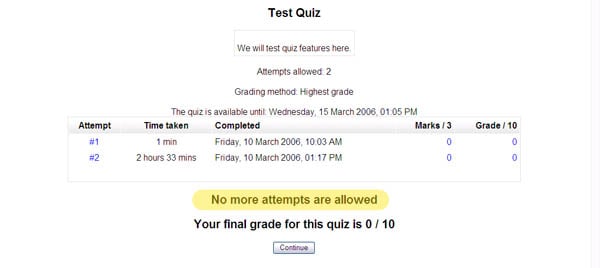
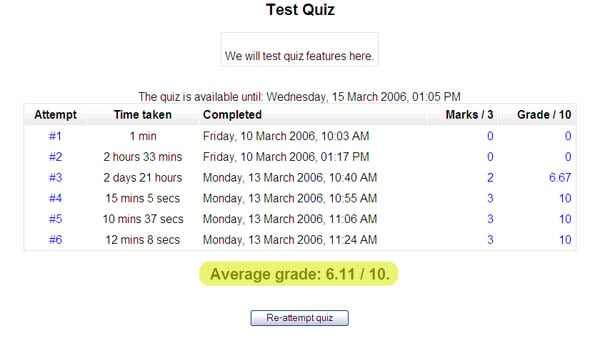
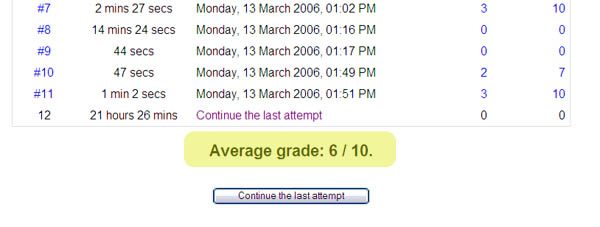
- Change the Grading method from Highest grade to Average grade.
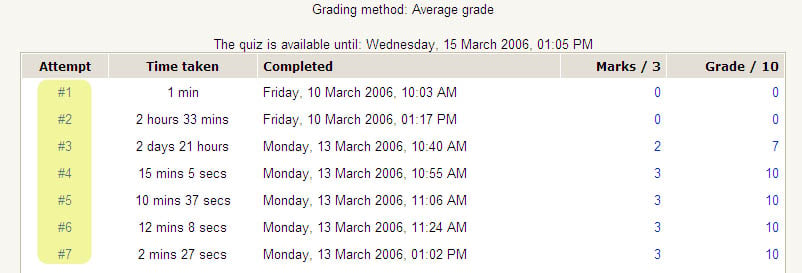
- Now, switch to student’s browser and view the result page. You should see that the the final grade is now changed to the average grading method. Depend on the grade that you had from the quizzes before, calculate the average and the number should be the same as what appear on the screen.
- Repeat step 2 and 3 twice, by changing the grading method to first attempt as well as last attempt.

[QIZ006S]: Testing Quiz (Adaptive Mode and Apply Penalties)
- From the admin’s browser, click Update this Quiz button on the top left corner. You should be presented with the quiz setting page.
- Change the Adaptive Mode to Yes and Apply Penalties to Yes. Change Each attempt builds on the last option back to No.
- Now switch back to student’s browser and re-attempt the quiz.
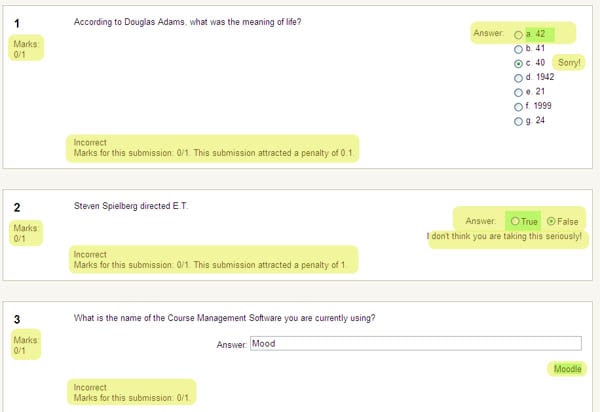
- Take the Multiple choice question: According to Douglas Adams, what was the meaning of life?
- Pick 21 as your answer and click submit. You should get a message in the bottom saying: Incorrect Marks for this submission: 0/1. This submission attracted a penalty of 0.1.

- Answer the other two questions with the correct answer. And click Submit all and finish.
- You should get a raw final score of 2.9 out of 3, since the wrong answer attracted 0.1 penalty. The final grade should be 9.67 out of 10.

[QIZ007TAS]: Testing Quiz (Decimal Points)
- This should be a quick one, from the admin’s browser, click Update this Quiz button on the top left corner. You should be presented with the quiz setting page.
- Change the Decimal Points to 0.
- Switch to student’s browser and view the result page (quiz page). You should see that the Final Mark (whatever type you set either Average, or Final, or Last Attempt) comes with no decimal point.

[QIZ008TAS]: Testing Quiz (Student’s review – Immediately after the attempt)
- From the admin’s browser, click Update this Quiz button on the top left corner. You should be presented with the quiz setting page.
- Now we are testing one of the main feature of quiz, the student’s review.
- We want students to be able to review the quiz Responses, Scores, Feedback and Answers immediately after the attempt. So make sure all the four checkboxes on Answers immediately after the attempt are ticked.

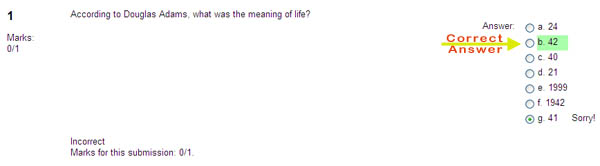
- Now go to student’s browser and attempt the quiz. Take the multiple choice questions again. Pick a wrong answer, say choose 41. You should get the following screen:
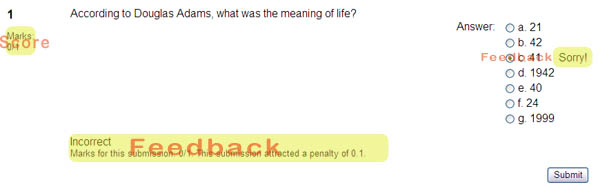
- You can see the feedback and score immediately after you answer the question. Now click Submit All and Finish.
- A message box should appear saying, You are about to close this attempt you will no longer be able to change your answers. Click OK.
- Since you have ticked the Response, then you should be able to view the Feedback page, which looks like the following:


[QIZ090TAS]: Testing Quiz (Student’s review – Later, while the quiz is still open)
- From the admin’s browser, click Update this Quiz button on the top left corner. You should be presented with the quiz setting page.
- We want students to be able to review the quiz Responses, Scores, Feedback and Answers, Later while the quiz is still open. So make sure all the four checkboxes on Later while the quiz is still open are ticked.

- Now, switch to student’s browser and re-attempt the quiz. Give wrong answers to all the questions. The correct answers are (make sure you answer other than these):
- Multiple Choice question: 42
- Short Answer question: Moodle
- True False question: True
- After answering all the questions, Submit All and Finish. A message box should appear saying, You are about to close this attempt you will no longer be able to change your answers. Click OK.
- You will be redirected directly to the result page, and will not be able to see the review page straight away. However, you can click the link that shows number of attempt.
- Click the link for the last attempt and you will get the review page where you can see the correct Answers, Feedbacks and score for each page.


[QIZ010TAS]: Testing Quiz (Student’s review – After the quiz is closed)
- From the admin’s browser, click Update this Quiz button on the top left corner. You should be presented with the quiz setting page.
- We want students to be able to review the quiz Responses, Scores, Feedback and Answers only After the quiz is closed. So make sure all the four checkboxes on After the quiz is closed are ticked.

- Switch to student’s browser and attempt the test. Give wrong answers to all the questions (you should know all the right answers by now :-) ), so then we could see the feedback and answers at the end.
- After answering all the questions, Submit All and Finish. A message box should appear saying, You are about to close this attempt you will no longer be able to change your answers. Click OK. You will be redirected directly to the result page, and will not be able to see the review page.
- Switch back to the admin’s browser, and update the quiz setting. Now change the closing date to a date that has passed. When I did this test, the date was 15 March 2006, I changed it to 9 March 2006.

- Now, go back to the student’s browser and refresh the page. You should not be able to see the Re-attempt the quiz button again. Instead, you will see links on each of number of quiz attempt.
- Click on the last quiz attempt that you have made and you will be redirected to the review page that shows your answers, the correct answers, feedbacks and also the scores for each question. The page looks like the following:


[QIZ011TAS]: Testing Quiz (Student’s review – After the quiz is closed)
- From the admin’s browser, click Update this Quiz button on the top left corner. You should be presented with the quiz setting page.
- Change the option Show quiz in a “secure” window to Yes. The "secure" window tries to provide a little more security for quizzes (making copying and cheating more difficult) by restricting some of the things that students can do with their browsers.
- Now, switch to student’s browser and re-attempt the quiz. I tested it using three most popular browsers (and their current version at the time of writing this document): Mozilla Firefox 1.0.7, Microsoft Internet Explorer 6.0.2 , and Opera 8.5.1. The secure window works most effectively in Explorer, partially works in Firefox and does not work in Opera. The tests are:
- The quiz appears in a new full screen window (Only works in Explorer)
- Some mouse actions are prevented (eg. Right click): This works both in Explorer and Firefox, however Opera still allows right click.
- Some keyboard commands are prevented (eg. Ctrl-A – select all and Ctrl-C – copy in Windows), this is a common trick done by student to get a copy of the questions by selecting all the text on the browser and copy it to clipboard, and paste them in a text editor): By the time this text is written, it only works in Explorer. The other two browsers allow the keyboard shortcut
[QIZ012TAS]: Testing Quiz (Require password)
- From the admin’s browser, click Update this Quiz button on the top left corner. You should be presented with the quiz setting page.
- You should see the require password textbox, put the word password as the password.

- Now switch to student’s browser again, and re-attempt the quiz. You should be prompted with a password prompt
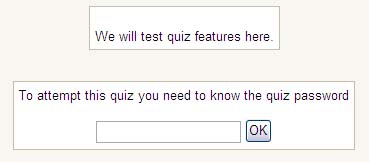
- Type password as the password :-) and click OK.
- You should get the quiz questions presented on the screen.


[QIZ012TAS]: Testing Quiz (Require network address)
- From the admin’s browser, click Update this Quiz button on the top left corner. You should be presented with the quiz setting page.
- Look at the require network address option. You can restrict access for a quiz to particular subnets on the LAN or Internet by specifying a comma-separated list of partial or full IP address numbers. This is especially useful for a proctored quiz, where you want to be sure that only people in a certain room are able to access the quiz.
- What we will do here basically is to put IP number range which does not represent our own IP number so that we should not be able to attempt the test. In my case, my IP is 127.0.0.1 and so I put the following number (any number that doesn’t match my IP range) in the textbox.

- Now, switch to student’s browser and refresh the page. You should not see the re-attempt button on the result page anymore. That means as a student, you cant attempt the quiz since you are not coming from the allowed IP address range.
- Go to the admin’s browser again, and now change the value of require network address to your IP address. In my case it is started with 127.0.0. and so I put that value in and when I refresh the student’s browser. Surprise! I can see the re-attempt button again.