Repositorio WebDAV
- Gestionando repositorios
- Subir un archivo
- Archivos del servidor
- Archivos recientes
- Archivos privados
- Banco de contenido
- Google Drive
- Videos de YouTube
- Flickr público
- Flickr
- Álbum web Picasa
- Descargador de URL
- Wikimedia
- Alfresco
- Amazon S3
- Box
- Dropbox
- Sistema de archivo
- Archivos de curso heredados
- Merlot.org
- OneDrive
- EQUELLA
- WebDAV
- Archivos incrustados
- Repositorios FAQ
Nota: Pendiente de Traducir. ¡Anímese a traducir esta página!. ( y otras páginas pendientes)
La creación y control de versiones distribuidas basadas en la Web ( Web-based Distributed Authoring and Versioning = WebDAV ) es un conjunto de métodos basados en el Protocolo Transferencia de Hipertexto ( Hypertext Transfer Protocol = HTTP ) que facilita la colaboración entre usuarios para editar y gestionar documentos y archivos almacenados en servidores de la World Wide Web.
Un repositorio WebDAV puede habilitarse desde la Administración > Administración del sitio > Plugins > Repositorios > Gestionar repositorios.
Configuración de WebDAV
Al habilitar el repositorio de WebDAV, puede crearse una instancia del repositorio en Administración > Sitio de administración > Plugins > Repositorios > repositorio WebDAV.

Opciones
WebDAV type: Selección a partir de una conexión HTTP o HTTPS
WebDAV server: Nombre del server
WebDAV path: Paso al directorio del webdav
Authentication: Actualmente sólo se admite la Autentificación Básica HTTP
WebDAV server port: Puerto del servidor webdav
WebDAV server user: Nombre del usuario de la Autentificación Básica HTTP
WebDAV server password: Contraseña de la Autentificación Básica HTTP
Por ejemplo, si se va a añadir un servidos webdav en http://webdavserver.tld/path/to/dir, deberán usarse las opciones: WebDAV type: HTTP WebDAV Server: webdavserver.tld
Configuración de WebDAV en Microsoft Windows Server 2003 R2 (Service Pack 2), IIS V6.0
Configurar Windows Server 2003
En principio, se debe instalar WebDAV en el servidor. Nota: al llevar adelante la instalación básica de Windows Server 2003 para la aplicación del servidor, varios componentes IIS 6 quedan incluidos pero no el WebDAV.
Instalar y Habilitar WebDAV en el Servidor
Para instalar WebDAV en la máquina IIS 6, en el Panel de Control, en la opción de Añadir o Eliminar Programas, se debe seleccionar Windows Components Wizard para optar por WebDAV que se encuentra bajo Application Server -> Internet Information Services -> World Wide Web Service -> WebDAV Publishing.
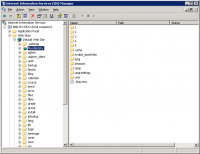
Una vez instalado WebDAV hay que habilitarlo tildando la opción WebDAV bajo el nodo Web Service Extensions en IIS Manager.
Configurar IIS
Configuring a new virtual directory in IIS is a two-step process:
- Create a new virtual directory using the Virtual Directory wizard
- Configure the access permissions on the new virtual directory
Crear Nuevo Directorio Virtual
- Open IIS and right-click on your Moodle website. Select New -> Virtual Directory... from the pop-up menu.
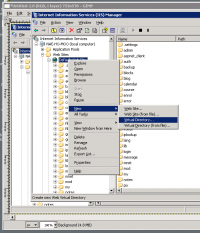
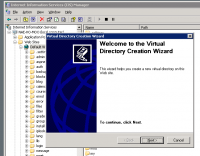
- Select New -> Virtual directory... from the pop-up menu. The Create New Virtual Directory Wizard is displayed.
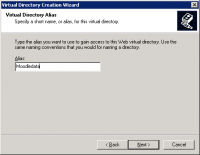
- Call the new virtual directory Moodledata.
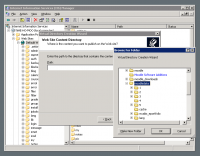
- Specify the path to the Moodledata directory.
- Ensure the new virtual directory has Read, Write and Browse permissions.
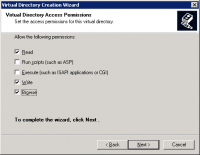
- Press the Finish button to create the new virtual directory.


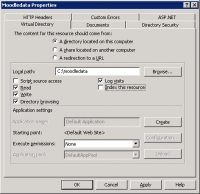
Configurar Propiedades del Directorio Virtual
- Right-click on the new virtual directory and select Properties from the pop-up menu.

- Ensure that Read, Write, Directory browsing, and Log visits are checked. Ensure Index this resource is unchecked.
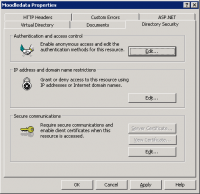
- Click on the Directory Security tab and press the Authentication and access control Edit... button
- Authenticated access configuration will depend on your needs. Basic access will require you to uncheck Enable anonymous access and check Basic authentication (password is sent in clear text). You may get a warning about security:
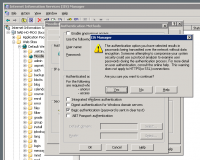
- Your new virtual directory is ready for testing.


Probar WebDAV en Windows XP
WebDAV needs to be enabled on any client machines that will be used to create and manage content for Moodle. Windows XP has a built-in WebDAV client service that needs to be enabled:
- Open the Services console under Administrative Tools and find the WebClient service.
- Double-click on this service to open its Properties sheet.
- Change the Startup Type to Automatic, then click the Start button to start the service.
Note: Internet Explorer 8.0 no longer supports web folders. See this blog post from David Conner for details. Instead, you will need to map a network drive (instructions on mapping a network drive are also given in David's blog post).
WebDAV path: /path/to/dir/
Permisos del repositorio
Este repositorio está, por omisión, disponible para los administradores, creadores de cursos, docentes, docentes editores y gestores, pero no lo está para invitados o estudiantes. Esta capacidad se puede modificar para controlar el acceso a usuarios con roles específicos.