Diferencia entre revisiones de «311/Editor TinyMCE»
m (tidy up) |
m (tidy up) |
||
| Línea 1: | Línea 1: | ||
{{ | {{Pendiente de traducir}} | ||
{{Moodle 2.7}} | {{Moodle 2.7}} | ||
El [[Editor de texto]] (al que a veces se refiere como el 'editor HTML' o antiguamente 'TinyMCE') tiene muchos íconos para asistirle al usuario el escribir contenido. Muchos de estos íconos y funciones deberían de resultarle famimiar a cualquiera que use un procesador de texto. Algunos ejemplos de donde verá Usted el editor de texto incluyen a: Al editar encabezados de secciones, descripción de una actividad, escribir una respuesta dentro de una pregunta de un examen o al editar el contenido de muchos bloques. | El [[Editor de texto]] (al que a veces se refiere como el 'editor HTML' o antiguamente 'TinyMCE') tiene muchos íconos para asistirle al usuario el escribir contenido. Muchos de estos íconos y funciones deberían de resultarle famimiar a cualquiera que use un procesador de texto. Algunos ejemplos de donde verá Usted el editor de texto incluyen a: Al editar encabezados de secciones, descripción de una actividad, escribir una respuesta dentro de una pregunta de un examen o al editar el contenido de muchos bloques. | ||
| Línea 153: | Línea 153: | ||
===Gestionar editores=== | ===Gestionar editores=== | ||
Un administrador del sitio puede habilitar / deshabilitar editores de texto en '' Configuraciones > Administración del sitio > Plugins > Editores de Texto > Gestionar editores ''. Por defecto, están habilitados los editores HTML TinyMCE y el de texto simple. | |||
===Configuraciones del editor TinyMCE=== | ===Configuraciones del editor TinyMCE=== | ||
El editor HTML TinyMCE tiene su propia página de ajustes en ''Administración > Administración del sitio > Plugins > Editores de texto > Editor HTML TinyMCE > Configuraciones generales '' con las siguientes opciones: | |||
====Plugins==== | ====Plugins==== | ||
* | *Botones para ecuaciones, emoticones,imágenes, medio, enlace automático y revisor de ortografía antiguopueden habilitarse, deshabilitarse o desinstalarse aquí al elegir su ojo respectivo. | ||
* | *Adicionalmente, los botones de ecuación, emoticón y revisor de ortografía tienen enlaces hacia sus pantallas de Ajustes. | ||
[[File:legacyspellchecker.png |thumb|none|upright=2.0|alt="The TinyMCE editor plugins screen" | | [[File:legacyspellchecker.png |thumb|none|upright=2.0|alt="The TinyMCE editor plugins screen" | La pantalla de Plugins del editor TinyMCE]] | ||
===== | =====Insertar ecuación===== | ||
Accessed from ''Administration>Site administration>Plugins>Text editors>TinyMCE HTML editor>Edit equation'', this allows you to enable or disable the TeX filter in the editor context and thereby display the Dragmath button. If you have a global custom TeX filter, then disable this setting. | Accessed from ''Administration>Site administration>Plugins>Text editors>TinyMCE HTML editor>Edit equation'', this allows you to enable or disable the TeX filter in the editor context and thereby display the Dragmath button. If you have a global custom TeX filter, then disable this setting. | ||
===== | =====Insertar emoticón===== | ||
Accessed from ''Administration>Site administration>Plugins>Text editors>TinyMCE HTML editor>Insert emoticon'', this allows you to enable or disable the emoticon filter in the editor context and thereby display the emoticon button. | Accessed from ''Administration>Site administration>Plugins>Text editors>TinyMCE HTML editor>Insert emoticon'', this allows you to enable or disable the emoticon filter in the editor context and thereby display the emoticon button. | ||
===== | ===== Revisor antiguo d eortografía===== | ||
The legacy spell checker is visible in IE9 and lower only, but not in other browsers. If you want to disable it and and rely on browser spell checker functionality instead, you can do this by disabling the ''legacy spellchecker'' plugin by clicking its eye in ''Administration > Site administration > Plugins > Text editors > TinyMCE HTML editor > General settings'' | The legacy spell checker is visible in IE9 and lower only, but not in other browsers. If you want to disable it and and rely on browser spell checker functionality instead, you can do this by disabling the ''legacy spellchecker'' plugin by clicking its eye in ''Administration > Site administration > Plugins > Text editors > TinyMCE HTML editor > General settings'' | ||
| Línea 193: | Línea 193: | ||
If PSpell is selected then aspell 0.50 or later must be installed on your server and the path to aspell set in Administration > Site administration > Server > System Paths. | If PSpell is selected then aspell 0.50 or later must be installed on your server and the path to aspell set in Administration > Site administration > Server > System Paths. | ||
=== | ===Personalizar la barra de herramientas del editor=== | ||
An administrator can remove or add buttons to the TinyMCE editor toolbar by altering the Editor toolbar box in ''Administration>Site administration>Plugins>Text editors>TinyMCE HTML editor>General settings'' as demonstrated in the screencast [http://youtu.be/vTW1DImro9c Customise the text editor in 2.4] | An administrator can remove or add buttons to the TinyMCE editor toolbar by altering the Editor toolbar box in ''Administration>Site administration>Plugins>Text editors>TinyMCE HTML editor>General settings'' as demonstrated in the screencast [http://youtu.be/vTW1DImro9c Customise the text editor in 2.4] | ||
| Línea 205: | Línea 205: | ||
|} | |} | ||
==== | ====Lista de Tipos de letra disponibles==== | ||
In addition to the default fonts, a site administrator can add extra fonts by typing their name and string in the box in ''Administration > Site administration > Plugins > Text editors > TinyMCE HTML editor>General settings'' as demonstrated in the screencast [http://youtu.be/udP7Bnur30Y How to add extra fonts]. | In addition to the default fonts, a site administrator can add extra fonts by typing their name and string in the box in ''Administration > Site administration > Plugins > Text editors > TinyMCE HTML editor>General settings'' as demonstrated in the screencast [http://youtu.be/udP7Bnur30Y How to add extra fonts]. | ||
| Línea 213: | Línea 213: | ||
|} | |} | ||
==== | ====Configuración personalizada==== | ||
A setting in ''Administration>Site administration>Plugins>Text editors>TinyMCE HTML editor>General settings'' provides a box in which an administrator can apply custom formats. See MDL-37186 for more details with examples, and see also the [http://www.tinymce.com/wiki.php/Configuration:formats TinyMCE configuration page] | A setting in ''Administration>Site administration>Plugins>Text editors>TinyMCE HTML editor>General settings'' provides a box in which an administrator can apply custom formats. See MDL-37186 for more details with examples, and see also the [http://www.tinymce.com/wiki.php/Configuration:formats TinyMCE configuration page] | ||
| Línea 260: | Línea 260: | ||
text-decoration, border, background, float, display"} | text-decoration, border, background, float, display"} | ||
== | ==Vea también== | ||
* [[Editor de texto FAQ]] | * [[Editor de texto FAQ]] | ||
Revisión del 14:05 13 may 2014
Nota: Pendiente de Traducir. ¡Anímese a traducir esta página!. ( y otras páginas pendientes)
Moodle 2.7
El Editor de texto (al que a veces se refiere como el 'editor HTML' o antiguamente 'TinyMCE') tiene muchos íconos para asistirle al usuario el escribir contenido. Muchos de estos íconos y funciones deberían de resultarle famimiar a cualquiera que use un procesador de texto. Algunos ejemplos de donde verá Usted el editor de texto incluyen a: Al editar encabezados de secciones, descripción de una actividad, escribir una respuesta dentro de una pregunta de un examen o al editar el contenido de muchos bloques.
Notas: TinyMCE fue el Editor de texto por defecto para Moodle 2.6 y versiones anteriores, pero de Moodle 2.7 en adelante, Atto será el editor HTML por defecto para las nuevas instalaciones. Atto es un Editor de texto en JavaScript que fue construido especificamente para Moodle. Usted puede cambiar su Editor de texto por defecto (regresar a tener TinyMCE) al ir a ' Administración > Administración del sitio > Plugins > Editores de texto > Gestionar editores ' y cambiar el orden de prioridad. También es posible deshabilitar el editor TinyMCE editor y usar solamente un editor de texto simple desde Administración > Administración del sitio > Plugins > Editores de texto > Gestionar editores. Un usuario individual puede seleccionar un editor en su perfil desde Administración > Configuración de Mi perfil > Editar perfil.
Atto

TinyMCE

Seleccionar TinyMCE en lugar de Atto como Editor de texto por defecto en Moodle 2.7+


Colapsar y expandir el editor
Moodle 2.6
El editor TinyMCE aparece primero con solamente una fila de botones. Al elegir el ícono de arriba a la izquierda se expanderá a tres filas.


Botones de barra de herramientas
Para aquellos que no están famliarizados con la barra de herramientas, aquí están los botones agrupados en sus filas. recuerde que el administrador del sitio puede editar o proporcionar botones adicionales.
Fila 1

| 1:Expander | 2.Formato | 3.Negritas | 4.Cursivas |
| 5.Lista con viñetas | 6.Lista numerada | 7.Añadir enlace | 8.Des-enlazar |
| 9.Detener auto-enlazado | 10.Añadir imagen | 11.Añadir emoticón | 12.Añadir medio |
| 13.Gestionar archivos incrustados |
Fila 2

| 1:Deshacer | 2.Rehacer | 3.Subrayado | 4.Tachado |
| 5.Subíndice | 6.Superíndice | 7.Alinear izquierda | 8.Alinear centro |
| 9.Alinear derecha | 10.Disminuir tabulador | 11.Aumentar tabulador | 12.Color del texto |
| 13.Color del fondo | 14.De Izquierda a Derecha | 15.De Derecha a Izquierda | 16.Espacio inseparable |
| 17.Caracter especial | 18.Tabla |
Fila 3

| 1:Familia del Tipo de letra | 2.Tamaño del Tipo de letra | 3.Editar HTML | 4.Buscar |
| 5.Buscar/remplazar | 6.Limpiar código sucio | 7.Remover formato | 8.Pegar texto simple |
| 9.Pegar MS Word | 10.Alternar pantalla completa |
Selectores de color
Hay cuatro niveles para la selección del color del tipo de letra o del color del fondo,
- Una matriz de colores para selección rápida de 5 por 8
- "Más colores" que enlaza a las pestañas del selector de colores, Paleta y Nombrada (con nombre)
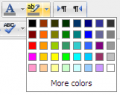
Una matriz de colores para selección rápida
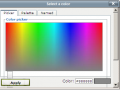
Una pestaña selectora de colores del arcoiris
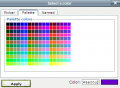
Una pestaña de Paleta con una matriz de colores de 18 por 12
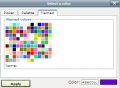
Una pestaña con nombre con paletas personalizadas


Insertar tabla
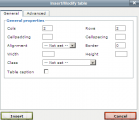
Pestaña General

Pestaña Avanzada


Para añadir bordes a un atabla
Los bordes de la celda son cruciales para ayudarle a los lectores a seguir las hileras a lo ancho de la pantalla. Si aun no están mostrándose Usted puede añadirlos como sigue:
- En la página del Wiki que contienbe su tabla, elija la pestaña para Editar
- Cuidadosamente seleccione todas las celdas de la tabla
- Después haga Click (Macs: Command+click o Ctrl+Click) sobre cualquier parte de su selección para obtener un menú contextual; desde éste seleccione Celda > Propiedades de Celda de Tabla; y entonces se cargará la caja de diálogo de propiedades de celda.
- Elija la pestaña de Avanzadas, configure el Color del Fondo a negro (por ejemplo), después elija Aplicar y luego elija Actualizar.
- Elija Guardar; se cargará entonces la página del Wiki que contiene su tabla, mostrando sus bordes.
Configuraciones de Administración del Sitio
Gestionar editores
Un administrador del sitio puede habilitar / deshabilitar editores de texto en Configuraciones > Administración del sitio > Plugins > Editores de Texto > Gestionar editores . Por defecto, están habilitados los editores HTML TinyMCE y el de texto simple.
Configuraciones del editor TinyMCE
El editor HTML TinyMCE tiene su propia página de ajustes en Administración > Administración del sitio > Plugins > Editores de texto > Editor HTML TinyMCE > Configuraciones generales con las siguientes opciones:
Plugins
- Botones para ecuaciones, emoticones,imágenes, medio, enlace automático y revisor de ortografía antiguopueden habilitarse, deshabilitarse o desinstalarse aquí al elegir su ojo respectivo.
- Adicionalmente, los botones de ecuación, emoticón y revisor de ortografía tienen enlaces hacia sus pantallas de Ajustes.

Insertar ecuación
Accessed from Administration>Site administration>Plugins>Text editors>TinyMCE HTML editor>Edit equation, this allows you to enable or disable the TeX filter in the editor context and thereby display the Dragmath button. If you have a global custom TeX filter, then disable this setting.
Insertar emoticón
Accessed from Administration>Site administration>Plugins>Text editors>TinyMCE HTML editor>Insert emoticon, this allows you to enable or disable the emoticon filter in the editor context and thereby display the emoticon button.
Revisor antiguo d eortografía
The legacy spell checker is visible in IE9 and lower only, but not in other browsers. If you want to disable it and and rely on browser spell checker functionality instead, you can do this by disabling the legacy spellchecker plugin by clicking its eye in Administration > Site administration > Plugins > Text editors > TinyMCE HTML editor > General settings
To spell-check via your browser, type your word (which if incorrectly spelt will have red lines under it) and press right click + CTRL

You can select a different spell engine from Administration> Site administration > Plugins > Text editors > TinyMCE HTML editor>Check spelling

According to: http://php.net/manual/en/book.pspell.php
"As of php 5.3. Pspell is no longer supported/bundled. Instead you can use the enchant which is bundled by default in 5.3."
If PSpell is selected then aspell 0.50 or later must be installed on your server and the path to aspell set in Administration > Site administration > Server > System Paths.
Personalizar la barra de herramientas del editor
An administrator can remove or add buttons to the TinyMCE editor toolbar by altering the Editor toolbar box in Administration>Site administration>Plugins>Text editors>TinyMCE HTML editor>General settings as demonstrated in the screencast Customise the text editor in 2.4
|
|


Lista de Tipos de letra disponibles
In addition to the default fonts, a site administrator can add extra fonts by typing their name and string in the box in Administration > Site administration > Plugins > Text editors > TinyMCE HTML editor>General settings as demonstrated in the screencast How to add extra fonts.

Configuración personalizada
A setting in Administration>Site administration>Plugins>Text editors>TinyMCE HTML editor>General settings provides a box in which an administrator can apply custom formats. See MDL-37186 for more details with examples, and see also the TinyMCE configuration page


- Example: Moving the toolbar to the bottom:
Add the following:
{"theme_advanced_toolbar_location" : "bottom"}
- Example: Adding your own custom styles.
(This might be useful for example if you want a "house style" for important notes, key points or similar) In the editor toolbar, enter "styleselect" and then in the custom box add the following code, changing it to suit your purposes:
{"style_formats" : [
 {"title" : "Bold text", "inline" : "b"},
 {"title" : "Red text", "inline" : "span", "styles" : {"color" : "#ff0000"}},
 {"title" : "Red header", "block" : "h1", "styles" : {"color" : "#ff0000"}} ]}
The following will let you use bootstrap CSS classes if you use a bootstrap based theme:
   {"style_formats" : [
       {"title" : "Well", "block" : "div", "classes" : "well"},
       {"title" : "Label", "inline" : "span", "classes" : "label"},
       {"title" : "Label - success", "inline" : "span", "classes" : "label label-success"},
       {"title" : "Label - warning", "inline" : "span", "classes" : "label label-warning"},
       {"title" : "Label - important", "inline" : "span", "classes" : "label label-important"},
       {"title" : "Label - info", "inline" : "span", "classes" : "label label-info"},
       {"title" : "Label - inverse", "inline" : "span", "classes" : "label label-inverse"},
       {"title" : "Button", "inline" : "a", "classes" : "btn btn"},
       {"title" : "Button - primary", "inline" : "a", "classes" : "btn btn-primary"},
       {"title" : "Button - info", "inline" : "a", "classes" : "btn btn-info"},
       {"title" : "Button - success", "inline" : "a", "classes" : "btn btn-success"},
       {"title" : "Button - warning", "inline" : "a", "classes" : "btn btn-warning"},
       {"title" : "Button - danger", "inline" : "a", "classes" : "btn btn-danger"},
       {"title" : "Button - inverse", "inline" : "a", "classes" : "btn btn-inverse"}
   ]}
- Example: Enabling copy of rich content with styles from MS Word (tm) and paste into TineMCE without removing important styles:
{"paste_retain_style_properties" : "margin, padding, width, height, font-size,
  font-weight, font-family, color, text-align, ul, ol, li,
  text-decoration, border, background, float, display"}