OAuth2 Services
![]() Diese Seite muss überarbeitet werden. Greif zu!
Diese Seite muss überarbeitet werden. Greif zu!
Wenn du dich um diesen Artikel kümmern willst, dann kennzeichne das, indem du die Vorlage {{Überarbeiten}} durch die Vorlage {{ÜberarbeitenVergeben}} ersetzt.
Wenn du mit deiner Arbeit fertig bist, dann entferne die Vorlage aus dem Artikel.
Danke für deine Mitarbeit!
OAuth2 Services
- Moodle unterstützt OAuth2 Services, die von jedem Plugin genutzt werden können, um authentifizierten Zugriff auf externe Dienste zu ermöglichen. Der Zugriff auf die externen Dienste erfolgt dabei entweder mit den aktuellen Moodle-Nutzerdaten oder unter Verwendung eines System-Nutzerkontos.
- OAuth2 Services werden z.B. verwendet, um die Funktionalität Nutzen Sie Ihre Anmeldung auf Google / Microsoft / Facebook auf der Anmeldeseite von Moodle bereitzustellen und dann die authentifizierte Sitzung mit Repositories wie Google Drive oder OneDrive zu teilen, ohne sich dort noch einmal anmelden zu müssen.
- OAuth2 Services können von Plugins nicht nur auf der Moodle-Anmeldeseite verwendet werden. Außerdem ist es möglich, sich gleichzeitig bei verschiedenen externen Diensten zu authentifizieren.
Anmeldung
Detaillierte Informationen dazu finden Sie im Artikel OAuth2 Authentifizierung.
Open ID Connect
Open ID Connect ist ein Standard für OAuth2 Login-Services, der es erleichtert, ein funktionierendes Anmeldesystem aufzusetzen. Wenn der Service, den Sie einrichten, konform mit Open ID Connect ist, dann müssen Sie nur die Basis-URL des Dienstes angeben. Moodle findet dann alle weiteren Information, die für die Anforderung eines "Discovery Dokumentes" nötig sind, das unter der URL <issuer base url>/.well-known/openid-configuration erwartet wird.
Provider-Konfiguration
Zuerst klären wir einige Begriffe: Im Folgenden ist Moodle der Client und der externe Service (Google, Facebook, ...) ist der Aussteller oder Provider.
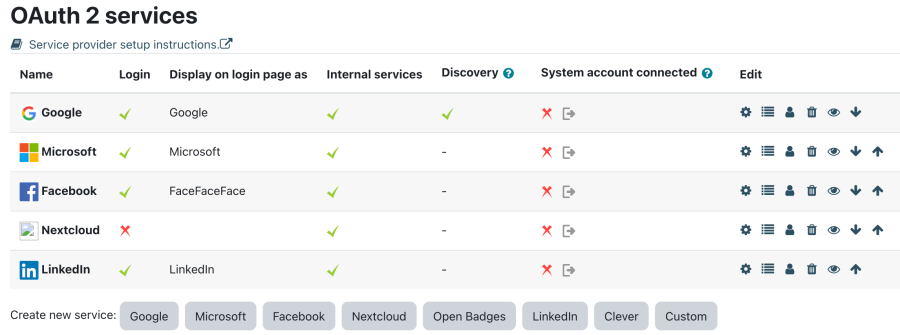
Um die OAuth2 Services zu konfigurieren, gehen Sie auf die Seite Website-Administration > Server > OAuth 2-Services.
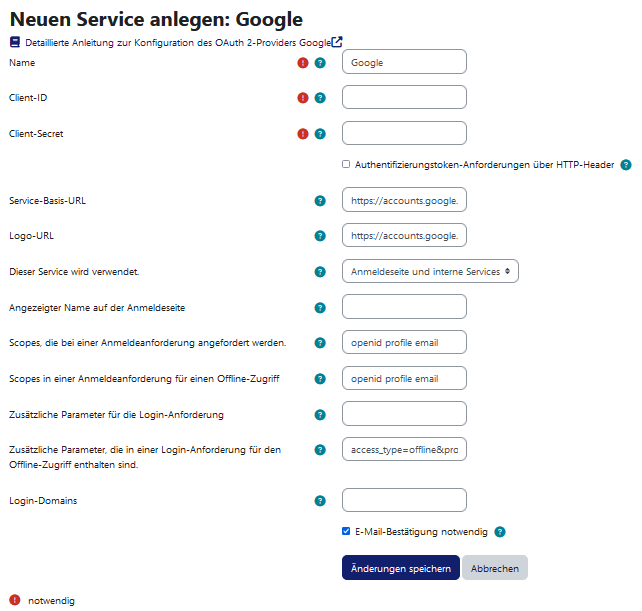
Unten sehen Sie alle von Moodle unterstützten Service-Provider. Klicken Sie auf den gewünschten Button, um den zugehörigen Service-Provider hinzuzufügen und zu konfigurieren. Das Formular ist bereits vorausgefüllt. Sie müssen nur noch die Client-ID und das Client-Secret des Providers eintragen.
Wie bekomme ich eine Client-ID und ein Client-Secret?
Die Client-ID und das Client-Secret werden außerhalb von Moodle vom OAuth2-Providers bereitgestellt. Entsprechende Anleitungen für die bekanntesten OAuth2-Provider finden Sie hier:
- OAuth2 Google Service
- OAuth2 Microsoft Service
- OAuth2 Facebook Service
- OAuth2 Nextcloud Service
- OAuth2 MoodleNet Service
- OAuth2 Open Badges Service
- OAuth2 LinkedIn Service
- OAuth2 Clever Service
Für weitere Dienste müssen Sie selbst beim Provider herausfinden, wie Sie eine Client-ID und ein Client-Secret erhalten. Der Aussteller braucht in seiner Konfiguration eine Redirect-URL für Moodle <wwwroot>/admin/oauth2callback.php. z.B. ist für eine Moodle-Site https://moodle.example.com die Redirect-URL https://moodle.example.com/admin/oauth2callback.php.
Einen Provider hinzufügen
If possible, use one of the preconfigured services if yours is among it. You can still configure individual details later on.
Choose from the list, then the following settings appear:
As a general rule, don't change any settings, except for Name, Client ID, Client Secret, and Service Base URL, unless installation instructions advise you to. Apart from that the defaults are usually fine, especially if you use one of the preconfigured services. See Advanced issuer settings (below) for explanations of some of the settings.
Login Domains
This setting only applies if "Show on login page" is checked. If specified, only users with matching emails will be able to sign-up and log in using this service.
This restriction will apply on top of the allowed and denied email domains settings in Manage authentication, however the latter are only checked when a user is created and are not checked again when the user logs in.
Weitere Einstellungen
After an issuer has been created, further configuration options are shown to the right of the service. Usually no change is required for preconfigured services.
- Edit
- Go to the settings screen again.
- Configure endpoints
- Define the issuer's endpoints, i.e. the URLs that Moodle will connect to. The following endpoints are mandatory for user authentication: authorization_endpoint, token_endpoint and userinfo_endpoint. (Example image below).
- Configure user field mappings
- If you use the issuer as an identity provider, you can configure how the provider's response (from the userinfo_endpoint) should be mapped to Moodle user fields. You should set up mappings for internal field names firstname, lastname and email so that the user is fully set up when they log in as these fields are mandatory in Moodle. If any of these are not mapped the user will be redirected to their Edit profile page and prompted for the missing information. (Example image below).
- Delete
- Delete the issuer configuration.
- Disable
- Mark the issuer as disabled; plugins may not use them.
- Move up / down
- Change the order that services are listed on the login page.
Ein System-Nutzerkonto verwenden
- Ein System-Nutzerkonto kann verwendet werden, um zusätzliche Funktionalitäten bereitzustellen, z.B. Links zum Google Drive Repository oder zum OneDrive Repository.
- Das System-Nutzerkonto sollte ausschließlich für diesen Zweck angelegt und verwendet werden.
- Für die Anmeldefunktionalität wird kein System-Nutzerkonto benötigt.
Refreshing Access Token
There is a scheduled task to regularly update the OAuth token for service accounts, Refresh OAuth tokens for service accounts (\core\oauth2\refresh_system_tokens_task). If for any reason the token cannot be refreshed, e.g. if the authorization expires, all Moodle administrators will be notified.
If an admin user does not wish to receive these notifications, it can be set up on the Notification preferences page. The notification option to deactivate is Important errors with the site.
Caution: A user who turns off the Important errors with the site notification may not receive other important information related to site errors. For example, the user will not receive e-mails about the results of the antivirus scan or any notification sent from a third-party plugin that uses the core message provider errors. Currently there are not many notifications sent using this message provider; unfortunately, there is no way to list them, so it is recommended to check the notifications that were received before and those that are received after deactivating the notification.
Siehe auch
- OAuth2 Authentifizierung
- OAuth2 Fehlerbehandlung
- Oauth2 problems in Moodle 3.3 Diskussionsbeitrag auf moodle.org
- Problem to configure Oauth2 with Microsoft Office365 Diskussionsbeitrag auf moodle.org


