Using Wiki: Difference between revisions
(change intro) |
Mary Cooch (talk | contribs) (copied from 3.4 docs) |
||
| (47 intermediate revisions by 10 users not shown) | |||
| Line 1: | Line 1: | ||
{{Wiki}} | {{Wiki}} | ||
This | This section outlines how to use wikis after the teacher has added a wiki acivity. To set up a wiki in your course, see [[Wiki settings]] | ||
== | == Creating the first page== | ||
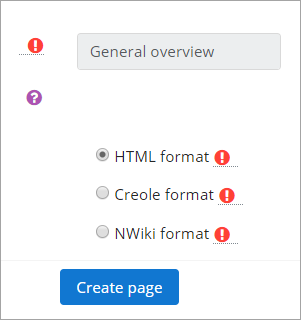
*Once the wiki is set up, a user will click the link and reach the following screen: | |||
[[File:WikiFirstPage.png]] | |||
==Adding more pages== | |||
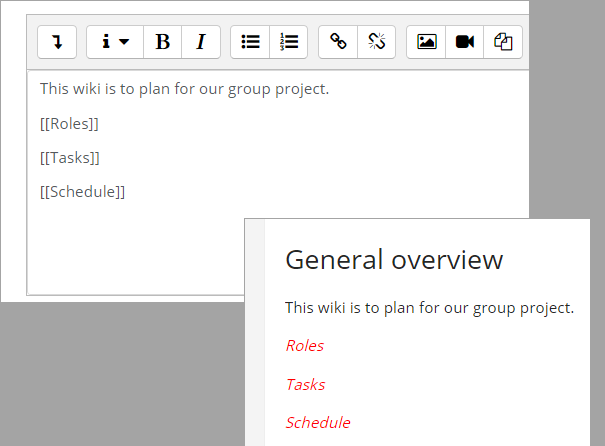
*Type the name of your page inside double brackets. (top image in screenshot below) You can preview it by clicking the "preview" button towards the bottom of the screen. | |||
*Press the "save" button. | |||
*Now click the link in italics for one of the pages (bottom image in screenshot below) and you will be prompted to create it in the same way you create the first page: | |||
[[File:WikiAddPage.png]] | |||
*A page once created no longer has italics. | |||
Note: Non-Boost themes have a '''New''' option from the navigation block for creating new pages, but you will still need to copy and paste the name of the new page onto the immediate parent page and surround it with double brackets. This creates a link to your new page and makes it accessible from the main Wiki page. Otherwise nobody will recognise the so called lost new page. | |||
=== | == Wiki editing in general == | ||
Depending on the type of the wiki, there are several ways to edit your page. | |||
: | But don't worry: The best thing of a wiki is, that nothing is lost. The old version will be there - and if someone changes your version of the page - your version will also be there. | ||
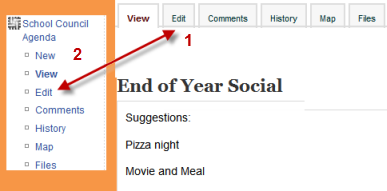
The options for editing, commenting viewing history, map and files may all be accessed from tabs at the top (''1'' in screenshot below) and if you are using a non-Boost theme, also from links in the navigation block (''2'' in screenshot below): | |||
: | |||
[[File:editingwiki.png]] | |||
*The '''View''' tab allows users to display and view the wiki page. | |||
*The '''Edit''' tab users to edit the wiki page. | |||
*The '''Comments''' tab allows users to see and add comments about the wiki - providing comments are enabled on the site. | |||
*The '''History''' tab allows users to see what has been altered in the wiki. Compare edits by clicking the "Compare Selected" button. Click the "Restore" button of the version you wish to restore if the latest edit is unsuitable | |||
*The '''Map''' tab allows users to view areas of the wiki such as a list of pages, updated or orphaned pages etc. (Orphaned pages are pages not linked to anywhere.) | |||
*To select what you want to see, click the Map menu dropdown box. | |||
*The '''Files''' tab allows users to access any files which have been added to the wiki.Only the teacher role can by default add and manage files to the '''Files''' tab, but you can allow students to add and manage them with a permissions override to the '''Manage wiki files''' capability (mod/wiki:managefiles) in any particular wiki. | |||
*The '''Administration''' tab is available to editing teachers in the course to delete page versions or selected pages. Clicking the "list all" button will list available pages to delete. The first page of the wiki cannot be deleted. | |||
==Deleting pages== | |||
Teachers and other users with the'' mod/wiki:managewiki'' capability can delete any page or page version, with the exception of the first page, via the Administration tab. | |||
==Why use a wiki?== | |||
Wikis are a simple, flexible tool for collaboration. They can be used for everything from simple lists of web links to building entire encyclopedias. As an example, [http://www.wikipedia.org| Wikipedia] is the largest wiki in the world. | |||
In your own class it's important to have a plan for your wiki so students know how it fits in with their learning. If it's a individual wiki, will they be graded? Is it simply a staging area for group work that will be submitted as assignments later? Will you let the students be completely responsible for the work? How will you deal with offensive content? The great advantage of a wiki is that all edits are clearly visible and reversible. | |||
== | ==Ideas for using wikis== | ||
===Group lecture notes=== | |||
Creating a wiki for group lecture notes after a lecture gives students a chance to combine all their notes. Those that missed information can get it from their peers. The group can also decide what information is critical and give it proper emphasis. Group lecture notes could be done with the entire class, if it is small enough, or with small working groups. Groups can also compare notes for further discussion and refinement. | |||
===Group Project management=== | |||
A teacher assigning a group project can give students a place to work by creating a wiki with the group mode enabled. This will give each group their own space to record research, to develop outlines and to create the final product. | |||
===Brainstorming=== | |||
Brainstorming is a non-judgmental group creative process in which group members are encouraged to give voice to any ideas they personally consider relevant to the group exercise. In a face-to-face meeting, a brainstorming facilitator will usually stand in front of a big piece of paper and elicit ideas from the participants in the room. A teacher can create an online version of this process by setting up a wiki for the entire class or for smaller student groups and asking people to submit ideas around a brainstorming topic. People can add ideas as they occur and link to other pages for elaboration. | |||
[[ | ===Contribute to other wikis=== | ||
[[ | A teacher might assign his or her class the task of contributing to [http://en.wikipedia.org Wikipedia], [http://en.wikiversity.org Wikiversity], or to another wiki on the Web, on any class topic, perhaps by assigning students to groups (or making it a class project if the class is small enough and the topic broad enough) and challenging them to collaboratively create an article they would feel confident posting to a public-information space. Students will use the course wiki to create drafts of the article they will eventually publish to the community at the end of the semester. | ||
===Collaborative story-telling=== | |||
Younger students could be encourage to work together on a wiki to build up a story -each adding a sentence following on from the previous contribution. | |||
== See also == | |||
*Using Moodle [http://moodle.org/mod/forum/view.php?f=366 Wiki module forum] | |||
*[[Creole format]] | |||
[[fr:Afficher un wiki]] | [[fr:Afficher un wiki]] | ||
[[de:Wiki ansehen]] | [[de:Wiki ansehen]] | ||
[[es:Uso de Wiki]] | |||
[[ja:Wikiを閲覧する]] | [[ja:Wikiを閲覧する]] | ||
Latest revision as of 11:28, 8 March 2018
This section outlines how to use wikis after the teacher has added a wiki acivity. To set up a wiki in your course, see Wiki settings
Creating the first page
- Once the wiki is set up, a user will click the link and reach the following screen:
Adding more pages
- Type the name of your page inside double brackets. (top image in screenshot below) You can preview it by clicking the "preview" button towards the bottom of the screen.
- Press the "save" button.
- Now click the link in italics for one of the pages (bottom image in screenshot below) and you will be prompted to create it in the same way you create the first page:
- A page once created no longer has italics.
Note: Non-Boost themes have a New option from the navigation block for creating new pages, but you will still need to copy and paste the name of the new page onto the immediate parent page and surround it with double brackets. This creates a link to your new page and makes it accessible from the main Wiki page. Otherwise nobody will recognise the so called lost new page.
Wiki editing in general
Depending on the type of the wiki, there are several ways to edit your page. But don't worry: The best thing of a wiki is, that nothing is lost. The old version will be there - and if someone changes your version of the page - your version will also be there. The options for editing, commenting viewing history, map and files may all be accessed from tabs at the top (1 in screenshot below) and if you are using a non-Boost theme, also from links in the navigation block (2 in screenshot below):
- The View tab allows users to display and view the wiki page.
- The Edit tab users to edit the wiki page.
- The Comments tab allows users to see and add comments about the wiki - providing comments are enabled on the site.
- The History tab allows users to see what has been altered in the wiki. Compare edits by clicking the "Compare Selected" button. Click the "Restore" button of the version you wish to restore if the latest edit is unsuitable
- The Map tab allows users to view areas of the wiki such as a list of pages, updated or orphaned pages etc. (Orphaned pages are pages not linked to anywhere.)
- To select what you want to see, click the Map menu dropdown box.
- The Files tab allows users to access any files which have been added to the wiki.Only the teacher role can by default add and manage files to the Files tab, but you can allow students to add and manage them with a permissions override to the Manage wiki files capability (mod/wiki:managefiles) in any particular wiki.
- The Administration tab is available to editing teachers in the course to delete page versions or selected pages. Clicking the "list all" button will list available pages to delete. The first page of the wiki cannot be deleted.
Deleting pages
Teachers and other users with the mod/wiki:managewiki capability can delete any page or page version, with the exception of the first page, via the Administration tab.
Why use a wiki?
Wikis are a simple, flexible tool for collaboration. They can be used for everything from simple lists of web links to building entire encyclopedias. As an example, Wikipedia is the largest wiki in the world. In your own class it's important to have a plan for your wiki so students know how it fits in with their learning. If it's a individual wiki, will they be graded? Is it simply a staging area for group work that will be submitted as assignments later? Will you let the students be completely responsible for the work? How will you deal with offensive content? The great advantage of a wiki is that all edits are clearly visible and reversible.
Ideas for using wikis
Group lecture notes
Creating a wiki for group lecture notes after a lecture gives students a chance to combine all their notes. Those that missed information can get it from their peers. The group can also decide what information is critical and give it proper emphasis. Group lecture notes could be done with the entire class, if it is small enough, or with small working groups. Groups can also compare notes for further discussion and refinement.
Group Project management
A teacher assigning a group project can give students a place to work by creating a wiki with the group mode enabled. This will give each group their own space to record research, to develop outlines and to create the final product.
Brainstorming
Brainstorming is a non-judgmental group creative process in which group members are encouraged to give voice to any ideas they personally consider relevant to the group exercise. In a face-to-face meeting, a brainstorming facilitator will usually stand in front of a big piece of paper and elicit ideas from the participants in the room. A teacher can create an online version of this process by setting up a wiki for the entire class or for smaller student groups and asking people to submit ideas around a brainstorming topic. People can add ideas as they occur and link to other pages for elaboration.
Contribute to other wikis
A teacher might assign his or her class the task of contributing to Wikipedia, Wikiversity, or to another wiki on the Web, on any class topic, perhaps by assigning students to groups (or making it a class project if the class is small enough and the topic broad enough) and challenging them to collaboratively create an article they would feel confident posting to a public-information space. Students will use the course wiki to create drafts of the article they will eventually publish to the community at the end of the semester.
Collaborative story-telling
Younger students could be encourage to work together on a wiki to build up a story -each adding a sentence following on from the previous contribution.
See also
- Using Moodle Wiki module forum
- Creole format


