Elluminate module: Difference between revisions
mNo edit summary |
|||
| Line 73: | Line 73: | ||
==Uninstalling the Elluminate Bridge for Moodle== | ==Uninstalling the Elluminate Bridge for Moodle== | ||
To uninstall the Elluminate Bridge for Moodle from your server, follow the steps below. | To uninstall the Elluminate Bridge for Moodle from your server, follow the steps below. | ||
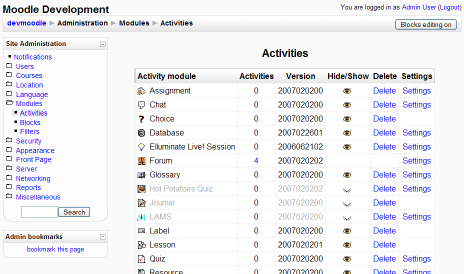
#Log in to http:// | #Log in to http://your.moodle.site/moodle/admin as the Moodle Administrator. The Administration page will open. <br>[[Image:elluminate7.png|none|Administration Page]] | ||
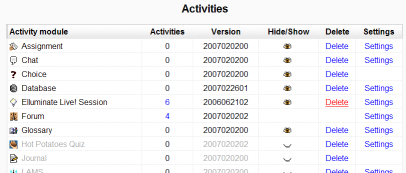
#Click on '''Activities''' in the '''Site Administration''' menu. The Activities configuration page will open. | #Click on '''Activities''' in the '''Site Administration''' menu. The Activities configuration page will open. | ||
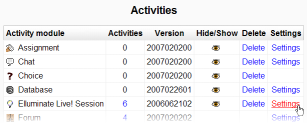
#Click on '''Delete''' on the Elluminate ''Live!'' Session row in the table and click '''Yes''' to confirm deletion. <br>[[Image:elluminate8.png|none|Activities Configuration]] | #Click on '''Delete''' on the Elluminate ''Live!'' Session row in the table and click '''Yes''' to confirm deletion. <br>[[Image:elluminate8.png|none|Activities Configuration]] | ||
Revision as of 14:26, 28 May 2008
Elluminate Bridge for Moodle (v1.0)
For users of the Moodle open-source course management system, the Elluminate Bridge for Moodle enables you to easily and seamlessly integrate live, synchronous distance learning and collaboration into your coursework.
The Elluminate Bridge for Moodle is a non-standard activity module and block that requires purchasing a 3rd party service. Please see http://www.elluminate.com/moodle_course_management_system.jsp for details on getting started.
Introduction
This document provides the information necessary to install and configure the Elluminate Bridge for Moodle with the Elluminate Live! Session Administration System.
Audience
It is assumed that the user has a basic working knowledge of the following:
- The Elluminate Live! web server, services, and the client JNLP files.
- The administration of Moodle version 1.8.3
Product Overview
The Elluminate Bridge for Moodle will enable your Moodle course management system (CMS) to create and launch Elluminate Live! sessions and recordings. The Elluminate Bridge for Moodle provides for the following Elluminate Live! Session Administration System functionality:
- Create a Public or Private session
- Set session boundary time
- Set recording state
- Provide access to recordings of sessions
In addition to Session Administration System functionality, the Elluminate Bridge for Moodle provides the following functionality:
- Grade students on their Elluminate Live! session attendance
Limitations
Currently, the Elluminate Bridge for Moodle supports only alphanumeric characters for session names.
Installation
Supported Moodle Configuration
- Moodle 1.8 (tested with Moodle 1.8.3)
- Red Hat Enterprise Linux 5
- Apache HTTP Server 2.2 (tested with Apache HTTP Server 2.2.3-11)
- MySQL 5.0 (tested with MySQL 5.0.22-2)
- PHP 5.1 (tested with PHP 5.1.6-15)
Pre-Installation Requirements
Before installing the Elluminate Bridge for Moodle, ensure the following:
- You have a login group and web service account on the Elluminate Live! scheduling server (Session Administration System). This is Elluminate, Inc.'s ASP for Elluminate Live! You can get access to a login group and the requisite web service account by contacting the sales team at Elluminate at http://www.elluminate.com/contact.jsp
- You have received your Elluminate Bridge for Moodle welcome e-mail from Elluminate.
- A Moodle installation exists on your website.
Important: For the purposes of this document, we’ll refer to your Moodle website as http://www.mysite.net/moodle/ with the Moodle code located in a directory on a server called /var/www/html/moodle/.
Installing the Elluminate Bridge for Moodle
To install the Elluminate Bridge for Moodle on your server, follow the steps below.
- Download the Elluminate Bridge for Moodle from: http://download.moodle.org/download.php/patches/elluminate.zip
- Extract the files from elluminate.zip to a temporary location.
- From the temporary location, copy ‘elluminate/elluminate_sas/blocks/elluminate’ into ‘/var/www/html/moodle/blocks/’.
- From the temporary location, copy ‘elluminate/elluminate_sas/mod/elluminate’ into ‘/var/www/html/moodle/mod/’.
- (Optional) If you're using a theme that displays its own icons, you must copy the Elluminate Live! activity module icon into your theme’s directory. For example, if you were using the ‘Chameleon’ theme with Moodle, you will need to create an ‘elluminate’ directory in that theme. For example, copy '/var/www/html/moodle/mod/elluminate/icon.gif' into the following Chameleon directory: '/var/www/html/moodle/theme/chameleon/pix/mod/elluminate/'
- Visit the Moodle administration page http://www.mysite.net/moodle/admin. This page shows you the progress as the database installation script for the Elluminate Bridge for Moodle is executing.
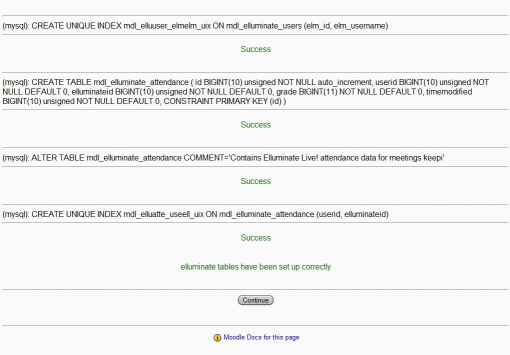
- When installation is complete, click on Continue. You will be notified of any errors or warnings if they exist.
- Ensure that the Moodle cron job is correctly set up and configured. For instructions see https://docs.moodle.org/en/Cron.


Elluminate ''Live!'' recordings will be visible through the Elluminate
block only after the Moodle cron job executes (but updating the list of
recordings step of the cron job will only happen once every 15 minutes).
Configuration
To change the settings of the Elluminate Live! activity module, follow the steps below.
- Log in to http://www.mysite.net/moodle/admin as the Moodle Administrator. The Administration page will open.
- Click on Activities in the Site Administration menu. The Activities configuration page will open.
- Click on the Settings link for Elluminate Live! Session. The Elluminate Live! Session configuration page will open.

- Enter the Elluminate Session Administration Server information (refer to your Elluminate Bridge for Moodle welcome e-mail):
- Address of the Elluminate Live! scheduling server that has been enabled for web services access.
- Username and password of the account on the Elluminate Live! scheduling server to be used for Moodle administration.


Do not use the credentials from your welcome email for anything except this
configuration page (unless directed to do so by an Elluminate support representative).
- Select a boundary time for all Elluminate Live! sessions. This is the number of minutes (0, 15, 30, 45 or 60) before the scheduled Start Time of a session a participant may join the session. If you want teachers to be able to set their own boundary time, select Choose. Default 15 minutes.
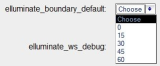
- Specify whether or not you want Web Services debugging turned on (Yes) or off (No). Default is No.
- Use the Test connection button to verify that you can connect. If the Test connection button does not seem to work, ensure that Moodle Debug Messages is set to NONE under Site Administration > Server > Debugging.
- Click on Save changes to complete the configuration.

You are now ready to add Elluminate Live! activities into courses on your site.
Uninstalling the Elluminate Bridge for Moodle
To uninstall the Elluminate Bridge for Moodle from your server, follow the steps below.
- Log in to http://your.moodle.site/moodle/admin as the Moodle Administrator. The Administration page will open.

- Click on Activities in the Site Administration menu. The Activities configuration page will open.
- Click on Delete on the Elluminate Live! Session row in the table and click Yes to confirm deletion.
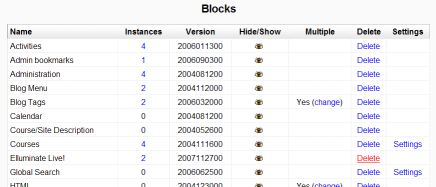
- Click on Blocks in the Site Administration menu. The Blocks configuration page will open.
- Click on Delete on the Elluminate Live! row in the table and click Yes to confirm deletion.
- On the file system on your Moodle server, delete the ‘elluminate’ folder from ‘/var/www/html/moodle/mod’.
- On the file system on your Moodle server, delete the ‘elluminate’ folder from ‘/var/www/html/moodle/blocks’.


